Macrame Plant Hanger with Beads: A Step-by-Step Guide

Hey there, fellow craft enthusiasts! Let’s be honest, not everyone is head over heels for macrame right now, but I’ve got a serious case of the macrame bug! My backyard is turning into a boho paradise one plant hanger at a time, and now I’m moving on to the front of the house!
Today, I’m excited to share a twist on a previous macrame plant hanger design—this time, we’re adding a touch of sparkle and personality with beads and charms. Plus, this one’s shorter, perfect for those smaller spaces. Get ready to master the square knot, half square knot, and gathering knot. Let’s create something beautiful!
Gathering Your Macrame Supplies
Before we dive in, let’s gather our crafting tools. Here’s what you’ll need:
- Cord: I used 4mm cotton cord, about 7 feet for the holding cords (four pieces) and roughly 16 feet for the working cords (four pieces). Remember, these are approximate measurements, and you can adjust based on your desired length.
- Beads: I chose 20mm round wood beads in a natural color. Feel free to experiment with different sizes, colors, and materials!
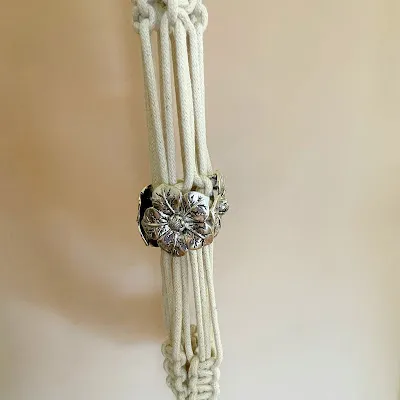
- Charms: Add a personal touch with necklace pendants! I had a few extras lying around that worked perfectly.
- Scissors
- Tape Measure
Pro Tip: Using different cord lengths? Alternate them when attaching to the ring! It helps to keep everything organized.
Let’s Get Knotty: Step-by-Step Instructions
-
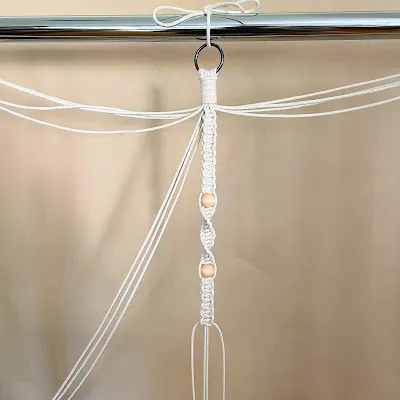
Starting Strong: Begin by attaching your cords to your ring using a wrap knot with about ten wraps. Remember to alternate the longer working cords with the shorter holding cords.
-
Square Knot Symphony: Divide your cords into groups of two long outer working cords and two shorter inner holding cords. Secure the inner cords (I like to tie them to a stable surface) to maintain tension.
-
Adding Beads: Before you get too far into knotting a leg, add your beads! It’s much easier than trying to do it later. Trust me on this one.
-
Knotting the First Section: Create 10 square knots. Don’t be afraid to adjust the number of knots to keep your plant hanger legs even. Sometimes the tension requires a bit of tweaking.
-
Bead and Repeat: Add a wood bead to the two center holding cords, sliding it under the last knot. Tie 15 half square knots, add another bead, and then tie 15 square knots (or adjust for your desired length). Repeat this step three more times.
-
Creating the Basket: Drop about 3 inches and grab two cords from the left leg and two from the right leg. Before you start knotting, add your pendant to the left working cord! Position it in the middle of the two cords as you tie a half square knot, then add two more square knots. Repeat on the other side.
-
Finishing Touches: Drop another 3 inches and create three more square knots with alternate cords to complete your plant basket. Finish with a wrap knot, about 7 or more wraps.
-
Tassel Time: I like to keep my tassels around 7 inches, but feel free to adjust to your liking.
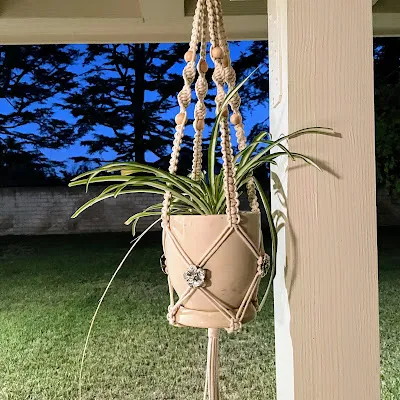
Ta-da! You’ve created a stunning macrame plant hanger with beads and charms.
 Wood Beads for Macrame
Image Alt Text: Close-up of wooden beads adorning a macrame plant hanger.
 Best Short Macrame Plant Hanger with Beads Instructions
Image Alt Text: A completed short macrame plant hanger with beads, showcasing its intricate knots.
 Flower Pendant Back
Image Alt Text: Detailed view of a flower pendant incorporated into a macrame plant hanger.
 Best Short Macrame Plant Hanger Instructions
Image Alt Text: Step-by-step instructions for creating a short macrame plant hanger, highlighting knotting techniques.
Share Your Creations!
I can’t wait to see your unique macrame plant hangers! Don’t be shy—share your masterpieces in the comments below. And remember to explore Robert Kline Art for more handcrafted gift ideas and inspiration. Happy crafting!
