Blog
Crafting the Perfect Cheese Board: A Step-by-Step Guide

Hey there, fellow cheese lovers and craft enthusiasts! Robert Kline here, and today we’re diving into the delicious world of cheese boards. They’re more than just a collection of tasty treats—they’re a feast for the eyes and a testament to your creativity. Whether you’re hosting a party, celebrating a special occasion, or just need a Tuesday pick-me-up, a well-crafted cheese board is always a good idea.
This comprehensive guide will equip you with the knowledge and confidence to assemble a show-stopping cheese board that will impress your guests and tantalize your taste buds. So, grab your favorite board, and let’s get crafting!
Essential Components of an Enchanting Cheese Board
A captivating cheese board is all about balance—a harmonious blend of flavors, textures, and colors. Here’s your guide to selecting the perfect elements:
1. Cheese: The Star of the Show (Choose 3-5 varieties)
The heart and soul of your cheese board, choose a delightful variety of cheeses that cater to different palates. Aim for a mix of:
- Familiar Favorites: Cheddar, Parmesan, Manchego
- Adventurous Additions: Truffle-infused Gouda, Smoked Gouda, Herbed Goat Cheese
- Textural Delights: Soft cheeses like Brie, Goat Cheese, and Blue Cheese, alongside harder options like Cheddar and Parmesan
Expert Tip from Sarah, a cheesemonger with 15 years of experience: ” Don’t hesitate to ask your local cheesemonger for recommendations! They are a wealth of knowledge and can help you curate a selection that complements each other perfectly.“
2. Charcuterie: Adding Savory Depth (Choose 2-4 varieties)
Charcuterie adds a salty, savory element that perfectly complements the richness of the cheese. Consider including:
- Spicy: Sopressata, Chorizo
- Savory: Prosciutto, Genoa Salami, Capocollo
- Smoked: Smoked Ham, Smoked Duck Breast
3. Bread and Crackers: The Perfect Vehicles (Choose 2-4 varieties)
Provide a variety of textures and flavors to complement your cheese and charcuterie. Opt for:
- Crunchy: Crostini, Water Crackers, Breadsticks
- Hearty: Sliced Baguettes, Multigrain Crackers
- Neutral: Plain Crackers
4. Fruit and Veggies: Bursts of Freshness (Choose 1-3 varieties)
Fresh fruits and vegetables add a welcome contrast in texture and flavor. Some seasonal favorites include:
- Fall: Grapes, Apple slices, Pears
- Winter: Pomegranate seeds, Dried cranberries, Orange slices
- Spring: Strawberries, Raspberries, Asparagus
- Summer: Cherries, Peaches, Tomatoes
5. Nuts and Olives: Textural Delights (Choose 2 varieties)
Nuts and olives offer a satisfying crunch and complement the other flavors on your board. Consider:
- Nuts: Marcona Almonds, Walnuts, Pistachios, Candied pecans
- Olives: Castelvetrano, Kalamata, Garlic Stuffed
Assembling Your Masterpiece: A Step-by-Step Guide
Now that you’ve gathered your ingredients, it’s time to assemble your masterpiece. Remember, there’s no right or wrong way to do this—let your creativity flow!
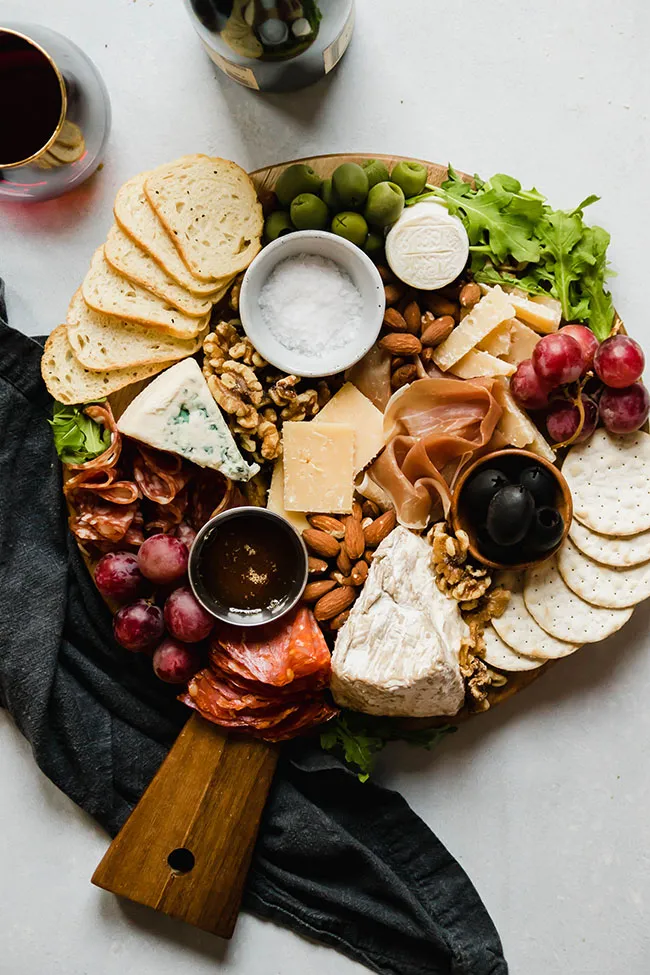
 Cheese and charcuterie board on a white table next to a glass of wine.
-
Prepare Your Cheese: Remove your cheese from the refrigerator about an hour before serving to allow it to come to room temperature. This enhances the flavor and texture.
-
Arrange Your Bowls: Start by placing small bowls around your board to hold dips, olives, nuts, or other smaller items. This adds visual interest and helps to define different areas.
-
Place Your Cheeses: Cut your cheeses into different shapes and sizes for variety. Arrange them around the board, leaving space between each type.
-
Add Charcuterie: Fan out slices of charcuterie or roll them into cones, tucking them between the cheeses. This adds height and visual appeal.
-
Fill in with Fruit, Veggies, and Crackers: Strategically place clusters of grapes, berries, or sliced fruit around the board. Tuck crackers and breadsticks into any open spaces.
-
Add Finishing Touches: Sprinkle nuts and olives throughout the board to fill in gaps. Consider adding small sprigs of fresh herbs like rosemary or thyme for a pop of color and aroma.
Tips and Tricks from Robert Kline Art
- Don’t Be Afraid to Get Creative: Cheese boards are all about expressing your personal style, so feel free to experiment with different combinations.
- Use a Variety of Cutting Tools: Provide a variety of cheese knives, spreaders, and small spoons for easy serving.
- Label Your Cheeses: If you’re using a variety of cheeses, consider labeling them with small flags or cards so guests know what they’re enjoying.
- Think Seasonally: Embrace the flavors of the season by incorporating in-season fruits and vegetables.
Conclusion
There you have it—the secrets to crafting a beautiful and delicious cheese board that will impress your guests and leave them wanting more. Remember, the key is to have fun, be creative, and don’t be afraid to experiment.
Now it’s your turn! Share your creations with us in the comments below—we’d love to see your cheese board masterpieces! And don’t forget to explore the Robert Kline Art website for unique, handcrafted gifts that are perfect for any occasion!
