Blog
Create Stunning DIY Paper Flower Shadow Boxes with Robert Kline Art!
Hey there, fellow craft enthusiasts! Ever wished you could create those breathtaking flower shadow boxes that look like they belong in a fancy art gallery? Well, with Robert Kline Art as your guide, that dream can become a beautiful reality! Today, I’m thrilled to take you step-by-step through crafting your very own paper flower shadow box, complete with delicate Cricut-made roses and a personalized vinyl monogram. This project makes for a truly unique and heartwarming gift for baby showers, weddings, birthdays, or just about any special occasion you can imagine.
Gathering Your DIY Shadow Box Supplies
Before we embark on this creative journey, let’s make sure you’ve got all the essentials on hand:
For the Shadow Box:
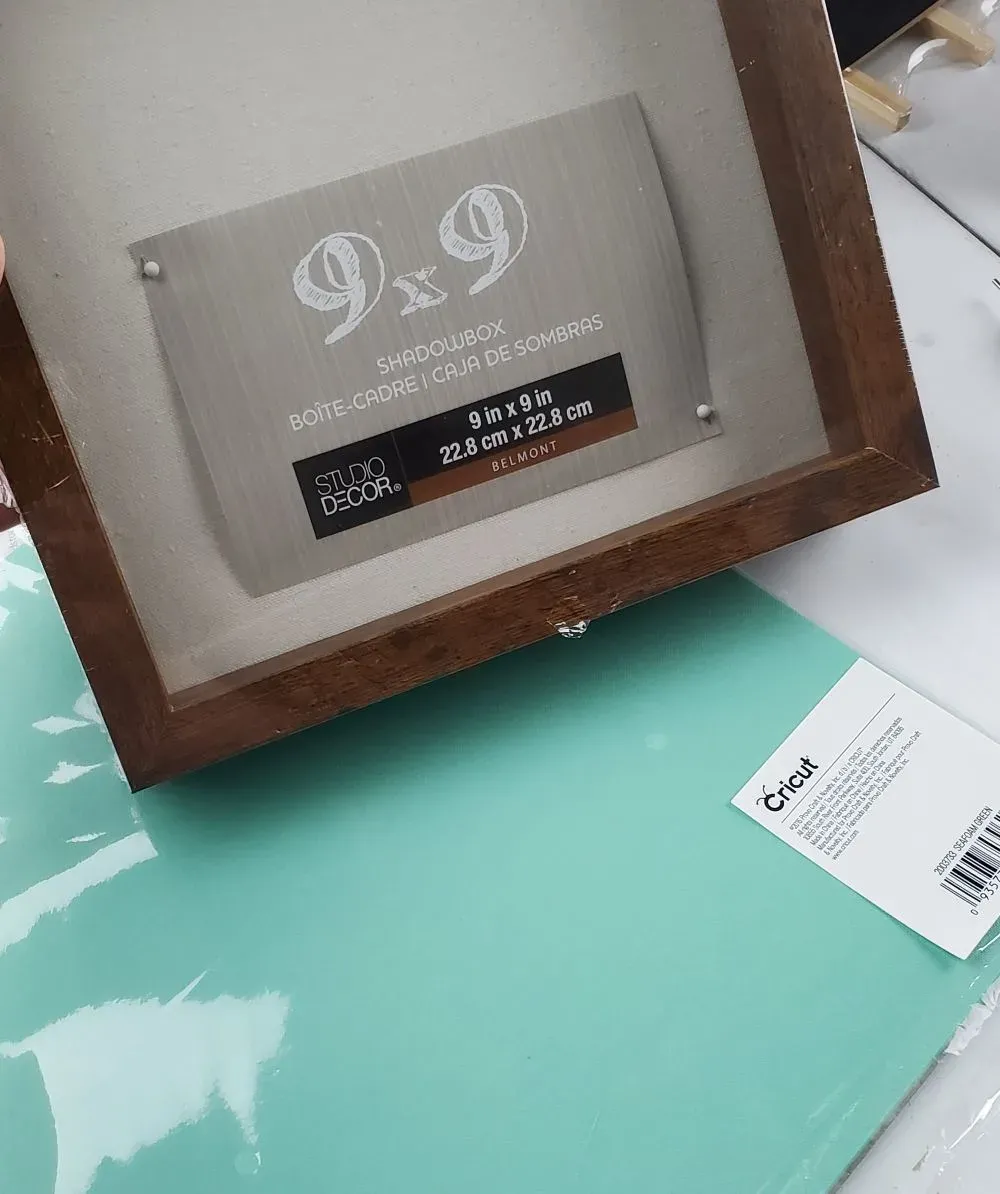
- Shadow box: Your local craft store is a treasure trove for affordable shadow boxes, especially if you can snag one on sale or use a coupon. But if you prefer the convenience of online shopping, Amazon has got you covered!
- Cardstock: Cricut 12×12 seafoam cardstock will lend an air of elegance to your creation.
- Quilling tool or tweezers: These will be your trusty sidekicks in shaping those intricate paper roses.
- Adhesive vinyl: Time to add a personalized touch with a monogram or a heartfelt message!
- Transfer tape: Transferring your vinyl design onto the shadow box will be a breeze with this handy tool.
- Tacky glue or a hot glue gun: Let’s keep those beautiful roses securely in place.
- Cricut Explore Air or Cricut Maker: These magical machines are about to become your new best friends. If you’re on the hunt for the best deals, remember to compare prices on both Cricut.com and Amazon.
 shadow box michaels
Caption: A stunning shadow box awaits your creative touch!
Crafting Your Exquisite Paper Flowers
Let’s be honest, the star of the show here is those incredibly lifelike 3D roses. Now, I won’t sugarcoat it—creating these beauties takes a bit of patience, but trust me, the end result is oh-so-worth it! Think of it as a relaxing crafting meditation.
The exact number of paper roses you’ll need hinges on the size of your shadow box. For this project, I opted for a 9×9 shadow box with an 8.5 x 8.5-inch inner board to be adorned with a symphony of paper blooms.
Through a bit of experimentation, I discovered that paper flowers sized to 6 inches across resulted in the most visually appealing rolled roses, each measuring roughly 1.6 to 1.75 inches wide. Naturally, some might turn out a tad smaller or larger depending on how tightly you roll them, embracing those perfectly imperfect handcrafted touches.
To ensure you have ample blossoms to grace your shadow box, I recommend creating five rows of five flowers, totaling a delightful 25 rolled roses.
Expert Tip: Before you commit to crafting a whole garden of paper roses, I highly encourage you to cut out a few in various sizes and arrange them on your board. This way, you can ensure they’ll fit harmoniously according to your vision.
Bringing Your Roses to Life with Cricut Design Space
- Open Cricut Design Space and click on “Image.” Search for “3D flowers,” and prepare to be greeted by a plethora of options. If you’d like to use the same template I used for this project, simply type “#M3D7E1” (don’t forget the “#”) in the search bar.
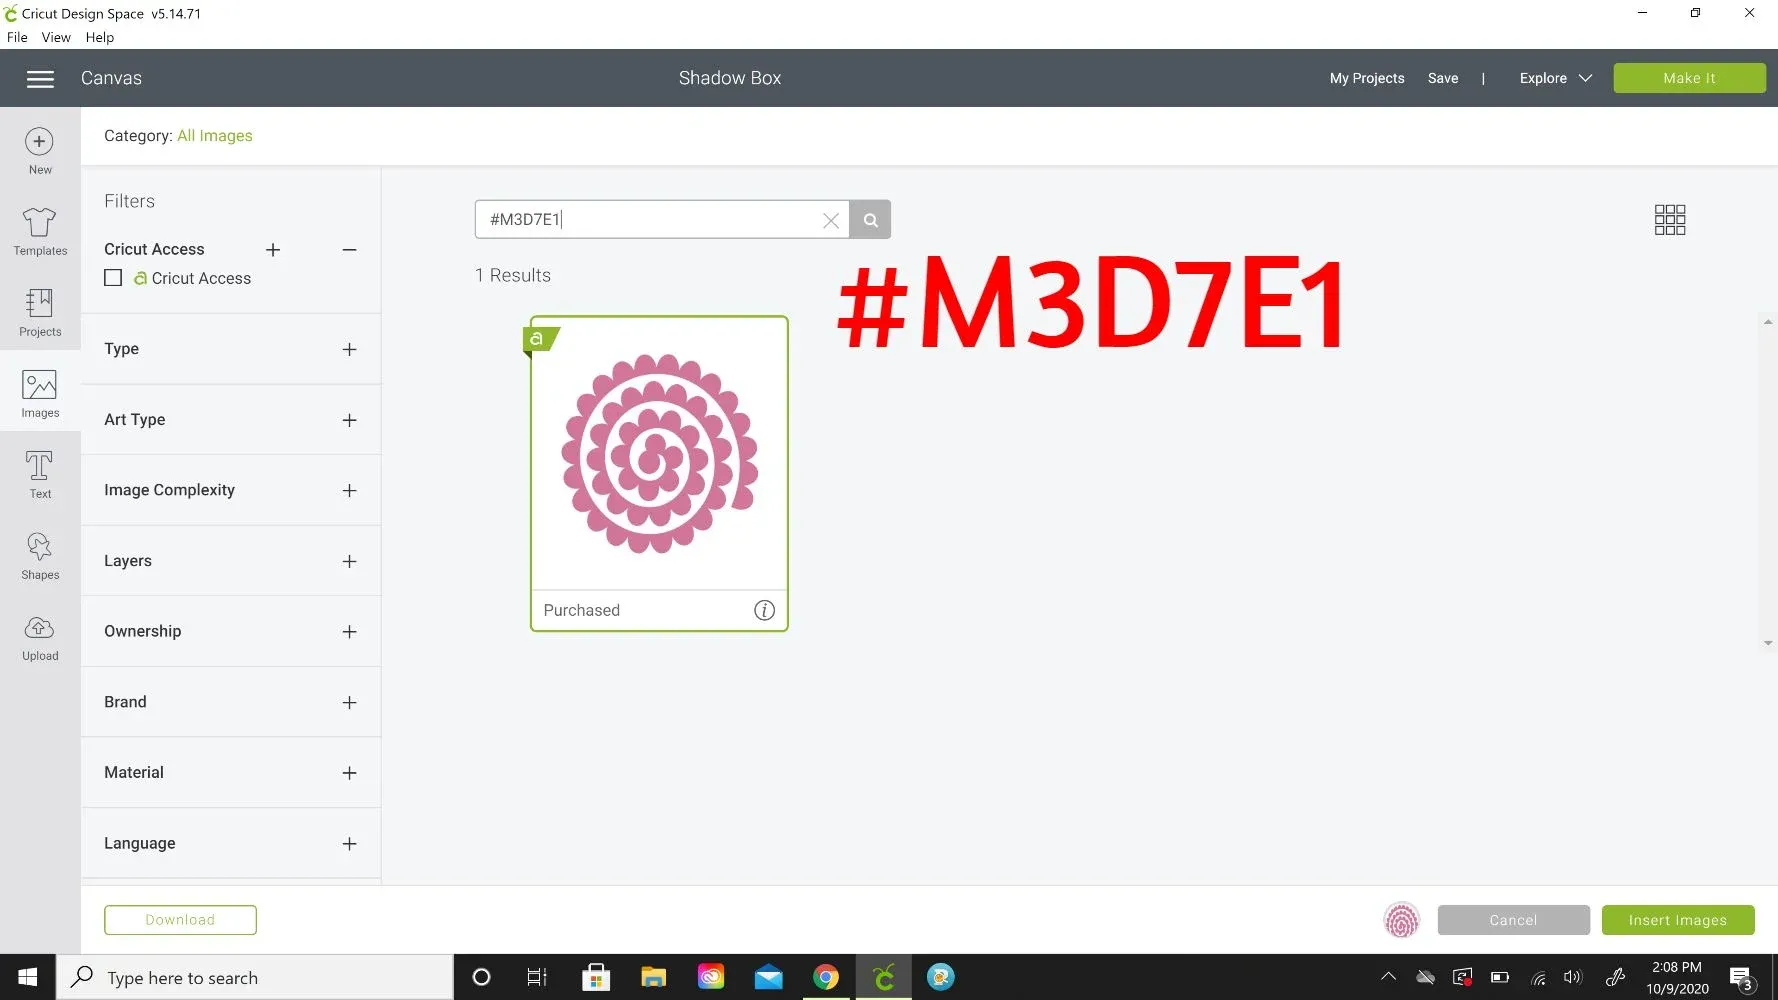 cricut d rose
Caption: Choosing the perfect 3D rose template in Cricut Design Space.
- Click on the chosen image, followed by “Insert Images.” Now, let’s adjust the size. In the “Width” box, type in “6 inches.” Hit “Return” to finalize the change, and Design Space will maintain the proportions for you.
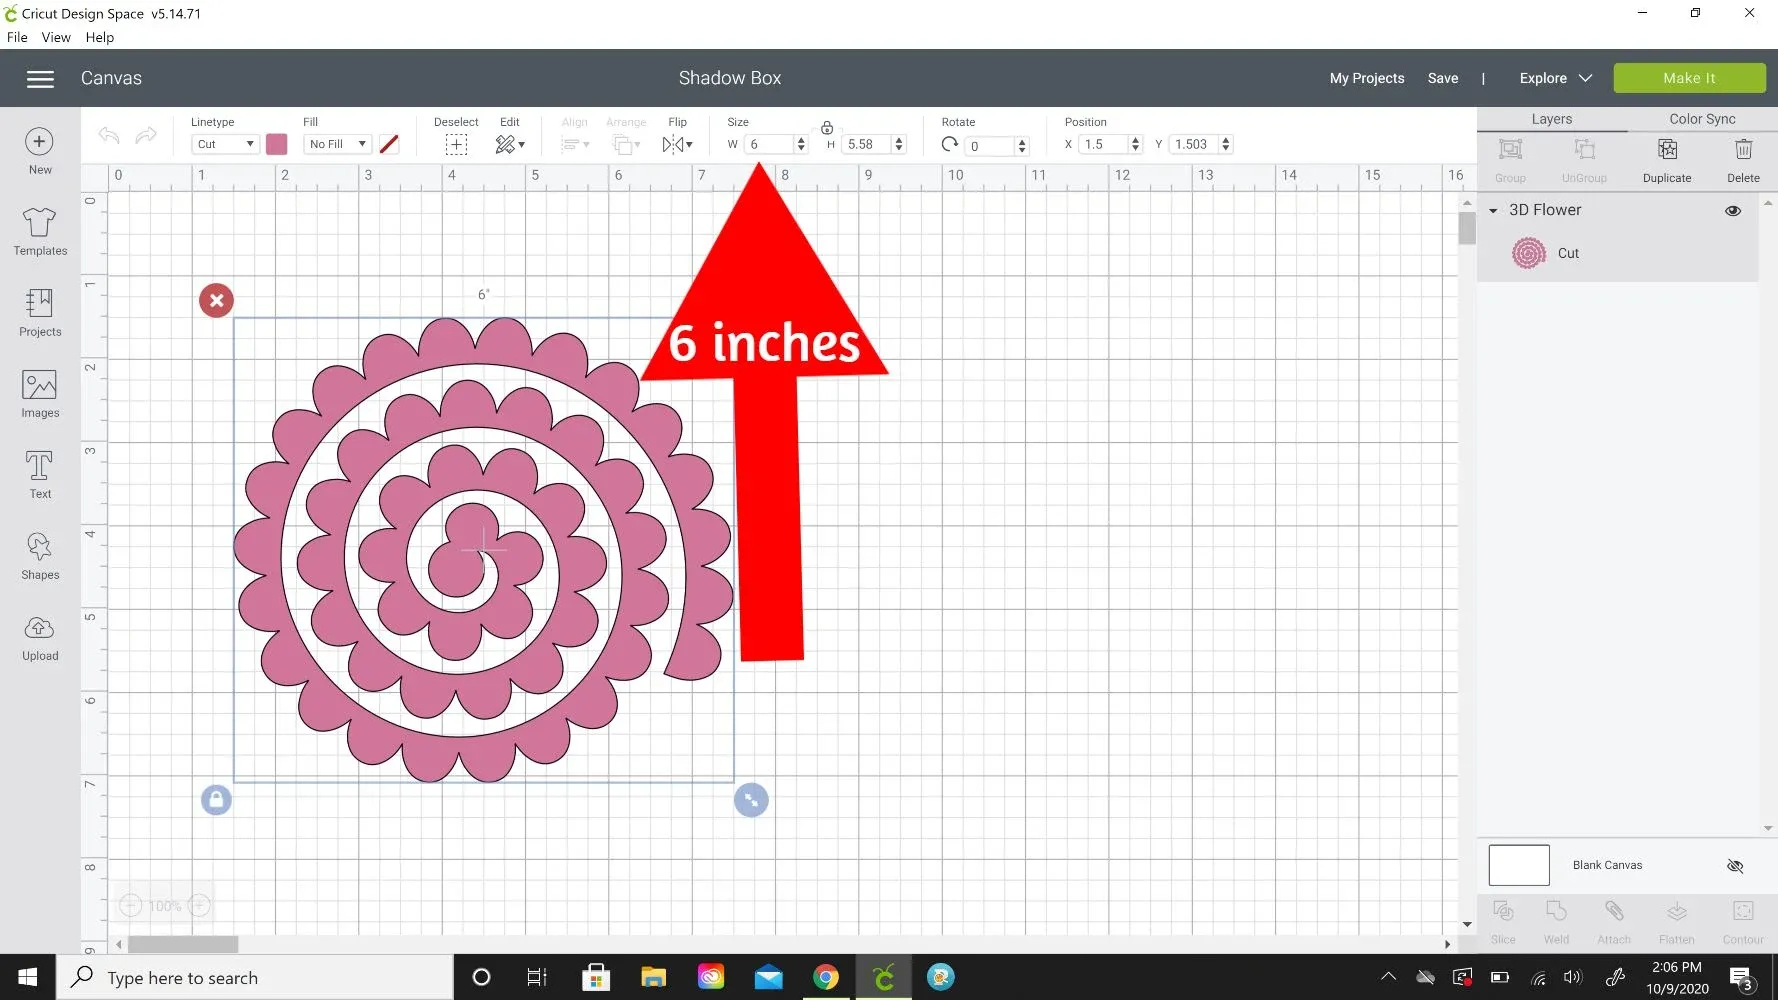 rose for shadow box size
Caption: Adjusting the size of your rose template for a perfect fit.
-
Time for a little Design Space strategy! I’m all about maximizing efficiency, so I aim to fit as many elements on a single mat as possible. Since Design Space doesn’t always utilize the space as economically as I’d like, I often step in and make some adjustments.
-
To accommodate four flowers per 12×12 sheet of cardstock, navigate to the “Prepare Screen” and change the “Project copies” at the top to “4.” Notice how Design Space automatically creates two mats, each containing two flowers?
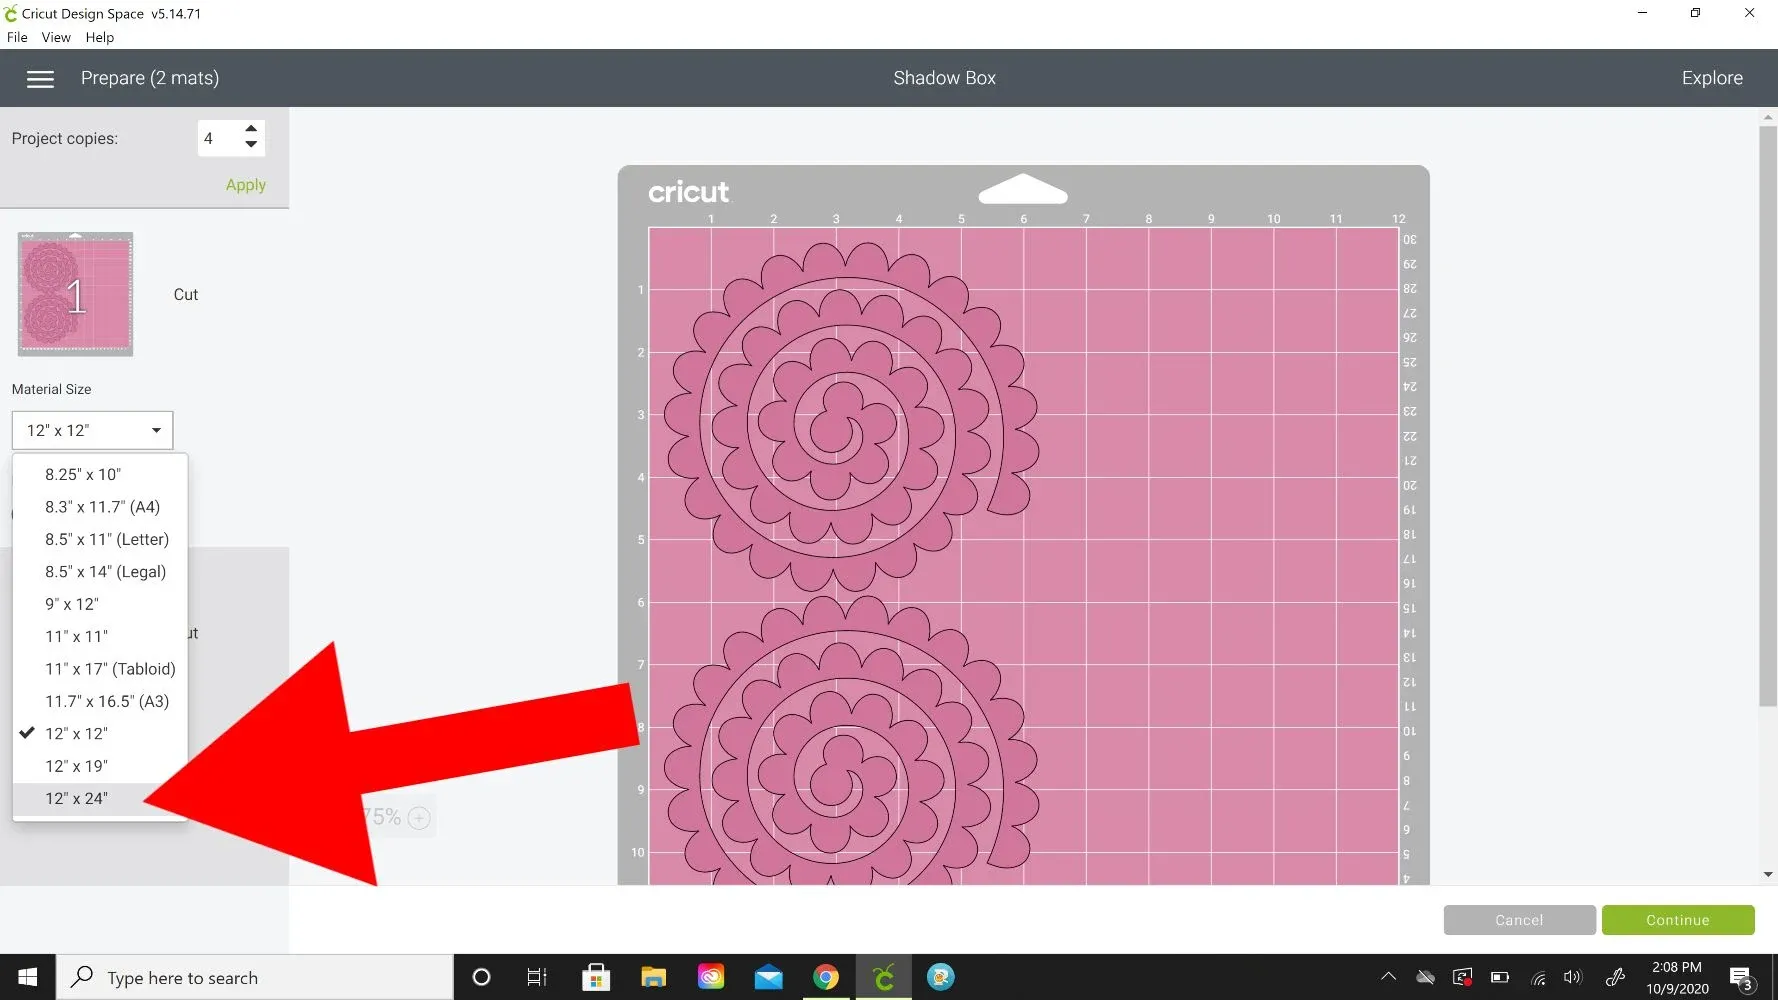 x mat cricut design space
Caption: Optimizing your mat space for maximum crafting efficiency.
- Let’s outsmart Design Space a bit and change the mat size to 12 x 24. This tricks the software into placing all four images onto a single mat. Don’t worry—we’ll still be using a standard 12 x 12 mat for cutting!
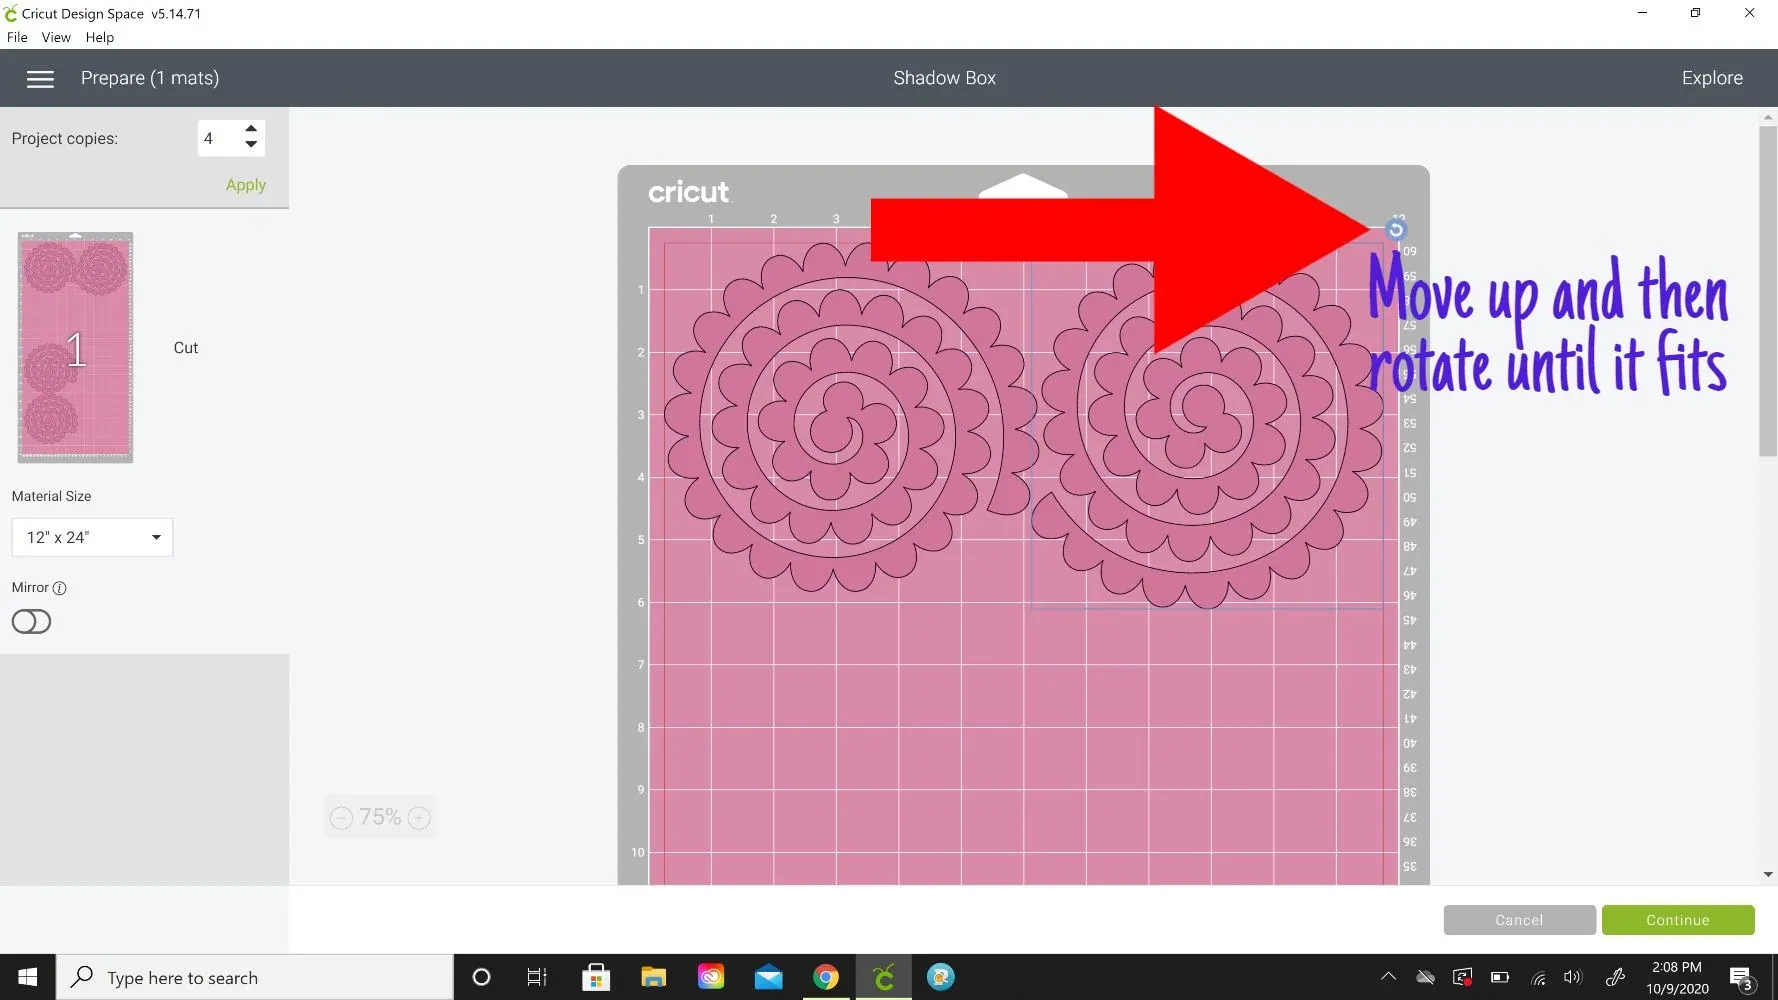 rotating in cricut design space
Caption: Arranging your rose cutouts strategically on the mat.
-
With all four images gracefully occupying a single mat, click on the second flower and relocate it above and to the right of the first rose. You might notice a bit of overlap, but fret not! Simply click the “Rotate” button and reposition the image to eliminate any overlapping.
-
Next, let’s position the third image just below the first, ensuring it sits above the 12-inch line. Finally, move the last flower to the side and give it a little rotation.
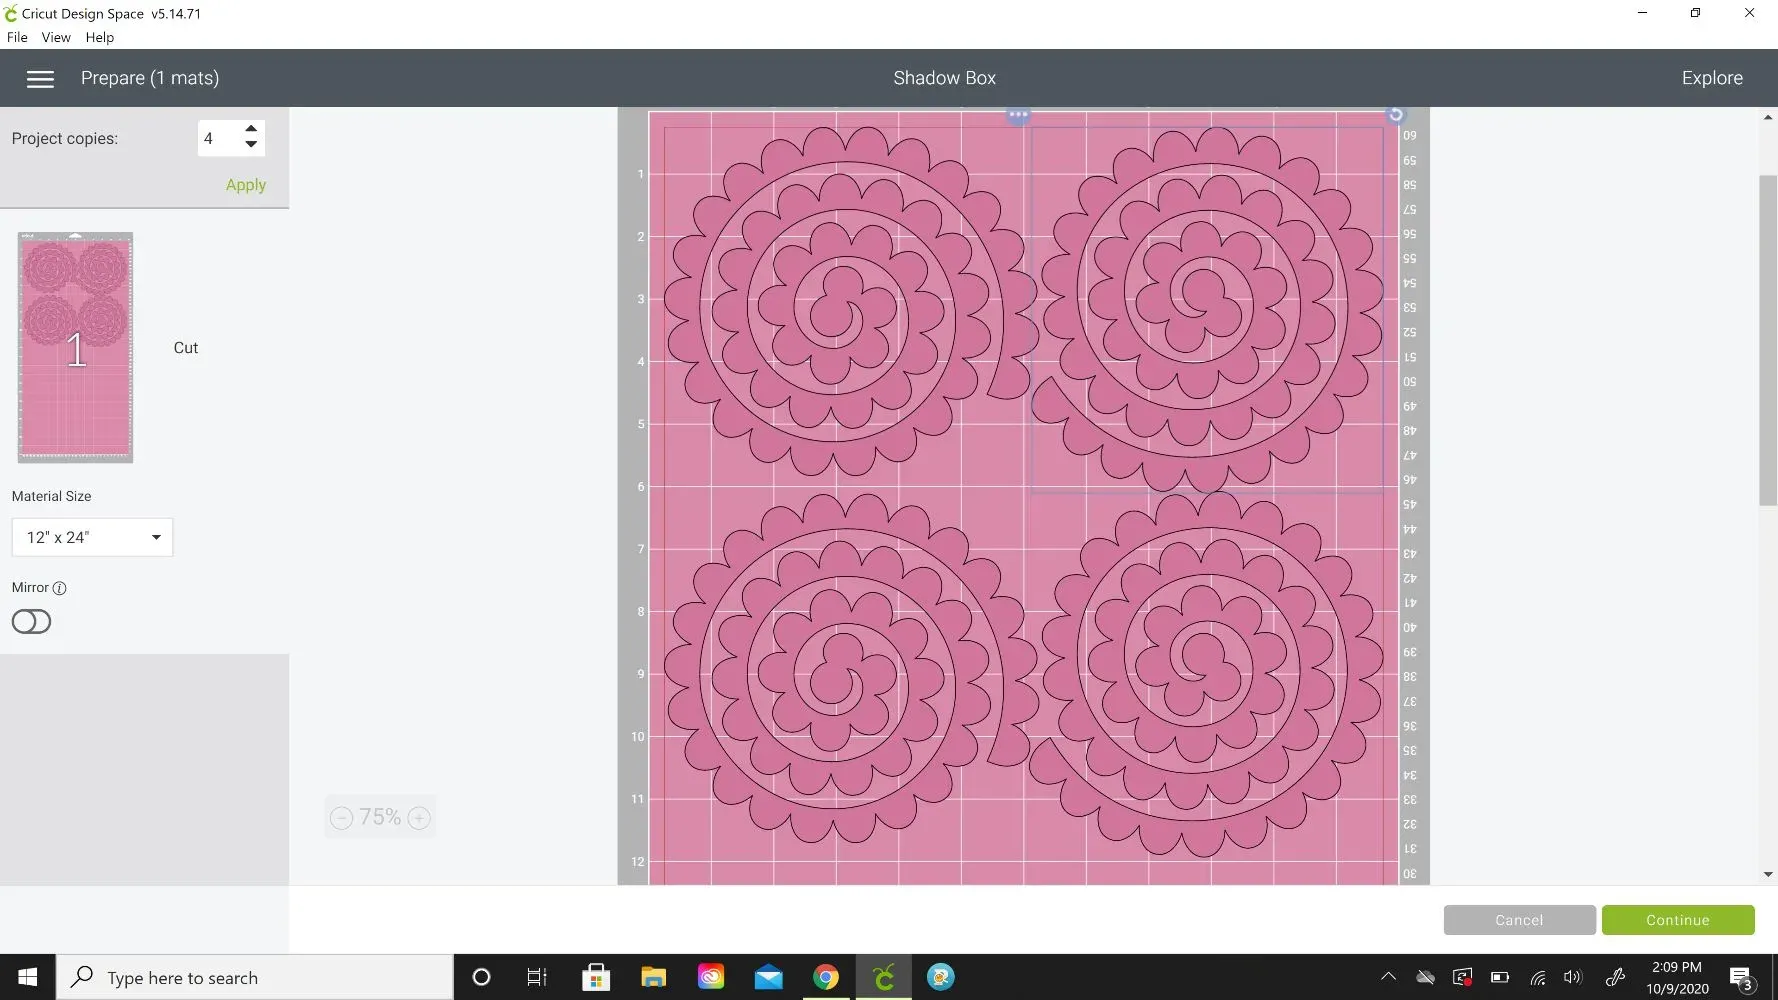 four roses cricut
Caption: Your perfectly arranged roses, ready to be brought to life.
-
With your rose templates meticulously arranged, it’s time to summon the cutting magic of your Cricut! Since we’re aiming for 25 paper flowers, we’ll need to feed seven sheets of cardstock through the machine. Why seven, you ask? Well, seven sheets with four flowers each yield 28 roses—and it’s always best to have a few extra, just in case!
-
Place your cardstock on the mat, select the “Cardstock” setting on your Cricut dial, load the mat, and with a press of the button, watch as your Cricut transforms those digital designs into tangible beauty.
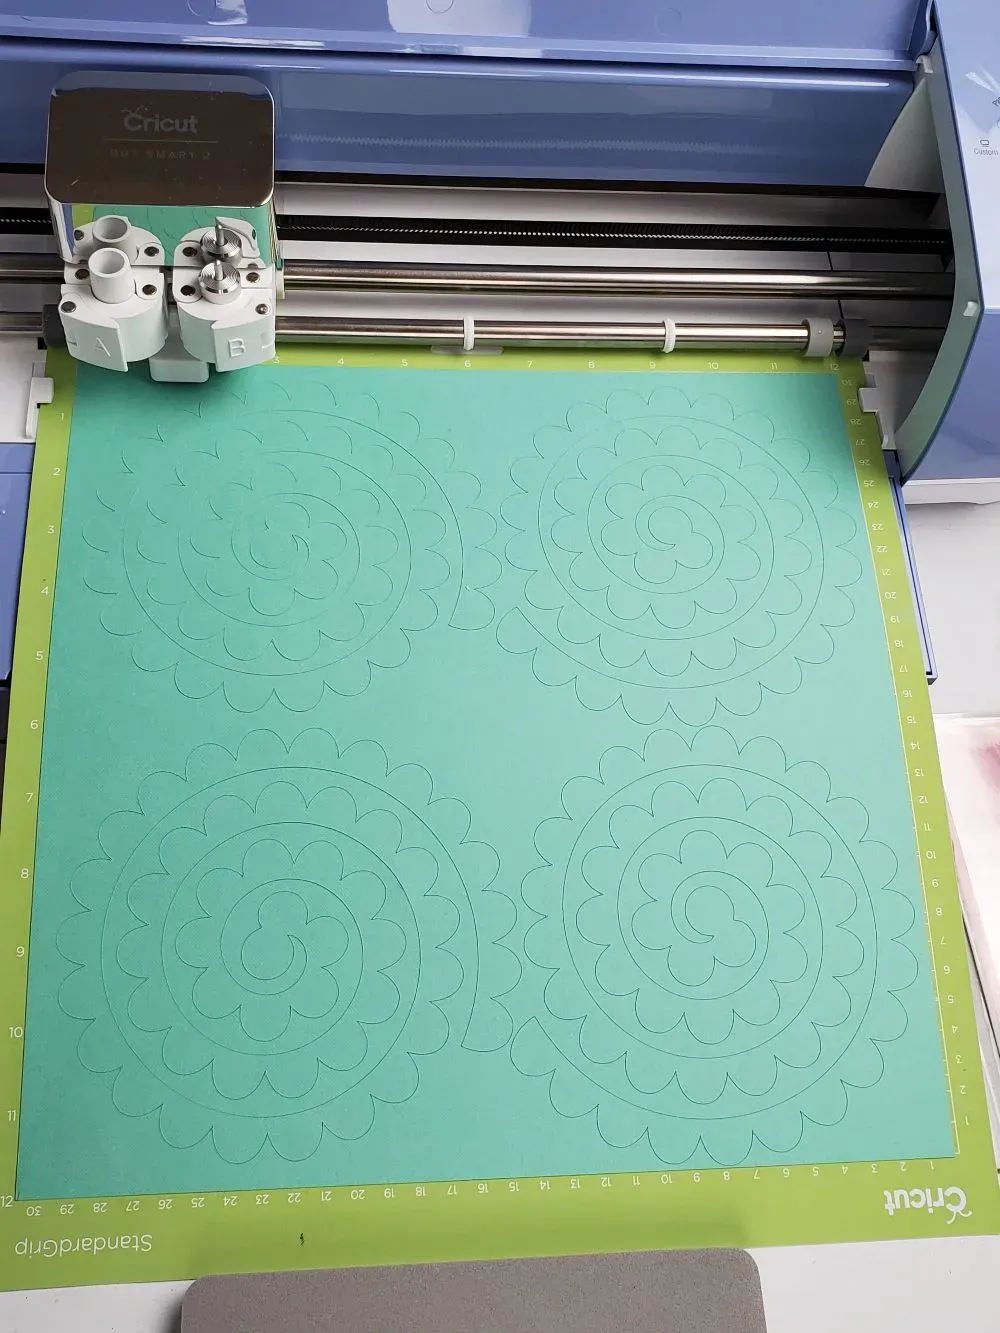 shadow box flower cricut
Caption: Watching your Cricut work its magic is pure crafting satisfaction!
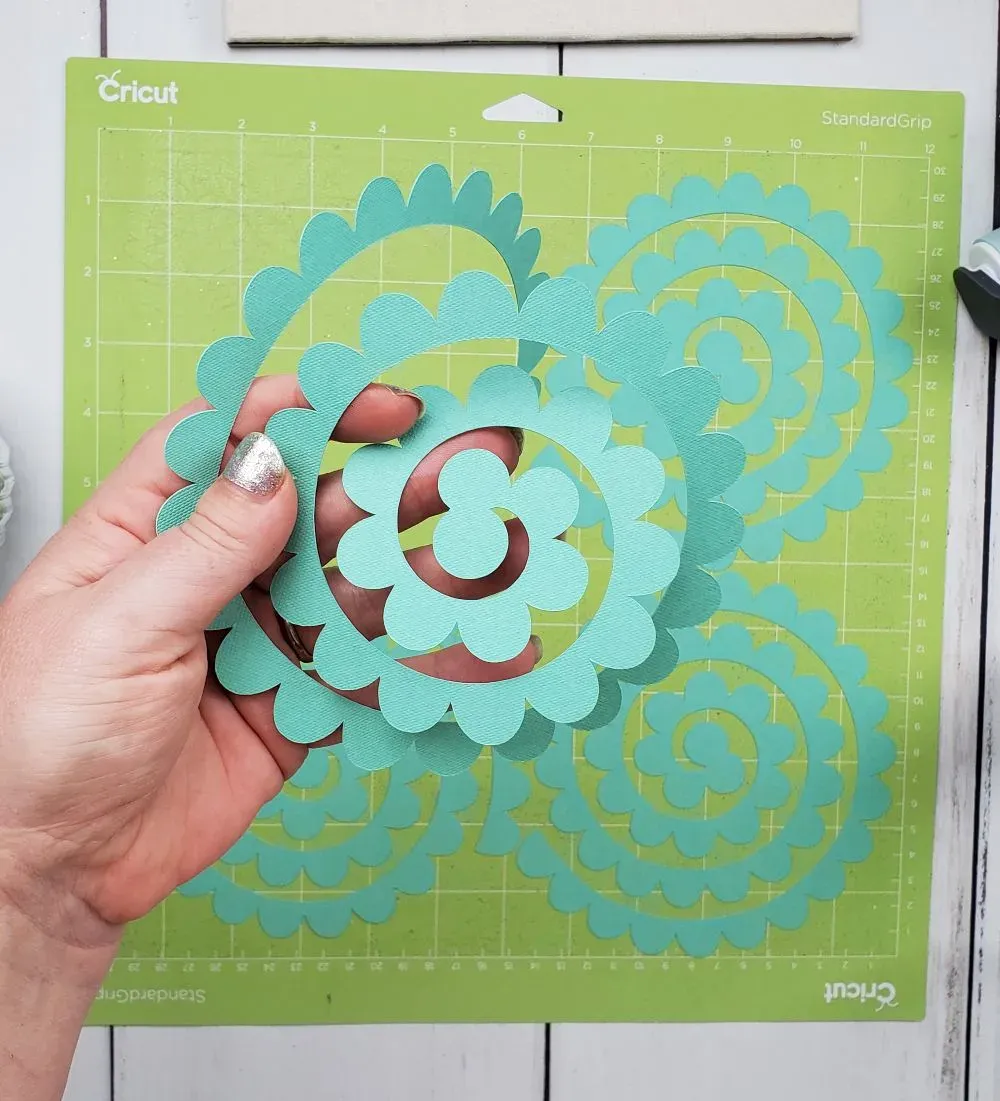
- Once your Cricut has finished its first round of cutting, gently remove the excess cardstock. Those circular rings make for effortless peeling.
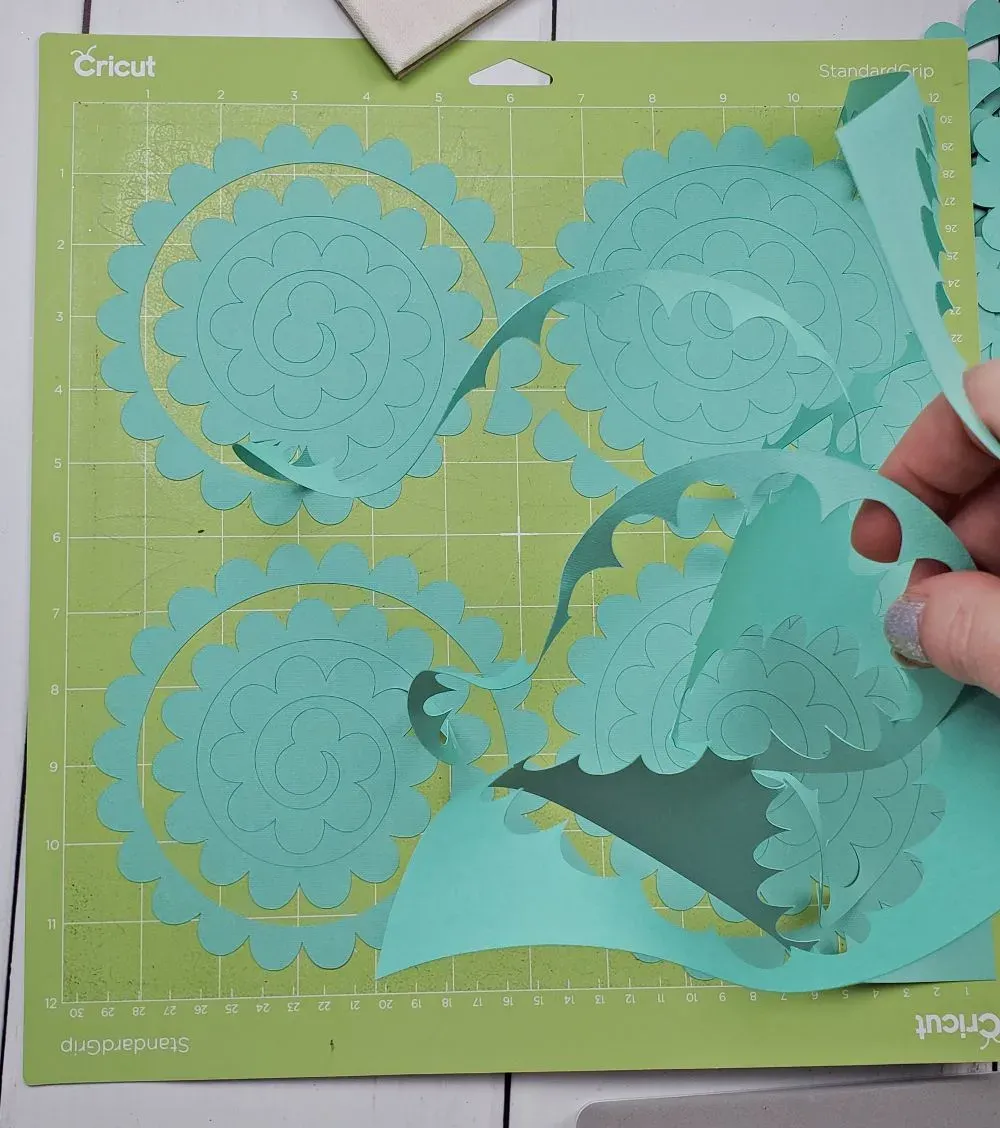 rose shadow box diy
Caption: Carefully removing your freshly cut rose templates.
- Now, let’s free those rose cutouts from their mat prison! You can either enlist the help of a scraper or simply flip the mat over and peel it away from the cardstock.
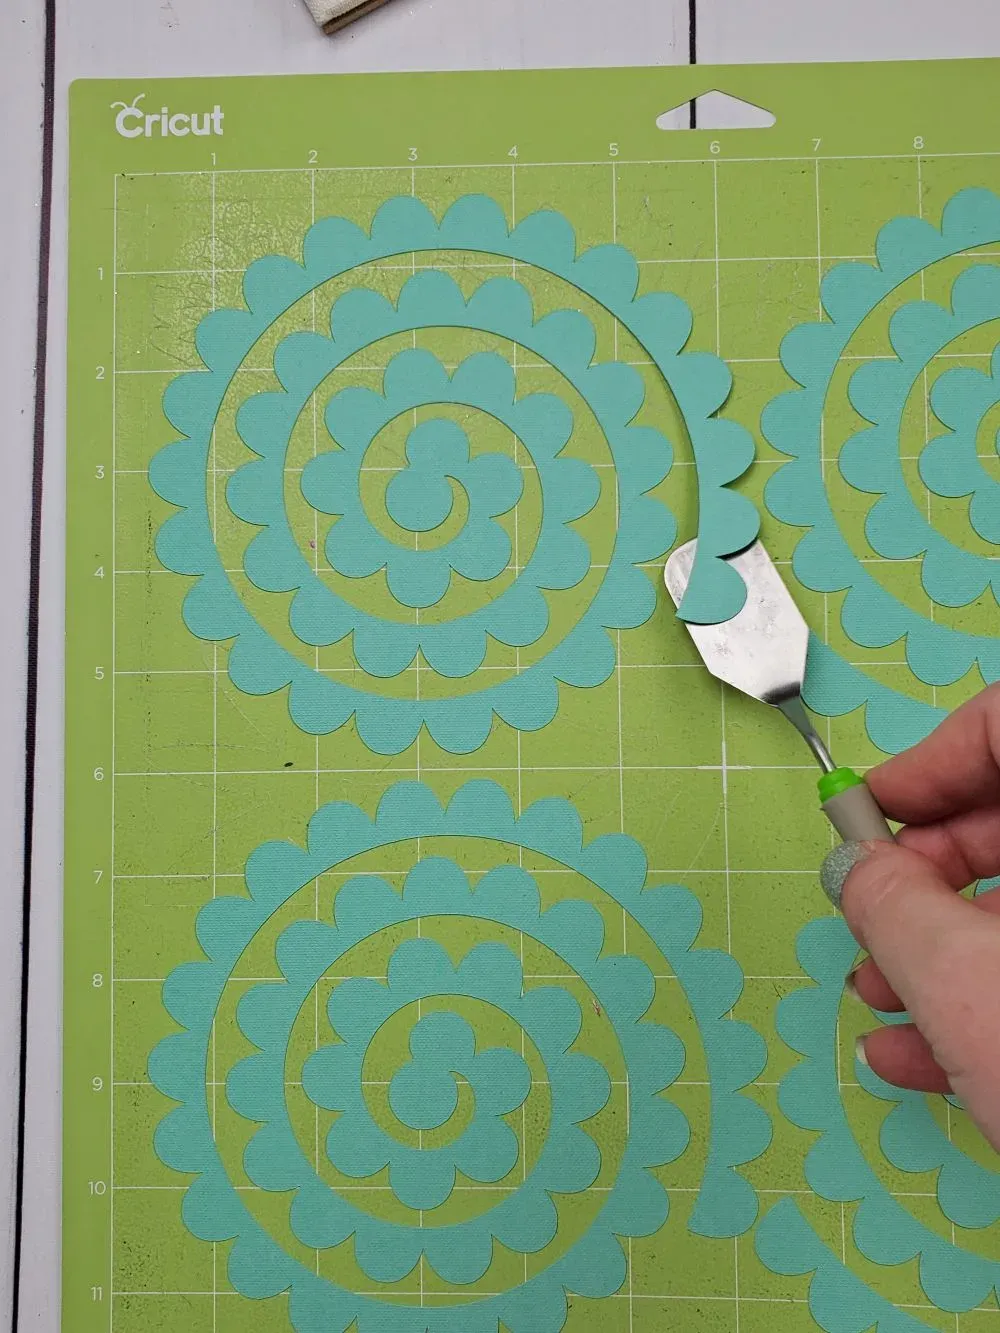 taking rose template off mat
Caption: Freeing your rose cutouts with precision and care.
- Get your fingers ready, because it’s time to roll! I won’t delve too deep into the art of rolling Cricut flowers in this tutorial, as I have a comprehensive guide dedicated to this very technique on my website. But, for a visual walkthrough, feel free to skip to the full YouTube video linked at the bottom of this post!
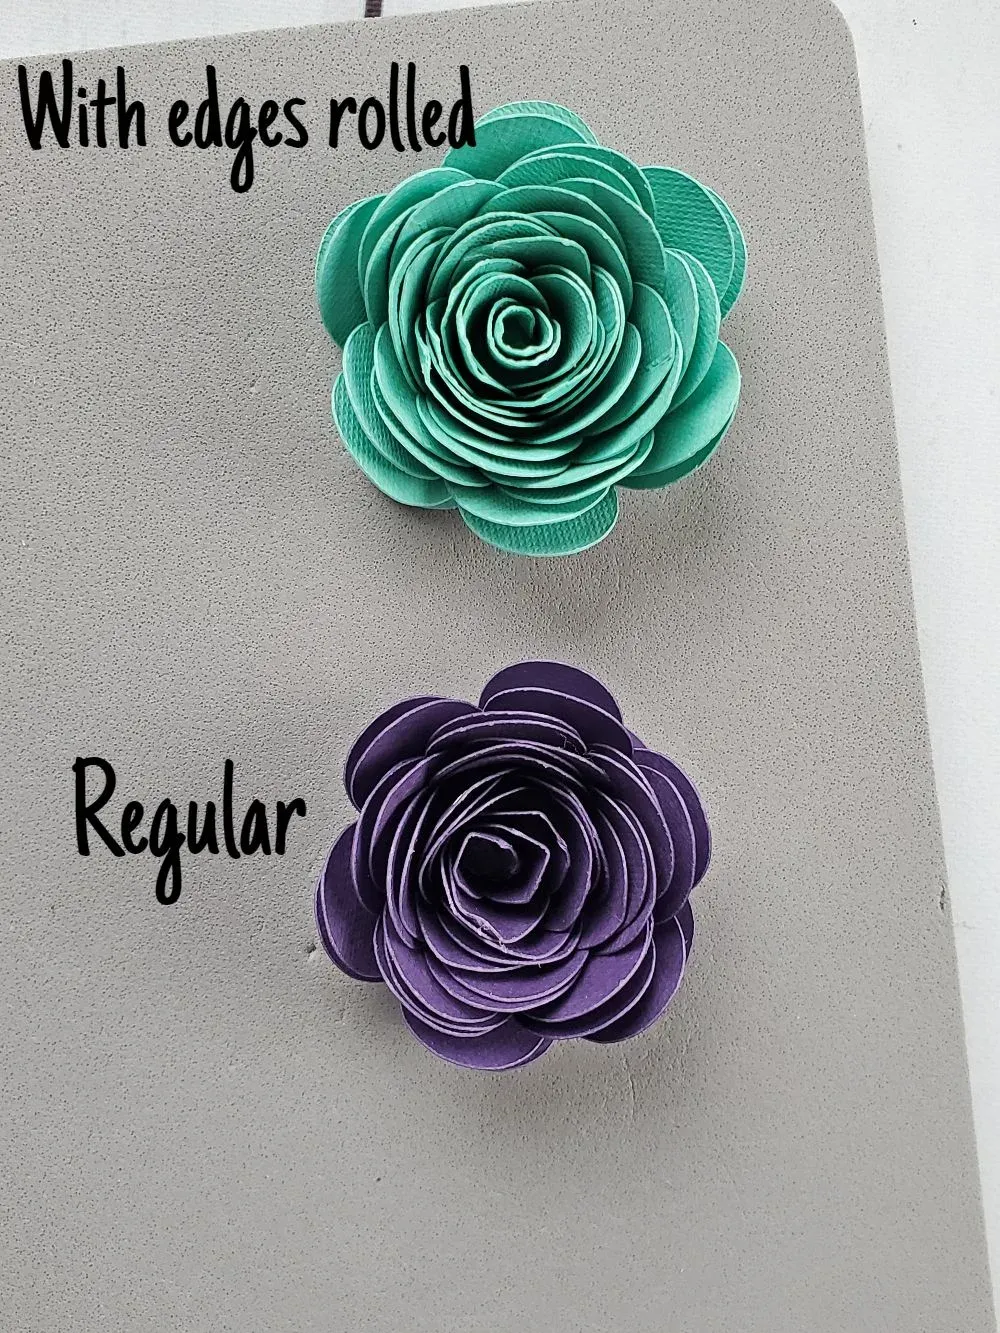
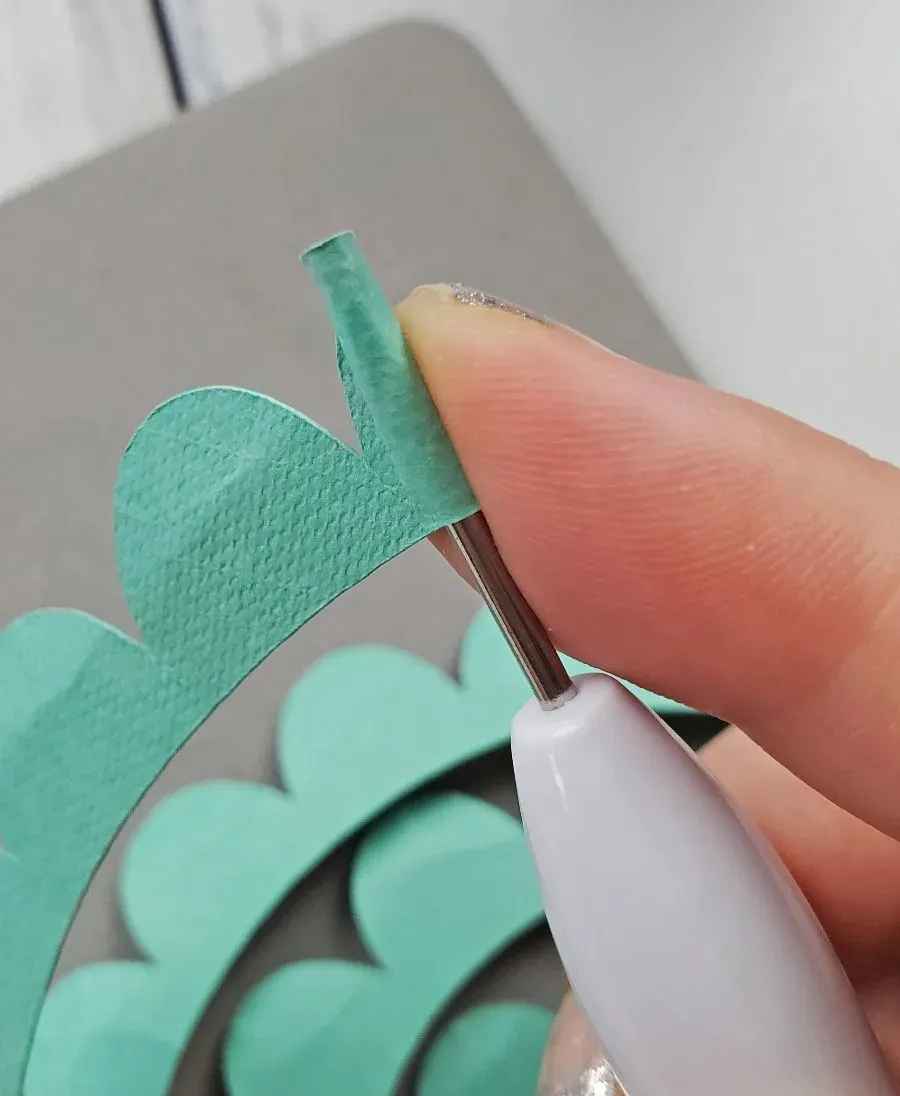
Pro Tip: For roses with petals that gracefully splay outwards, try gently rolling the edges of the cutouts’ backside using a ball tool.
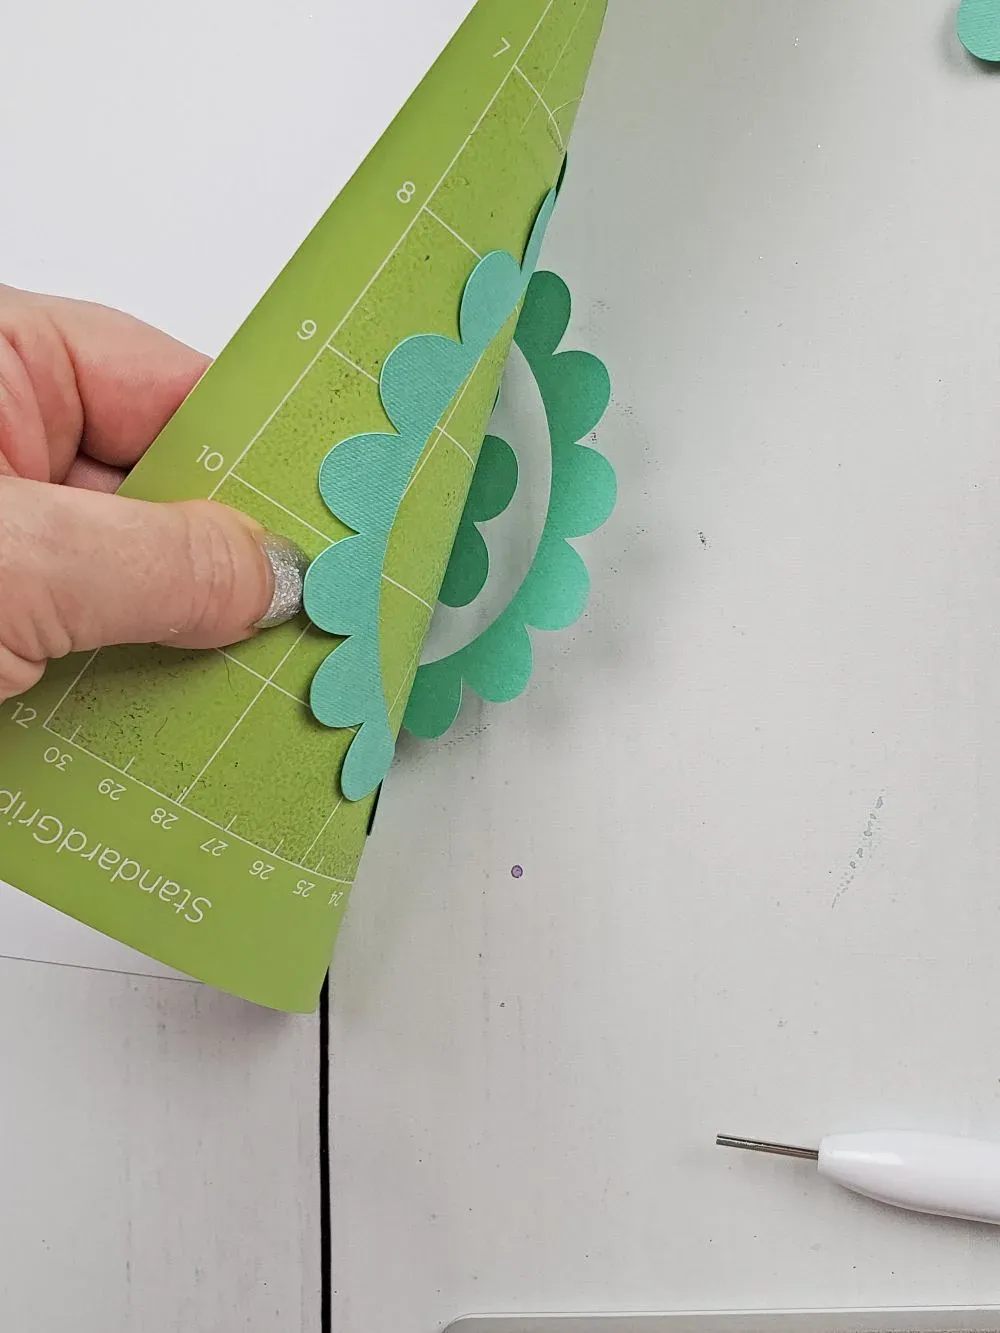 removing cardstock from cricut mat
Caption: Using a ball tool to add delicate curves to your petals.
- Using tweezers or the end of a quilling tool, begin rolling the paper towards yourself, starting from one end of the cutout. I like to alternate between using the tool and my fingers, rolling a bit, then releasing and rolling with my fingertips to achieve a natural look.
 paper flower for shadow box
Caption: Rolling your paper roses: a therapeutic crafting experience.
- Once you’ve rolled all 25 paper flowers, allow them to unfurl slightly, revealing their inner beauty. Secure the base of each rose with a touch of tacky glue or hot glue, and allow ample drying time.
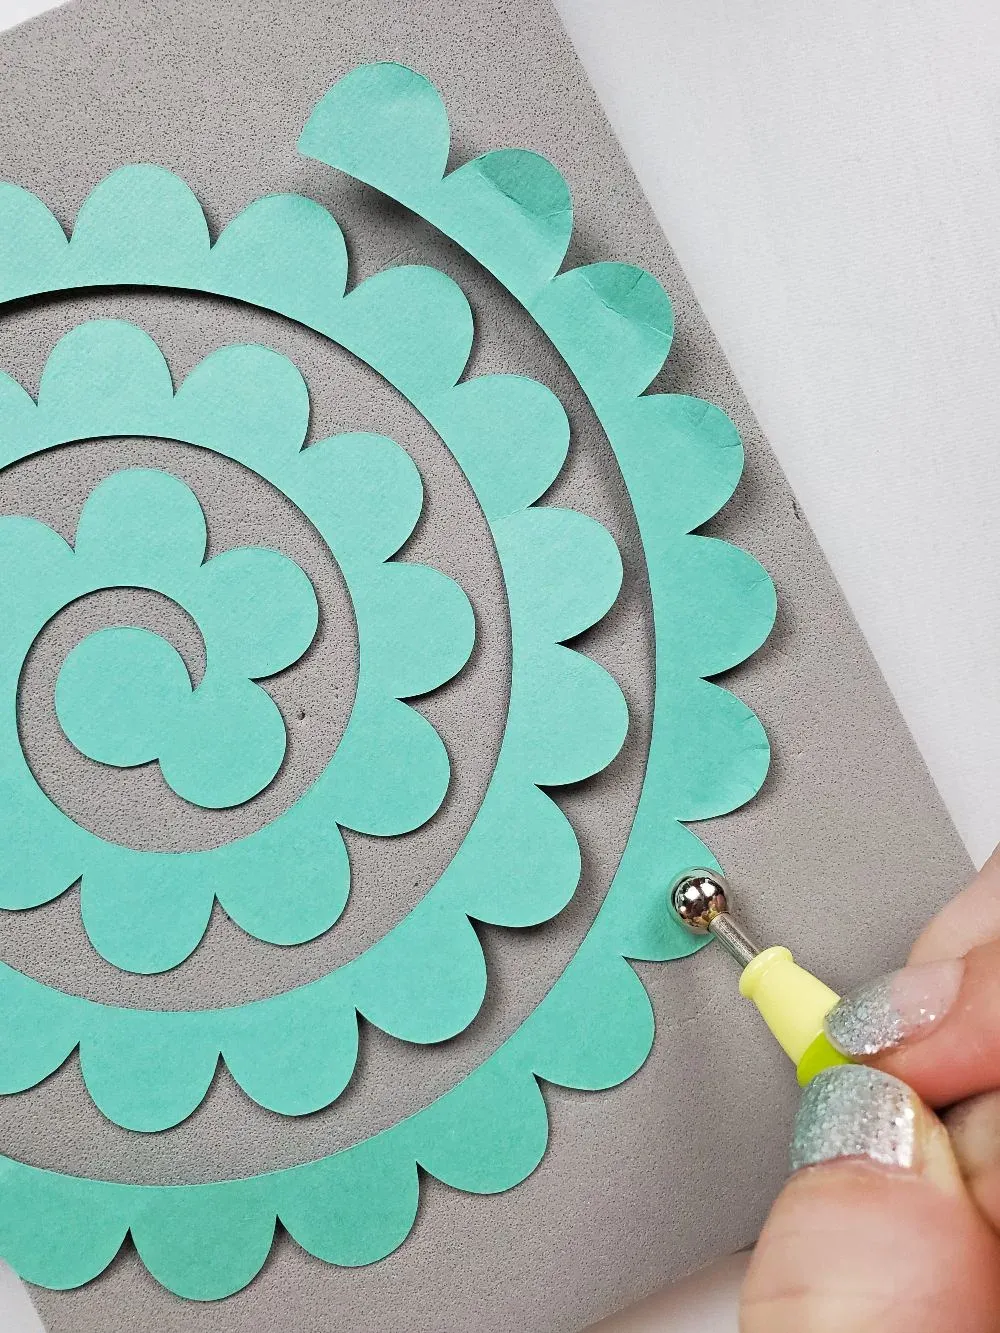 rolling flowers
Caption: Securing the base of your roses with a dab of glue.
Assembling Your Shadow Box Masterpiece
Congratulations on making it through the most time-consuming part—give yourself a pat on the back! Now, let’s bring this shadow box to life.
-
Gently disassemble your shadow box and remove the inner board. I find it helpful to keep the wooden rim handy as a visual guide to avoid placing the roses too close to the edges.
-
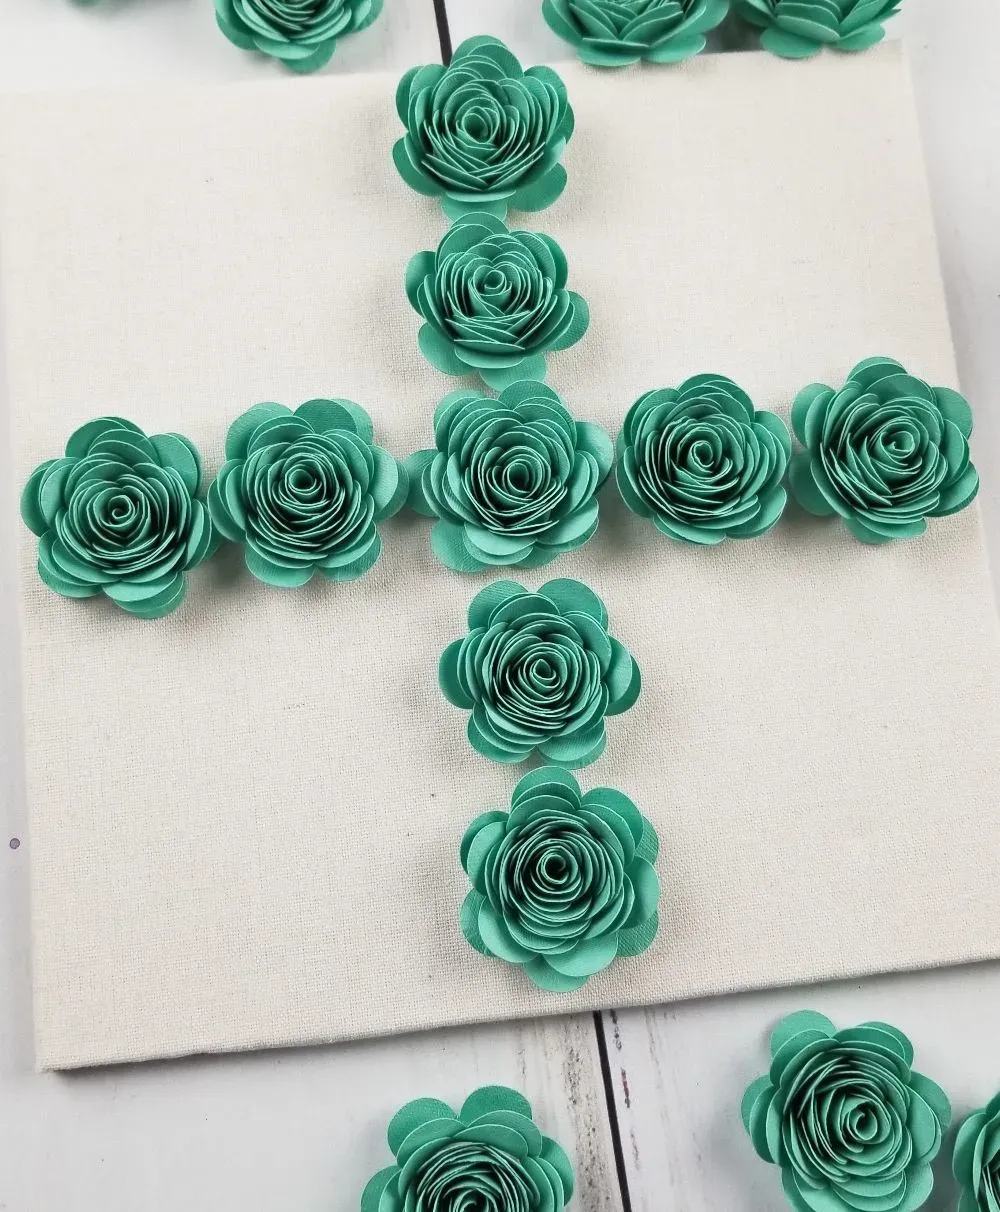
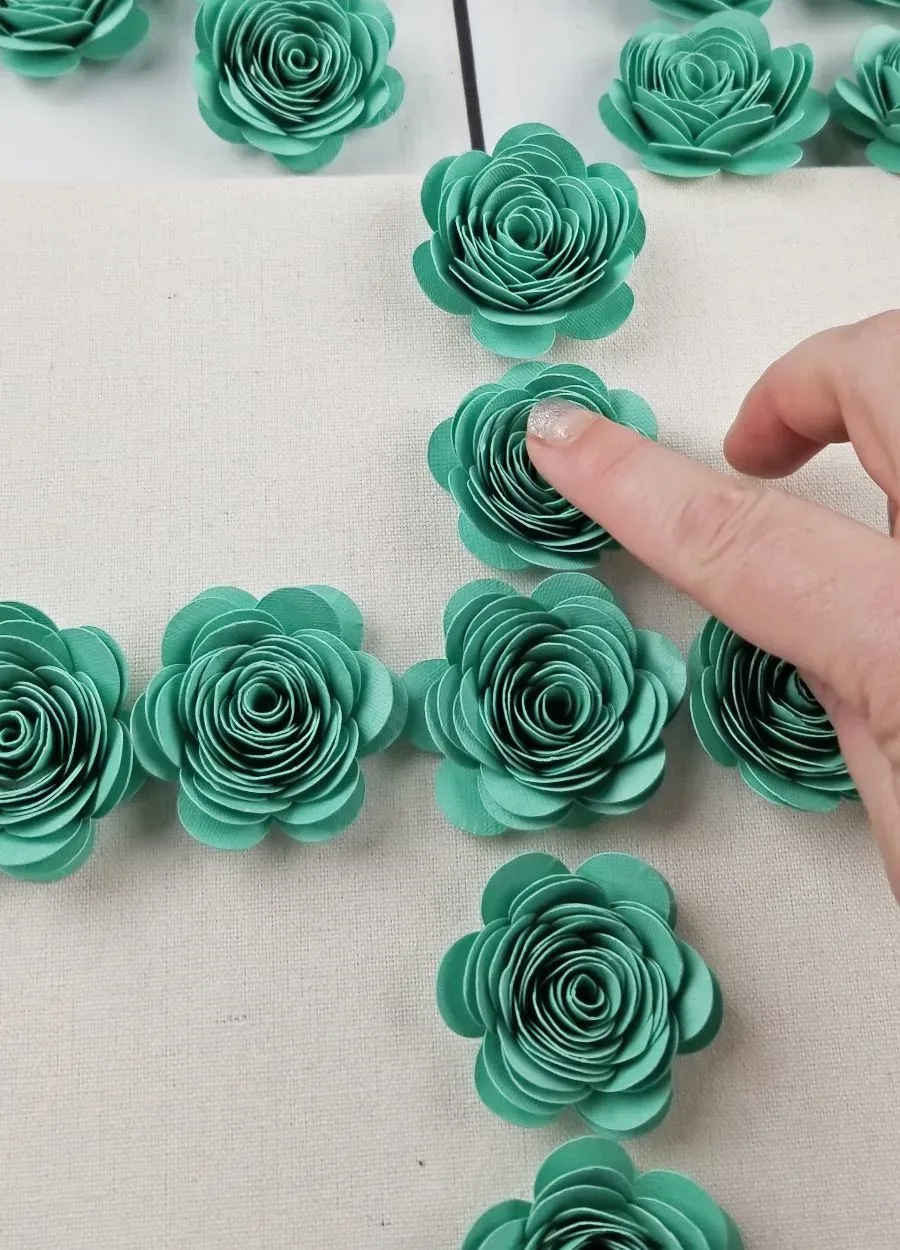
Before gluing, play around with the placement of your paper flowers on the board to get a sense of spacing and overall composition.
 flowers for shadow box
Caption: Experimenting with flower placement for a visually pleasing composition.
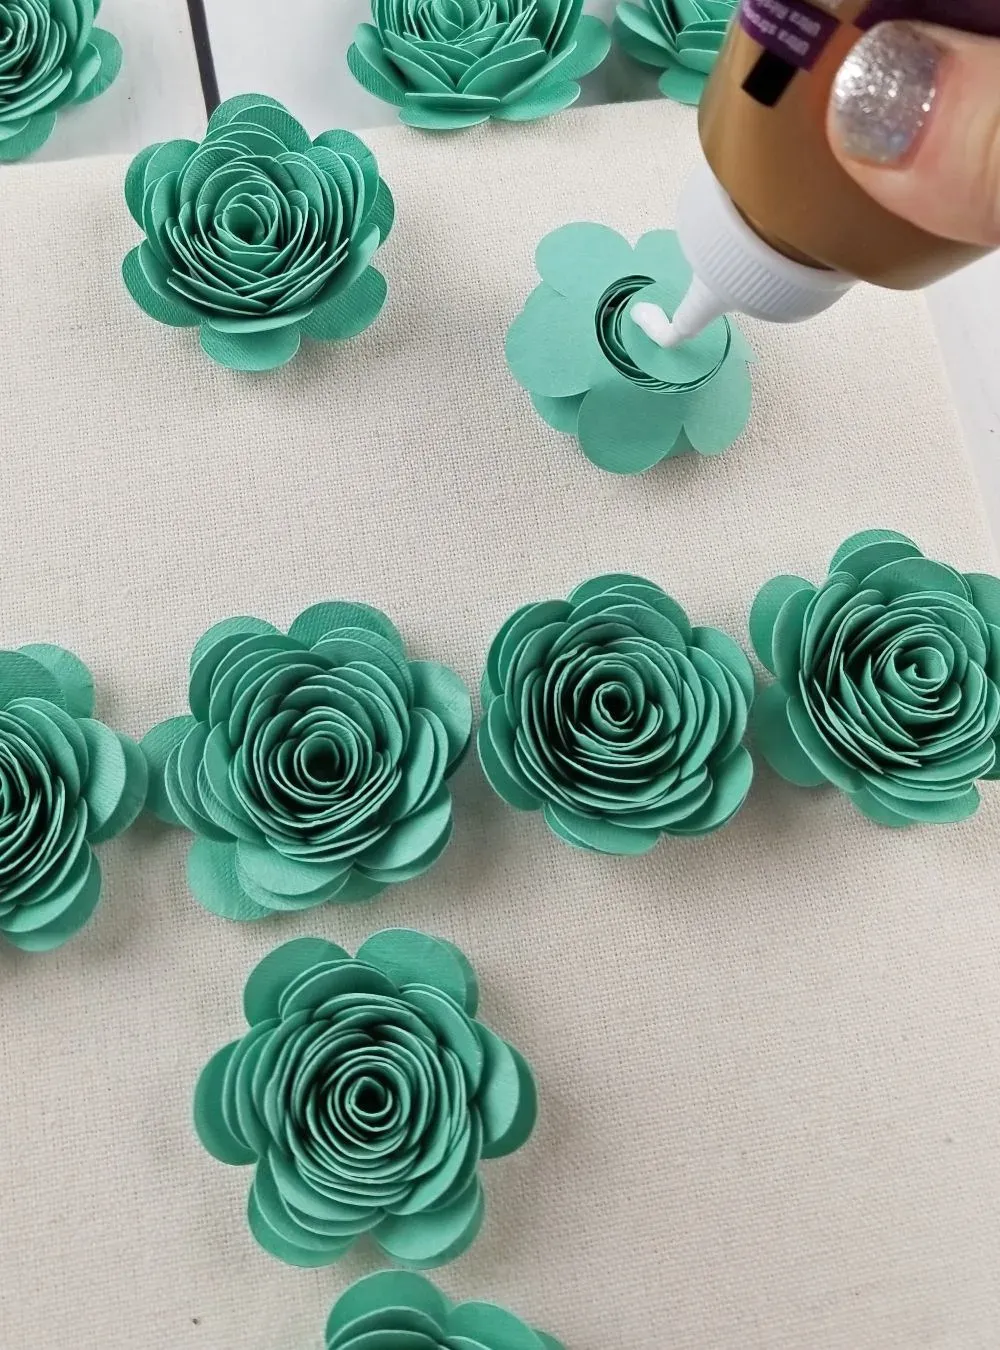
- To ensure a perfectly centered masterpiece, measure and mark the exact center of the board—this will be the designated spot for your central rose. Once it’s glued down, continue gluing the remaining roses, starting from the center and moving outwards, both horizontally and vertically. Take care to maintain alignment for a polished look.
 paper flower shadow box diy
Caption: Carefully gluing your roses onto the shadow box base.
- Gently press down on each flower to ensure a secure bond with the glue.
 making flower shadow box
Caption: Securing your roses with a gentle press.
- Continue this process until the entire base is adorned with your stunning blooms. Doesn’t it look beautiful already?
 gluing paper flowers in shadow box
Caption: Your shadow box is starting to blossom!
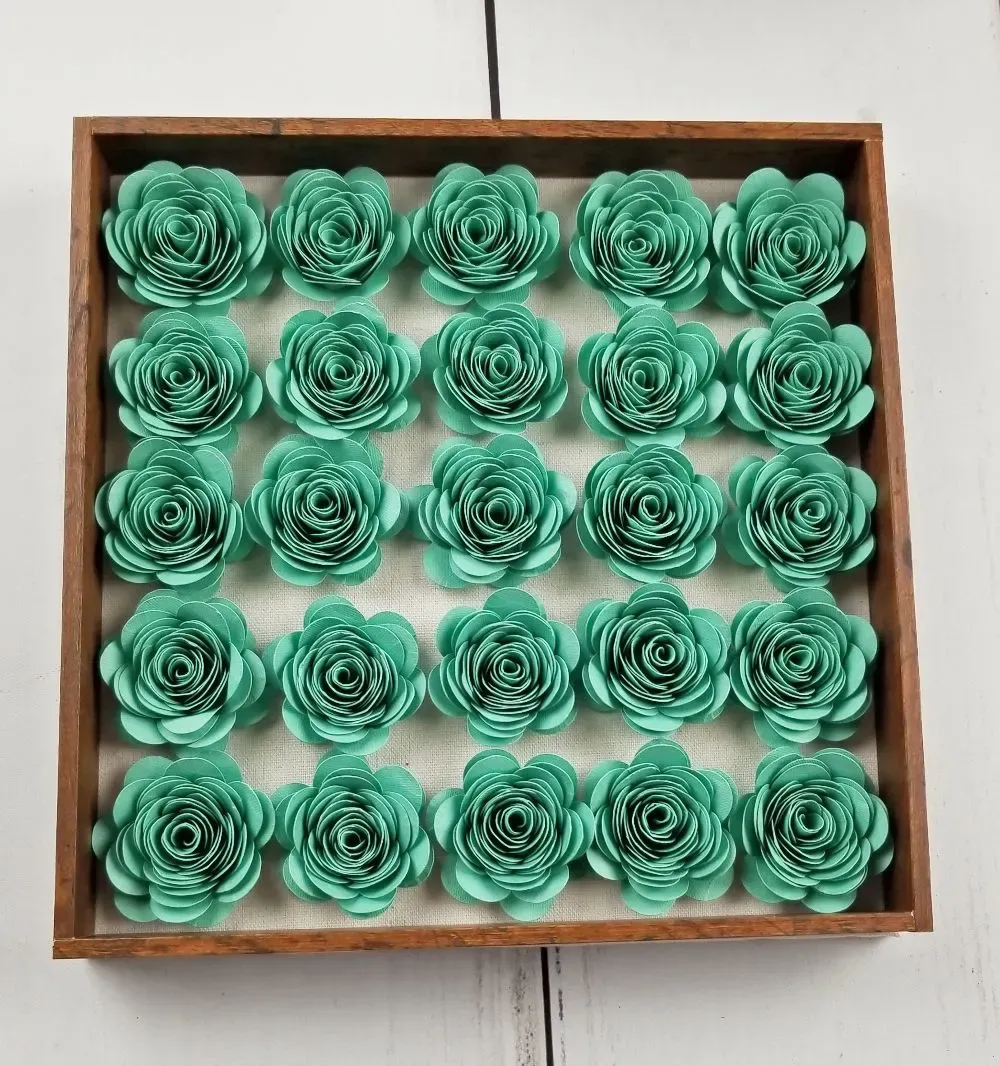
- Allow the glue to dry completely before moving on to the next step. Trust me, you don’t want any of your hard work coming undone!
 diy flower shadow box
Caption: A symphony of roses, patiently waiting to be framed.
Adding a Personal Touch with a Vinyl Monogram
No personalized gift is complete without a touch of vinyl magic! For this project, you can customize the front of your shadow box with a short and sweet phrase, a meaningful Bible verse, a simple “Mom,” or even a child’s name—the possibilities are endless!
Since we’re celebrating a precious little one’s arrival, I opted for a classic split monogram accompanied by the baby’s name delicately nestled in the center.

Caption: Designing a personalized vinyl monogram in Cricut Design Space.
I’m a big fan of the split letter monograms from CreativeFabrica, and I was lucky enough to snag one at a steal—just $1!
For those who prefer to keep things budget-friendly, I’ve got you covered! Head over to my website for a collection of free split letter monograms and a handy video tutorial that guides you through creating your very own.
Creating Your Monogram in Cricut Design Space
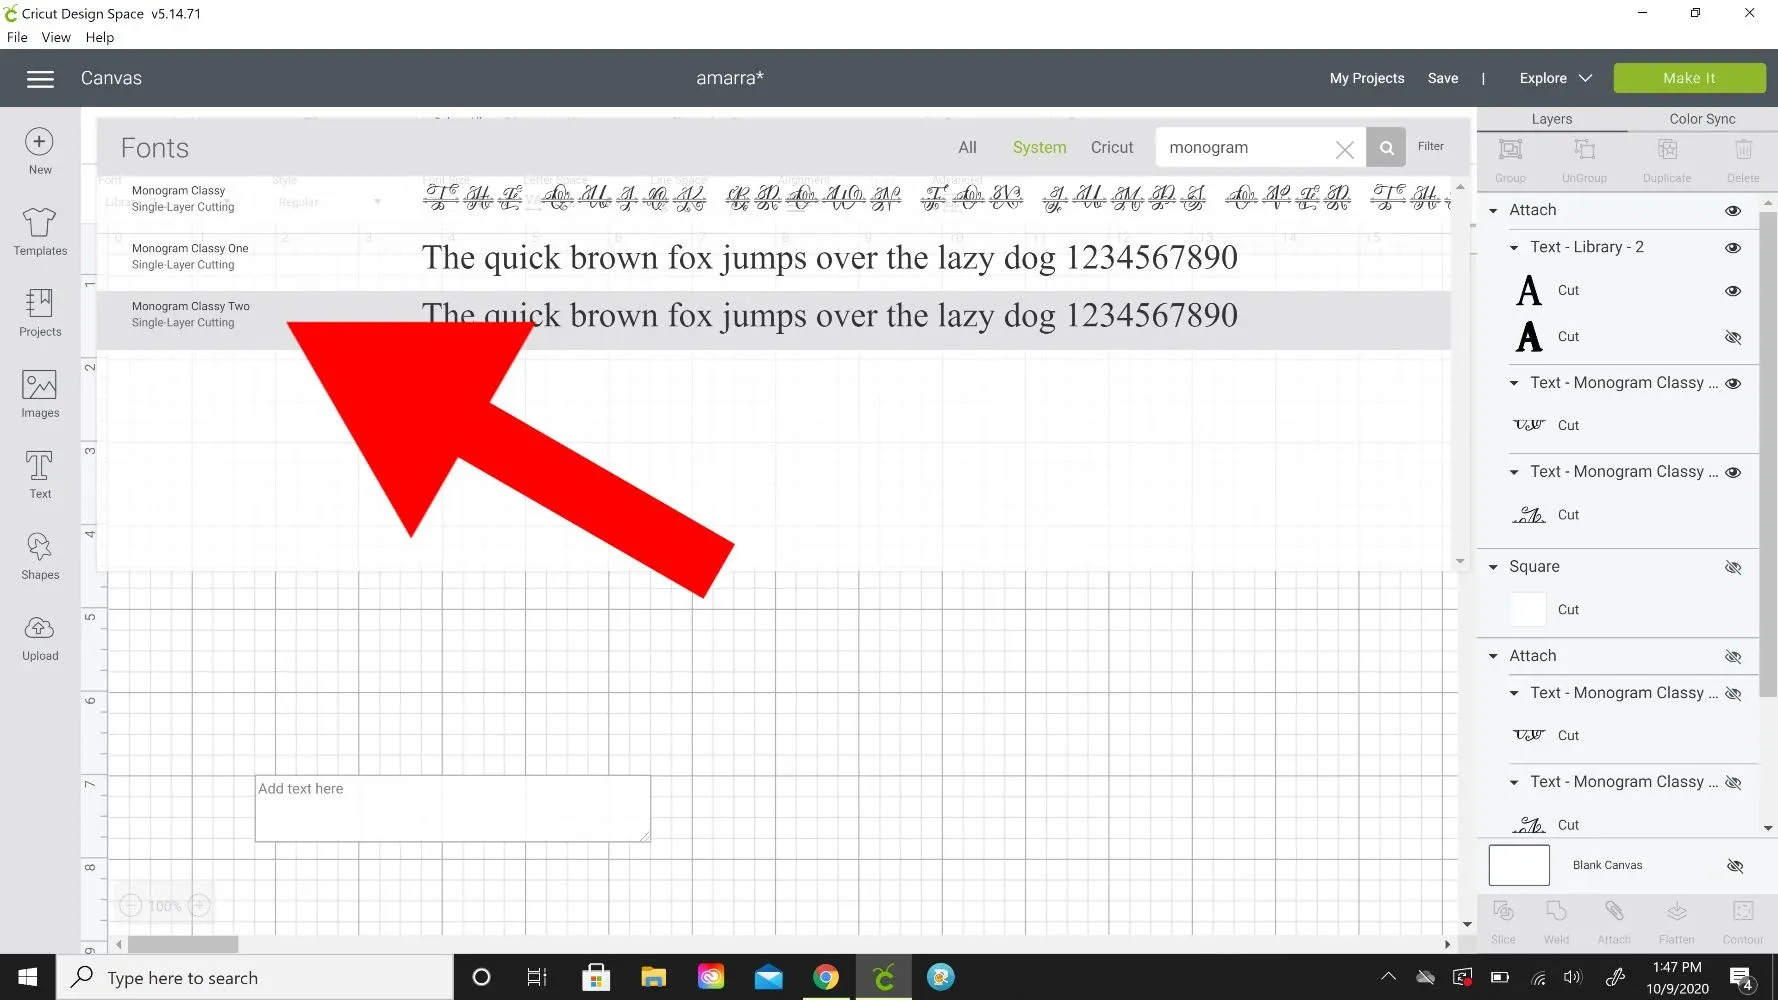
- With your chosen split letter monogram downloaded, open up Cricut Design Space and click on the “Text” button. In the text search box, type in “Monogram Classy.” This particular collection boasts three distinct fonts, but I decided to go with “Type Two” for its separate top and bottom letter elements.
 diy shadow box with paper flowers cricut
Caption: Choosing the perfect font for your split letter monogram.
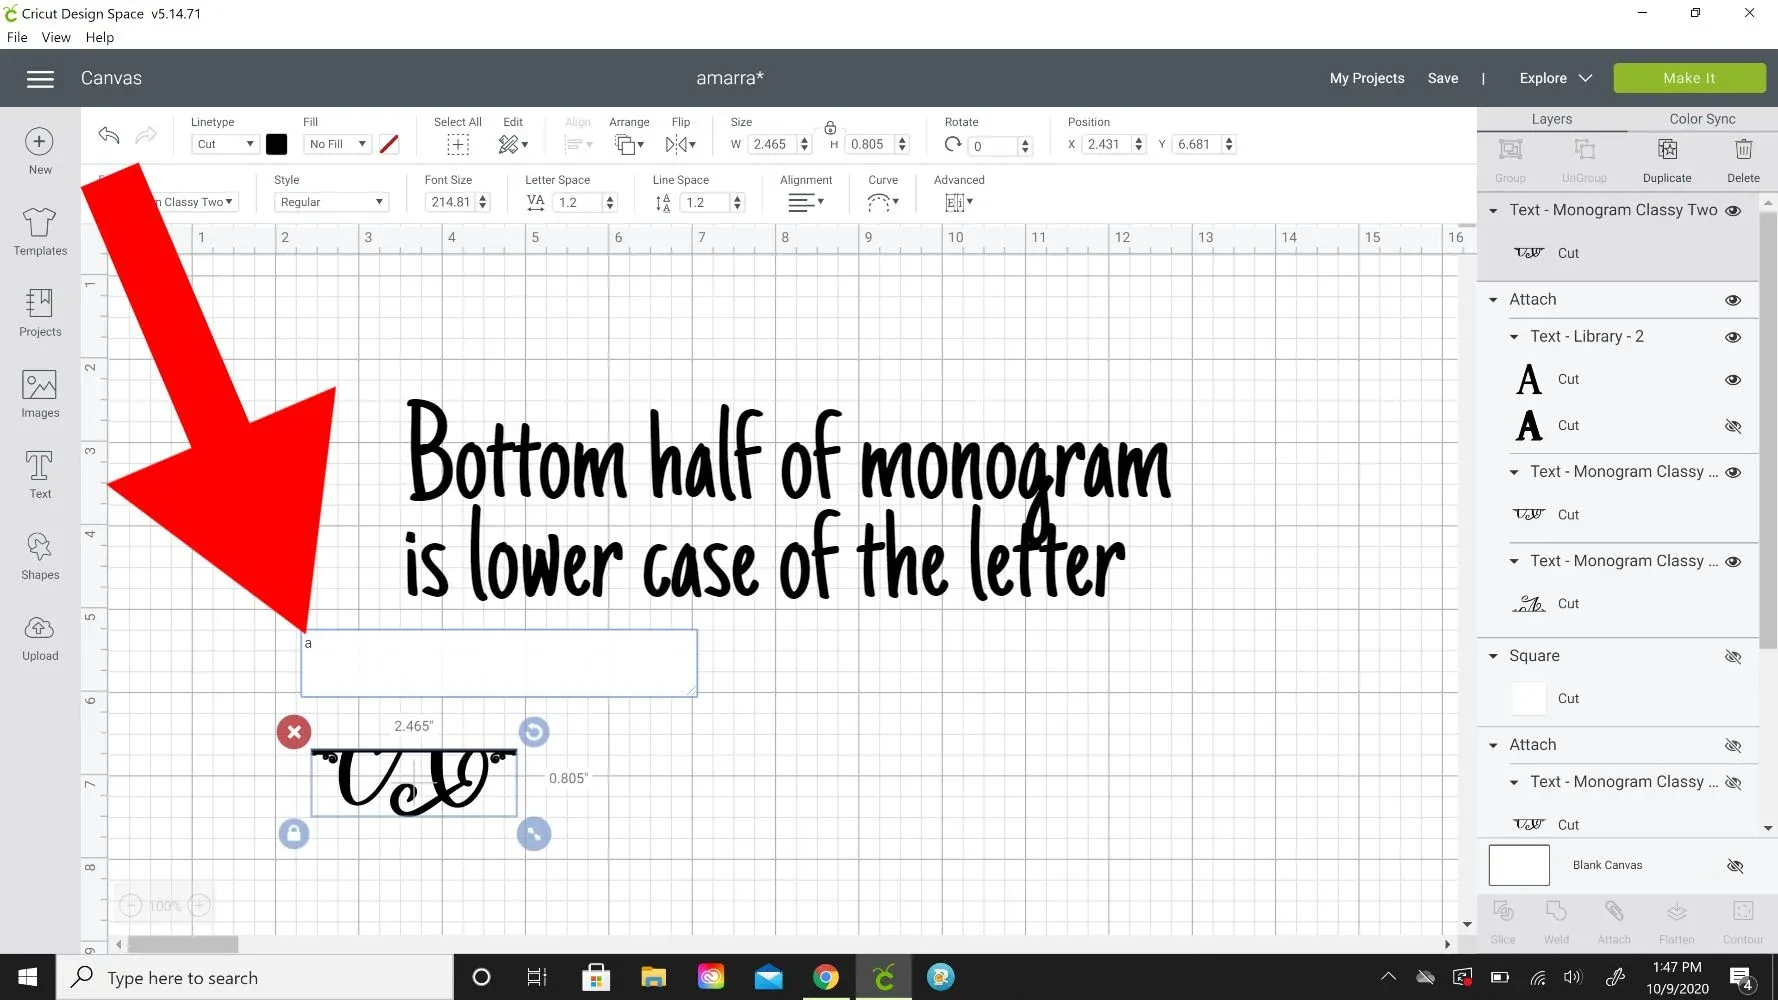
- To add the bottom half of the letter, type a lowercase “a” in the text box. For the top half, insert a new text box and type in a capital “A.” Adjust the width of both letters to match, and then reposition them to create a visually pleasing gap between them.
 monogram classy
Caption: Creating your split letter monogram step-by-step.
- Now comes the fun (and sometimes challenging) part—selecting the perfect font for the baby’s name! After much deliberation, I settled on the elegant “Library 2” font, available through Cricut Access.
 bottom half monogram
Caption: Exploring different font options for the baby’s name.
- Type in the name and adjust its size so that it fits harmoniously between the top and bottom elements of your monogram. Select all the elements and choose “Align Center Horizontally” to ensure everything is perfectly centered.
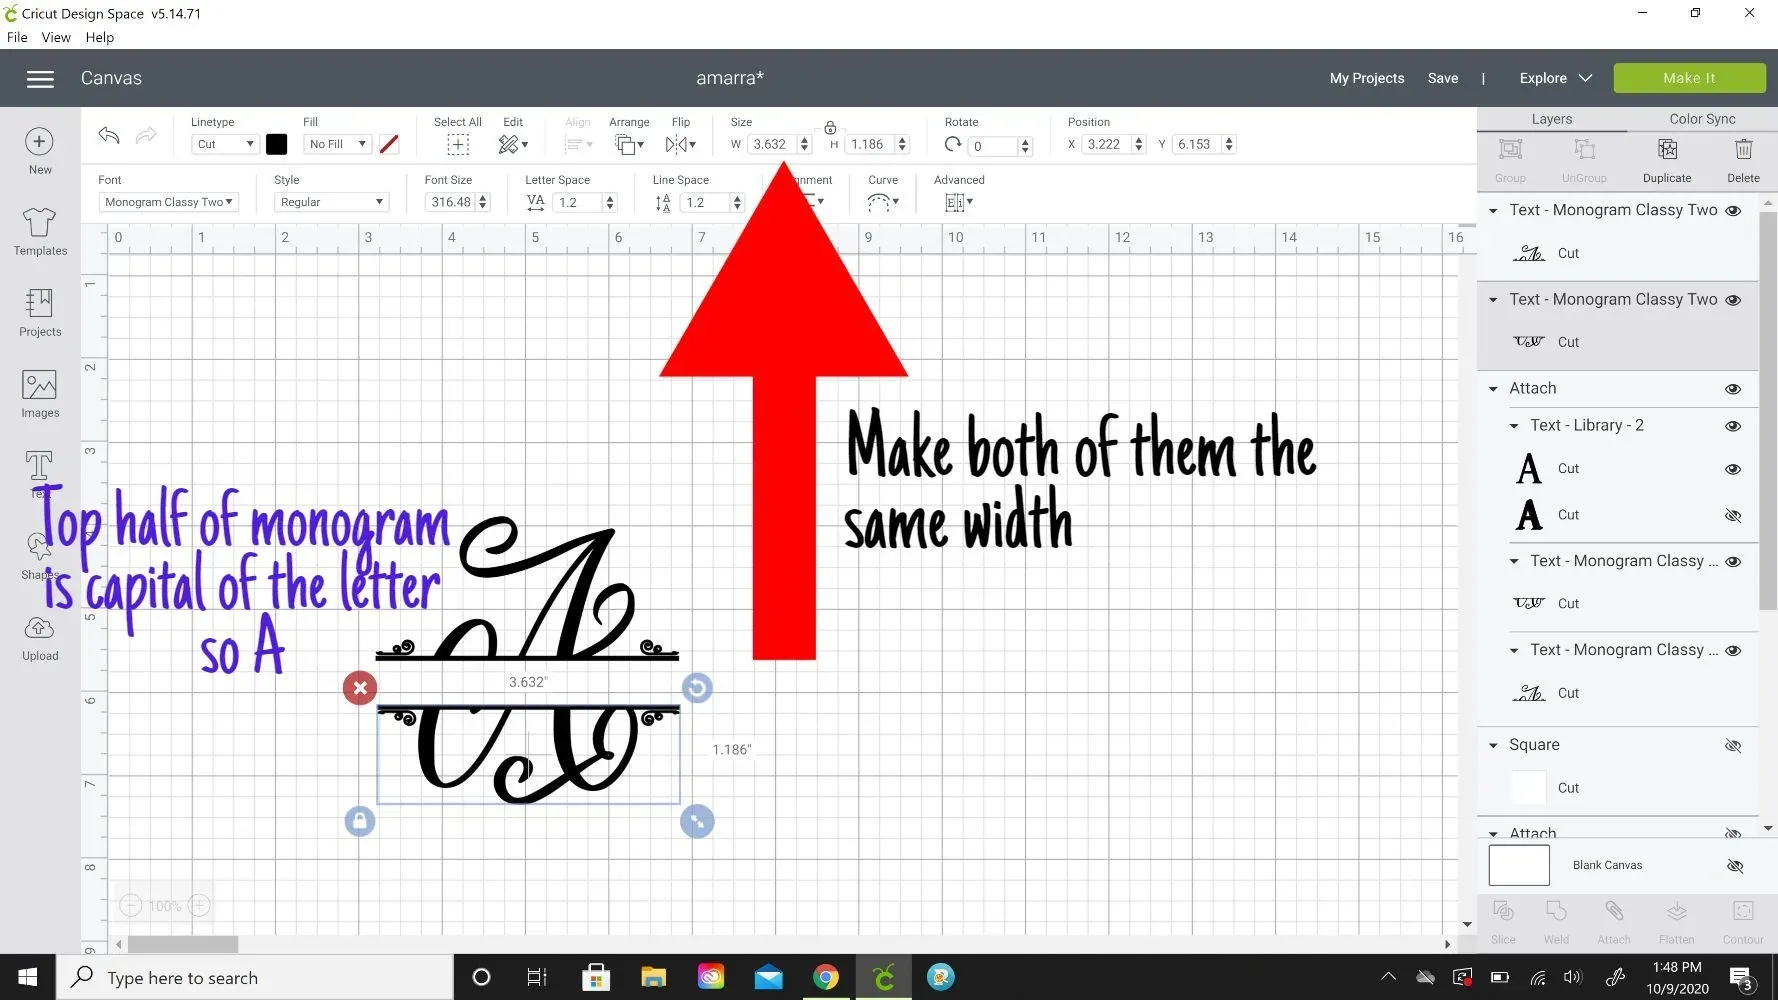 split monogram design space
Caption: Aligning your design elements for a polished and professional look.
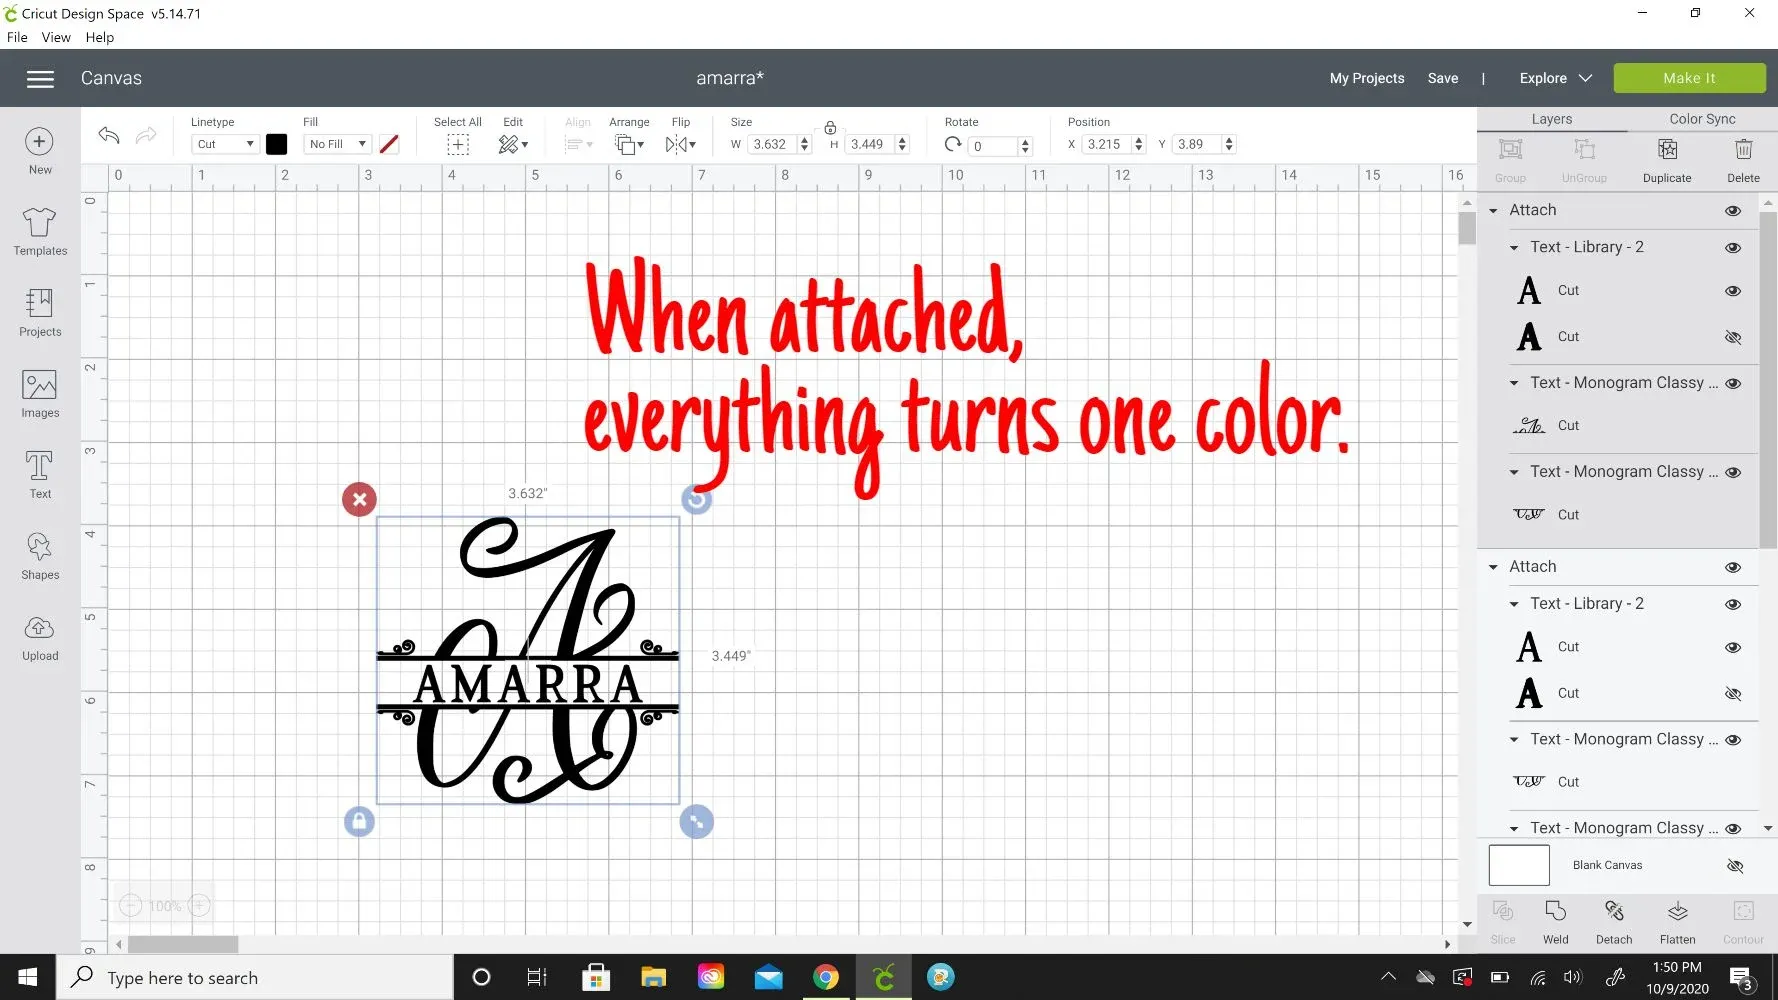
- Since we’ll be cutting the entire design from a single color of vinyl, go ahead and click “Attach” to merge all the elements.
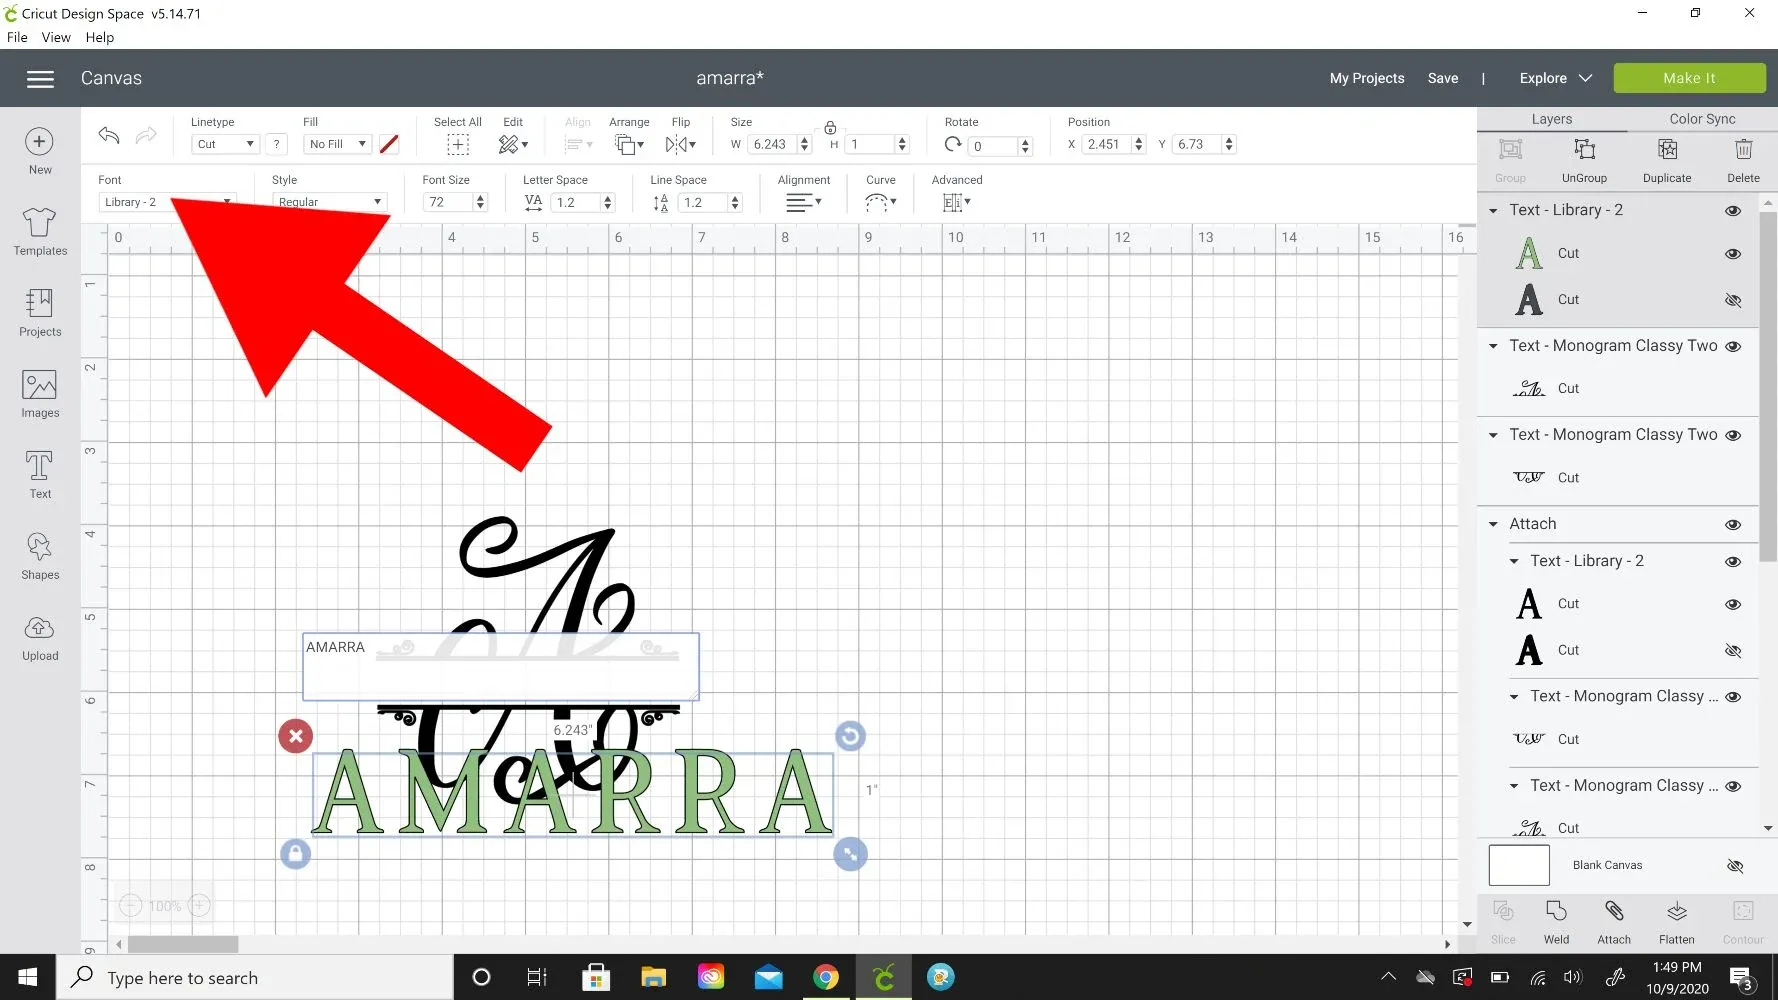 library font cricut
Caption: Grouping your design elements for a seamless cutting experience.
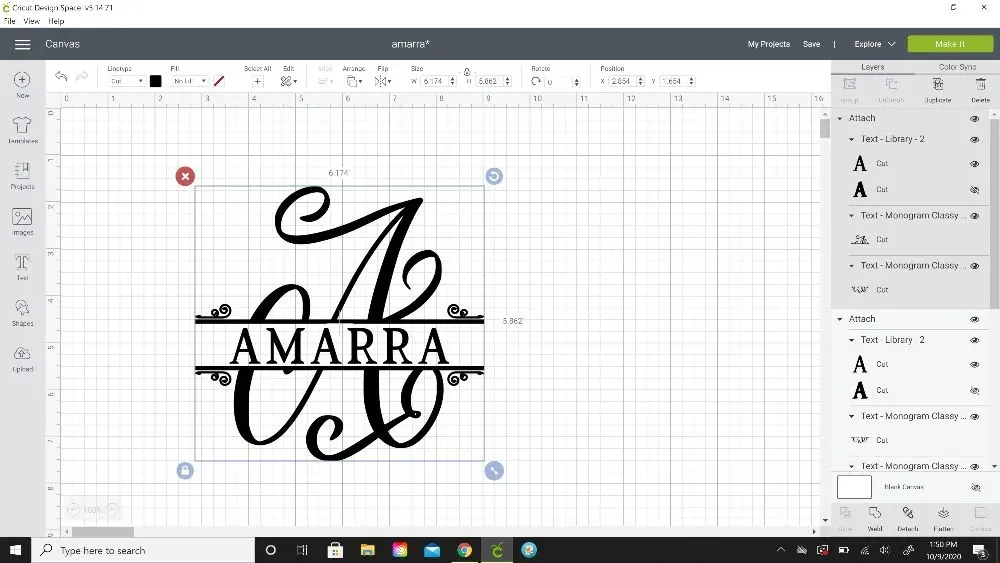
- Adjust the size of your merged design to be slightly larger than 6 inches wide.
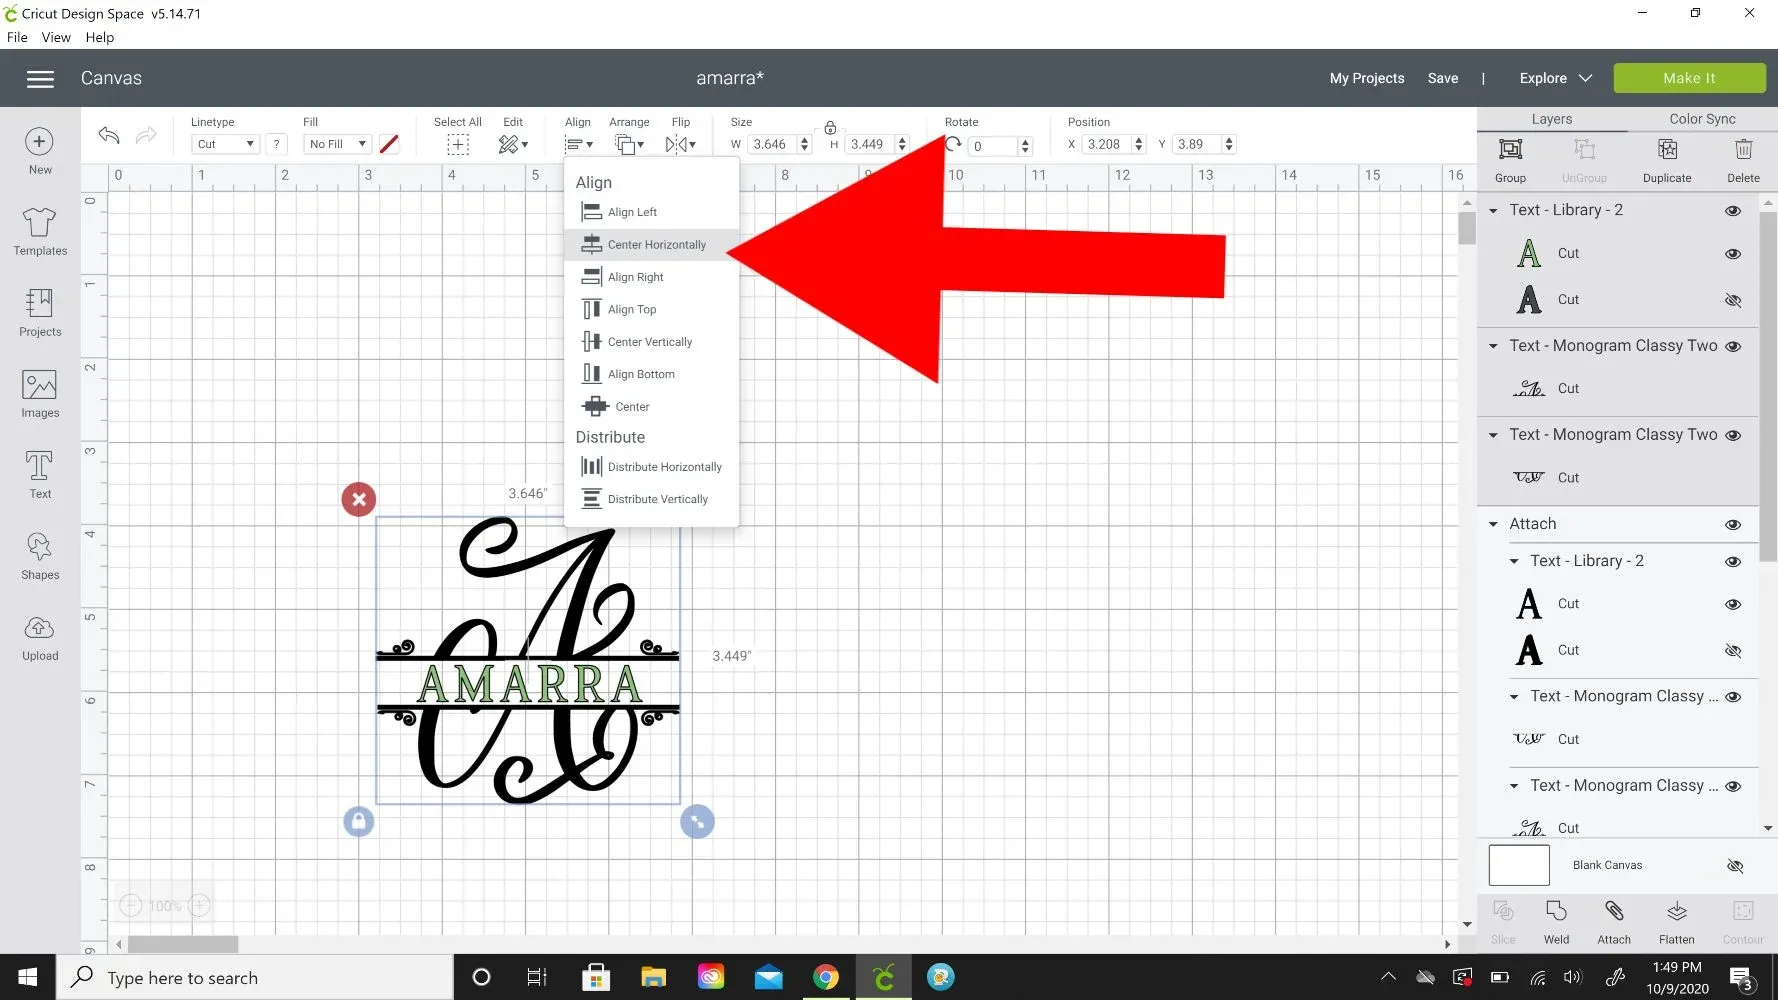 center monogram name
Caption: Adjusting the size of your monogram to fit the shadow box perfectly.
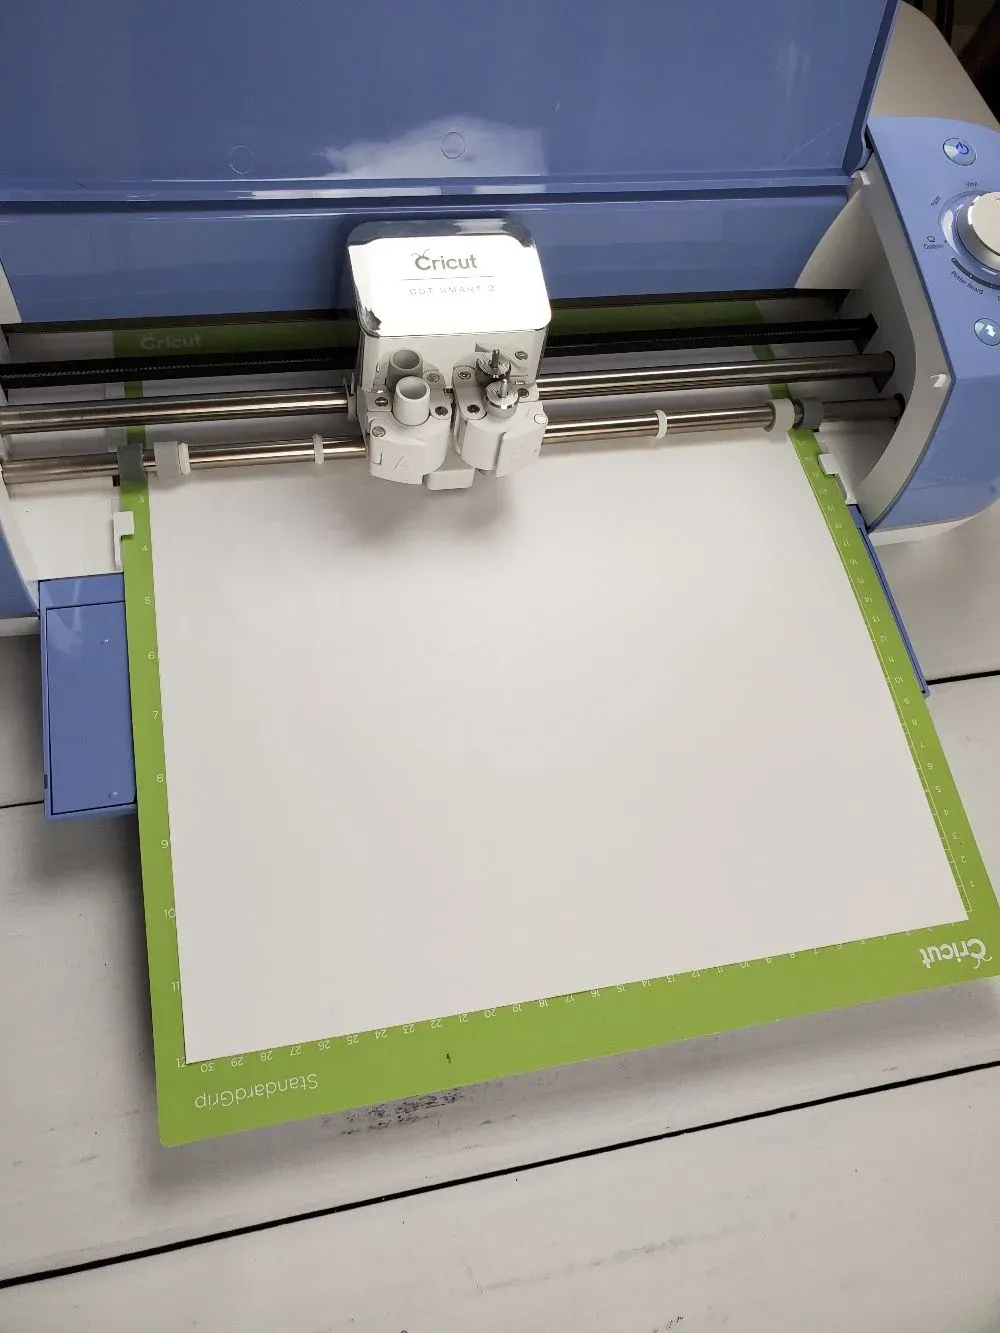
- Select the “Vinyl” setting on your Cricut and let it work its magic, cutting out your personalized design.
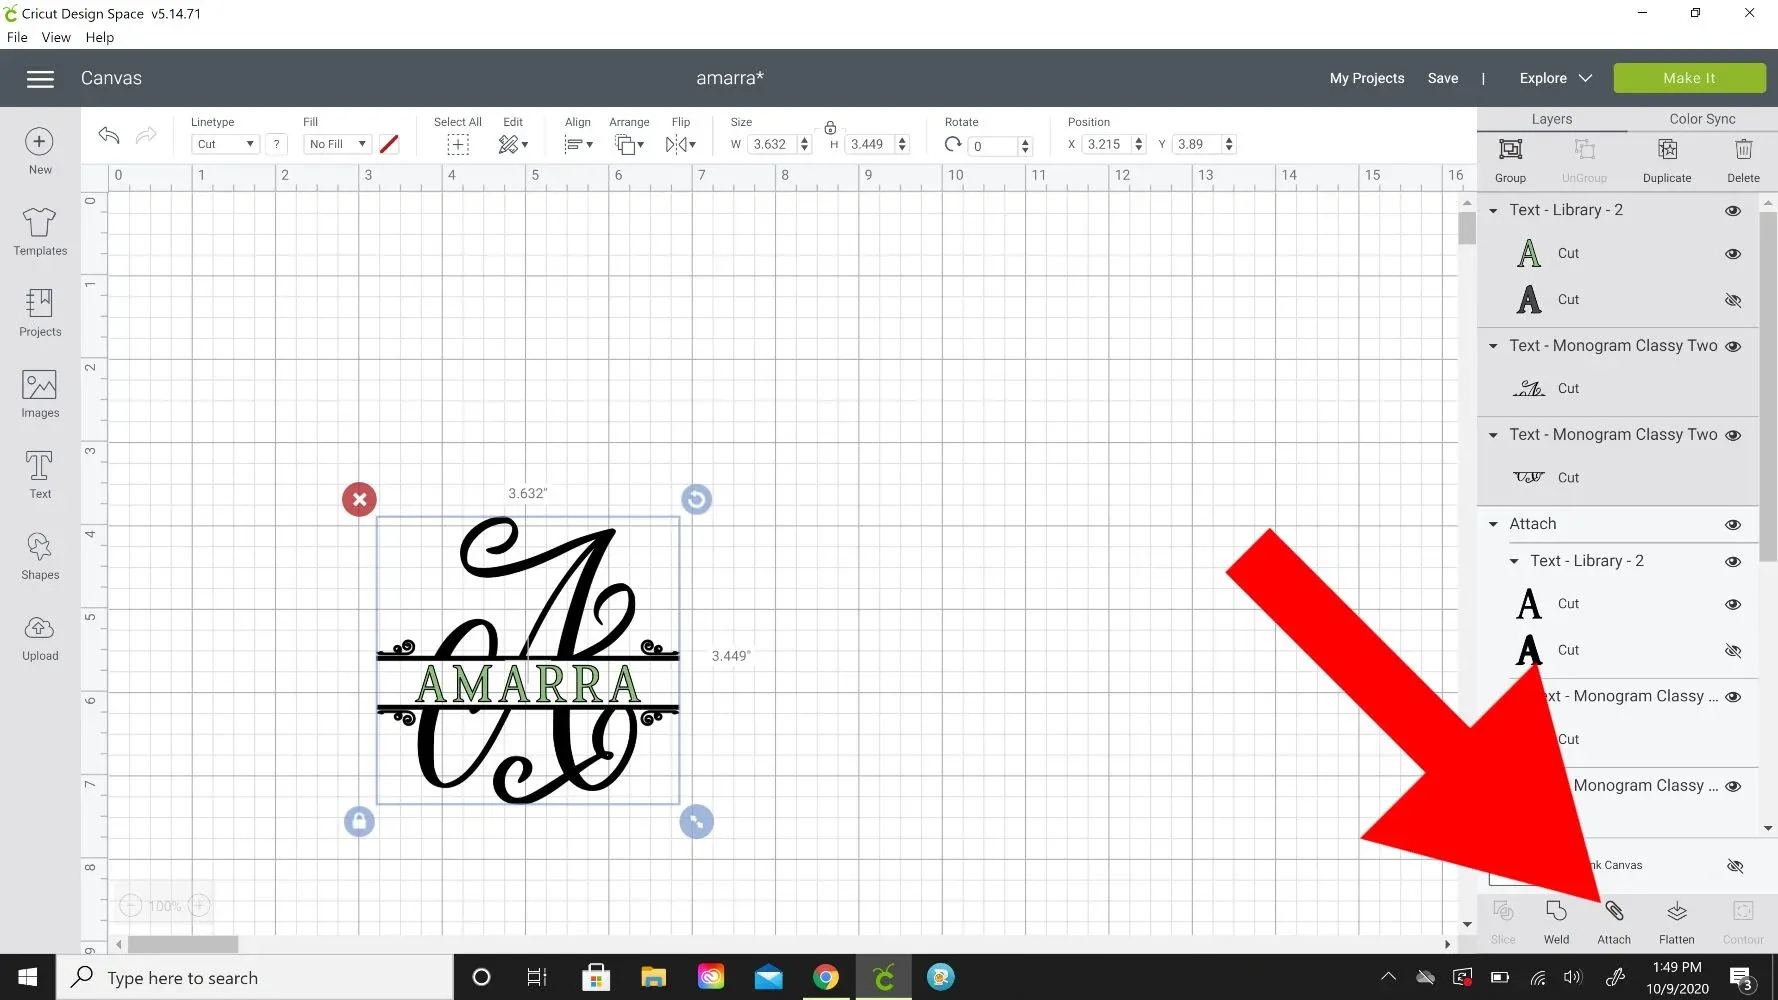 attach cds
Caption: Sending your design to your Cricut for cutting.
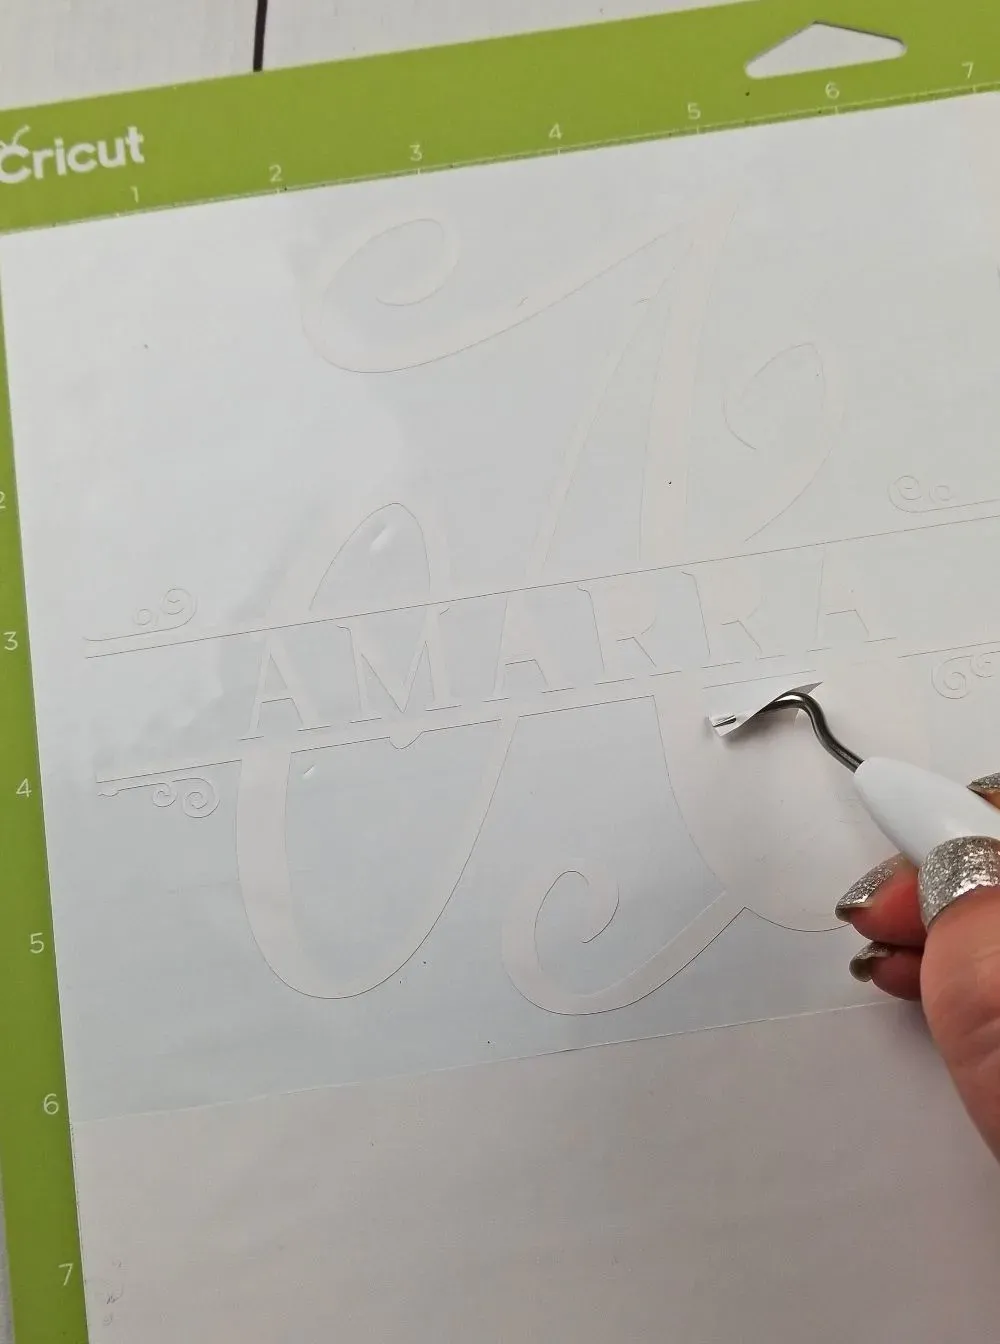
- Once your Cricut has finished, carefully weed away the excess vinyl.
 attaching monogram cricut
Caption: Weeding your vinyl design with precision.
Applying Vinyl to Your Shadow Box
You have two options for applying your vinyl design: you can either remove the glass from the shadow box before application or apply it after the rose backing is in place. I chose to remove the glass since my roses were still drying, but be extra cautious if you opt for this method!
-
Clean the glass thoroughly to remove any dust or smudges.
-
Apply transfer tape to your vinyl design, burnish it well, and trim any excess.
-
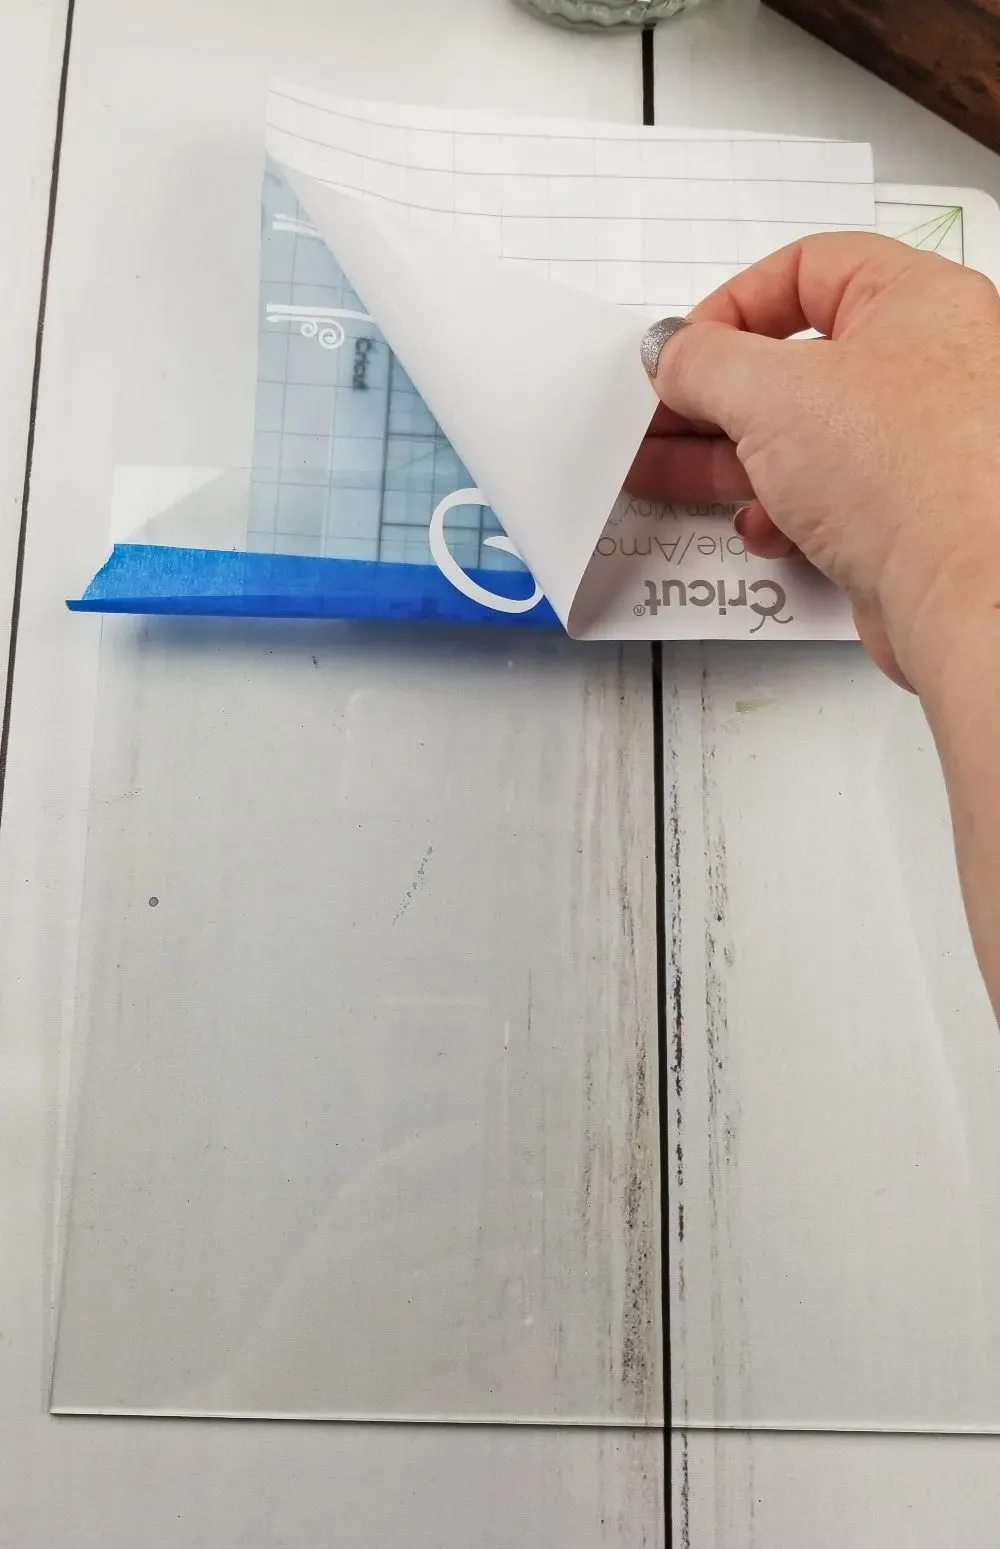
Center the design on the glass, enlisting the help of a ruler for perfect placement. Secure the top edge of the transfer tape to the glass using blue painter’s tape (this technique is often referred to as the “hinge method”).
 monogram name for shadow box
Caption: Using the hinge method for flawless vinyl application.
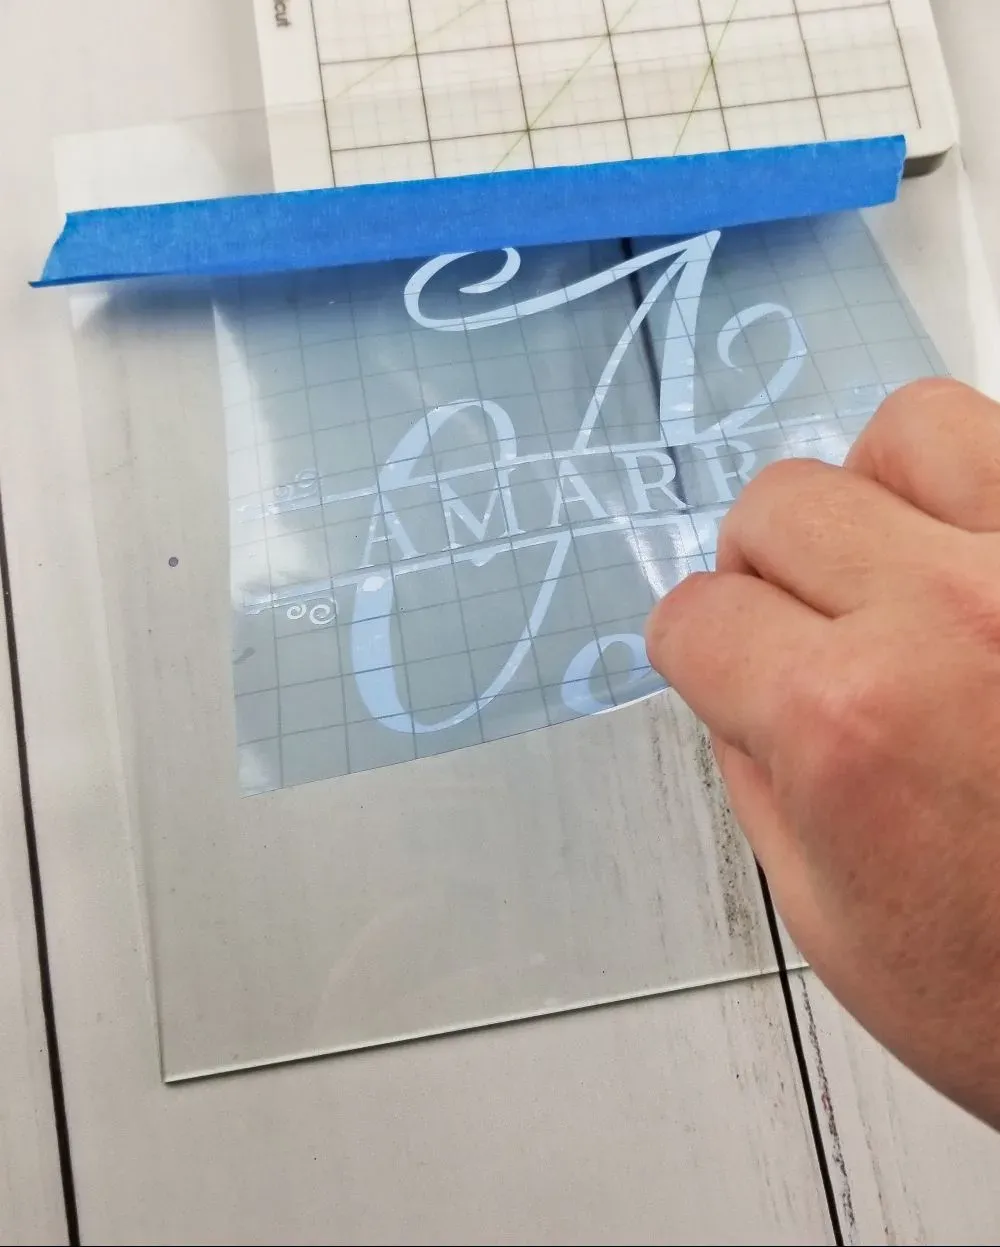
- Carefully flip the paper over, peel away the backing, and gently lay the vinyl onto the glass.
 cutting monogram vinyl
Caption: Applying your vinyl design to the glass with care.
- Smooth out any air bubbles or wrinkles using a scraper, ensuring the vinyl adheres firmly to the glass.
 weeding monogram
Caption: Burnishing your vinyl design for a smooth and bubble-free finish.
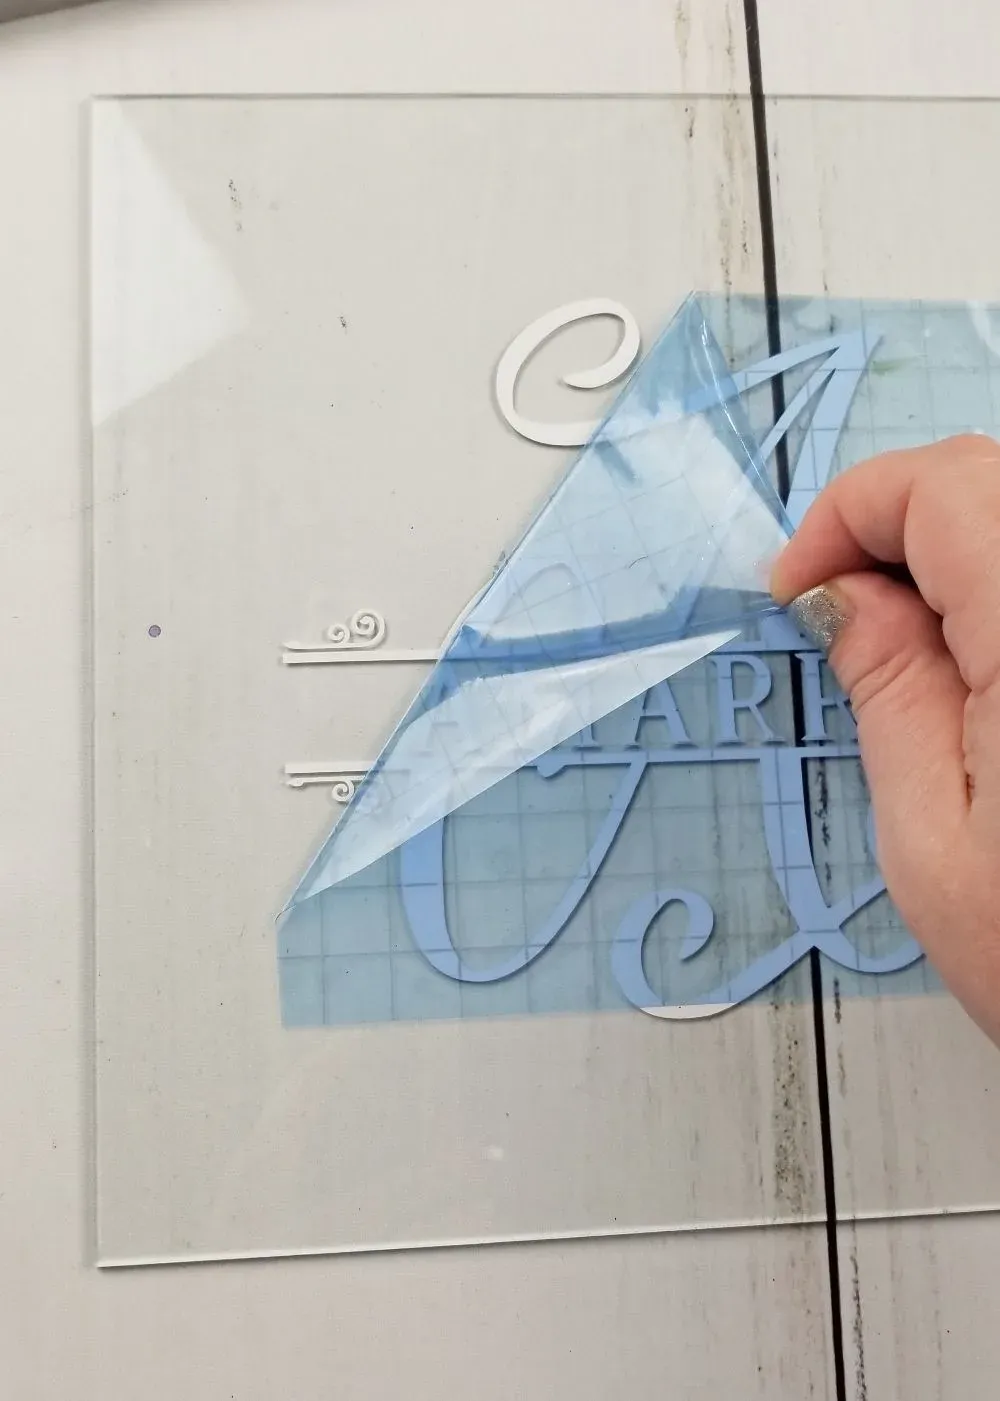
- Once the vinyl is securely in place, gently peel away the transfer tape.
 applying vinyl to shadow box
Caption: Removing the transfer tape to reveal your perfectly applied design.
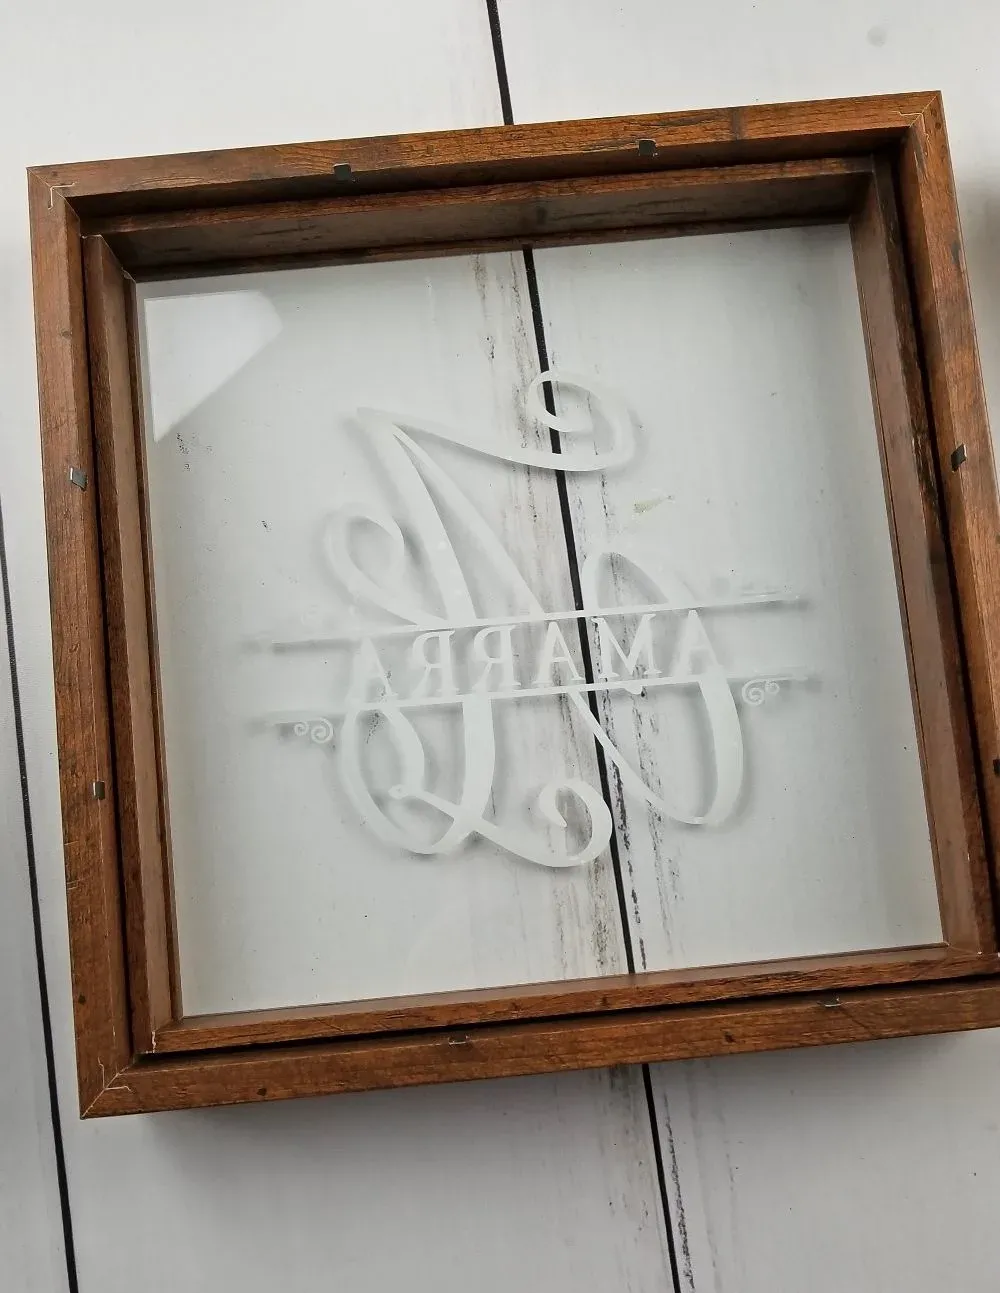
- Place the glass, vinyl side down, into the shadow box frame.
 name on shadow box
Caption: Positioning your personalized glass panel within the shadow box frame.
Putting It All Together
-
Now, let’s reunite the inner board adorned with your stunning paper roses with the shadow box frame. I find it easiest to keep the wooden rim around the roses and flip them both over together.
-
Secure the back of the shadow box by pushing down the tabs or following your specific shadow box’s closing mechanism.
 vinyl name on shadow box application
Caption: Securing the back of your shadow box for a polished and finished look.
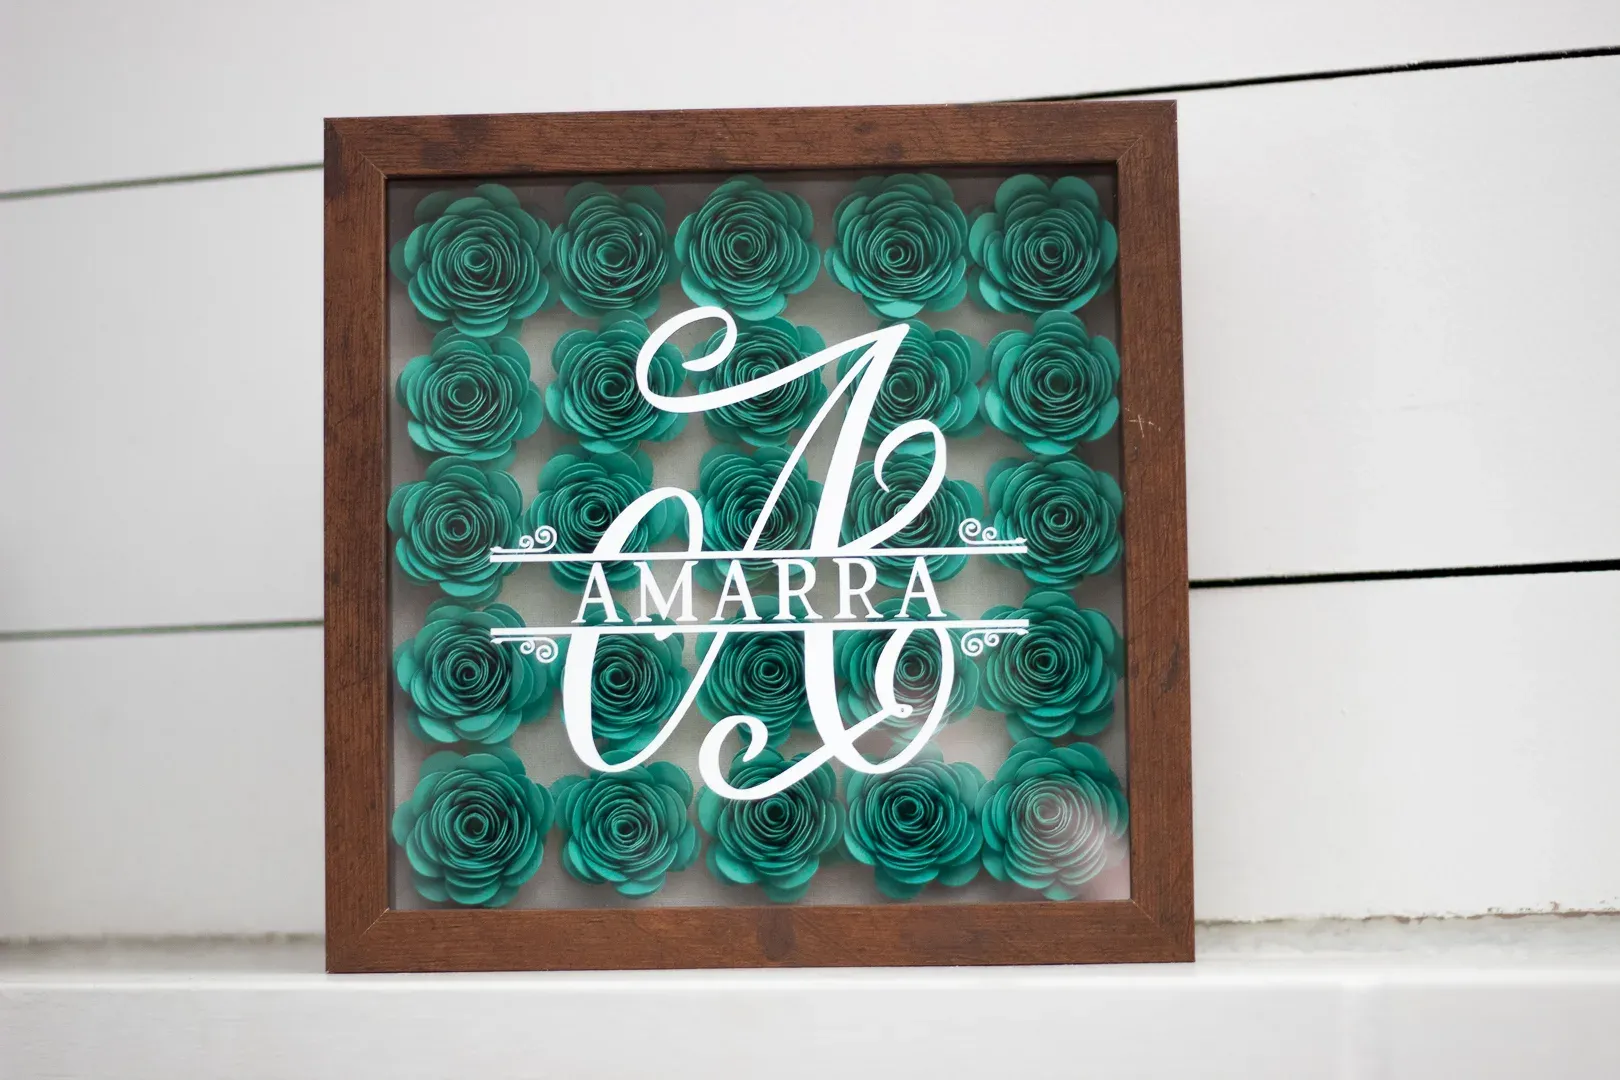
And there you have it—your very own masterpiece! This custom flower shadow box is a testament to your creativity and a gift that’s sure to be cherished for years to come.
 monogram name on diy shadow box
Caption: Admiring your stunning handmade creation.
Explore the World of Robert Kline Art
Thank you for joining me on this creative adventure! If you’re feeling inspired to explore more DIY projects and unleash your inner artist, be sure to visit the Robert Kline Art website. We’ve got a treasure trove of ideas, tutorials, and inspiration waiting for you!
Don’t forget to share your crafting triumphs with me – tag your creations on social media with #RobertKlineArt! Happy crafting!
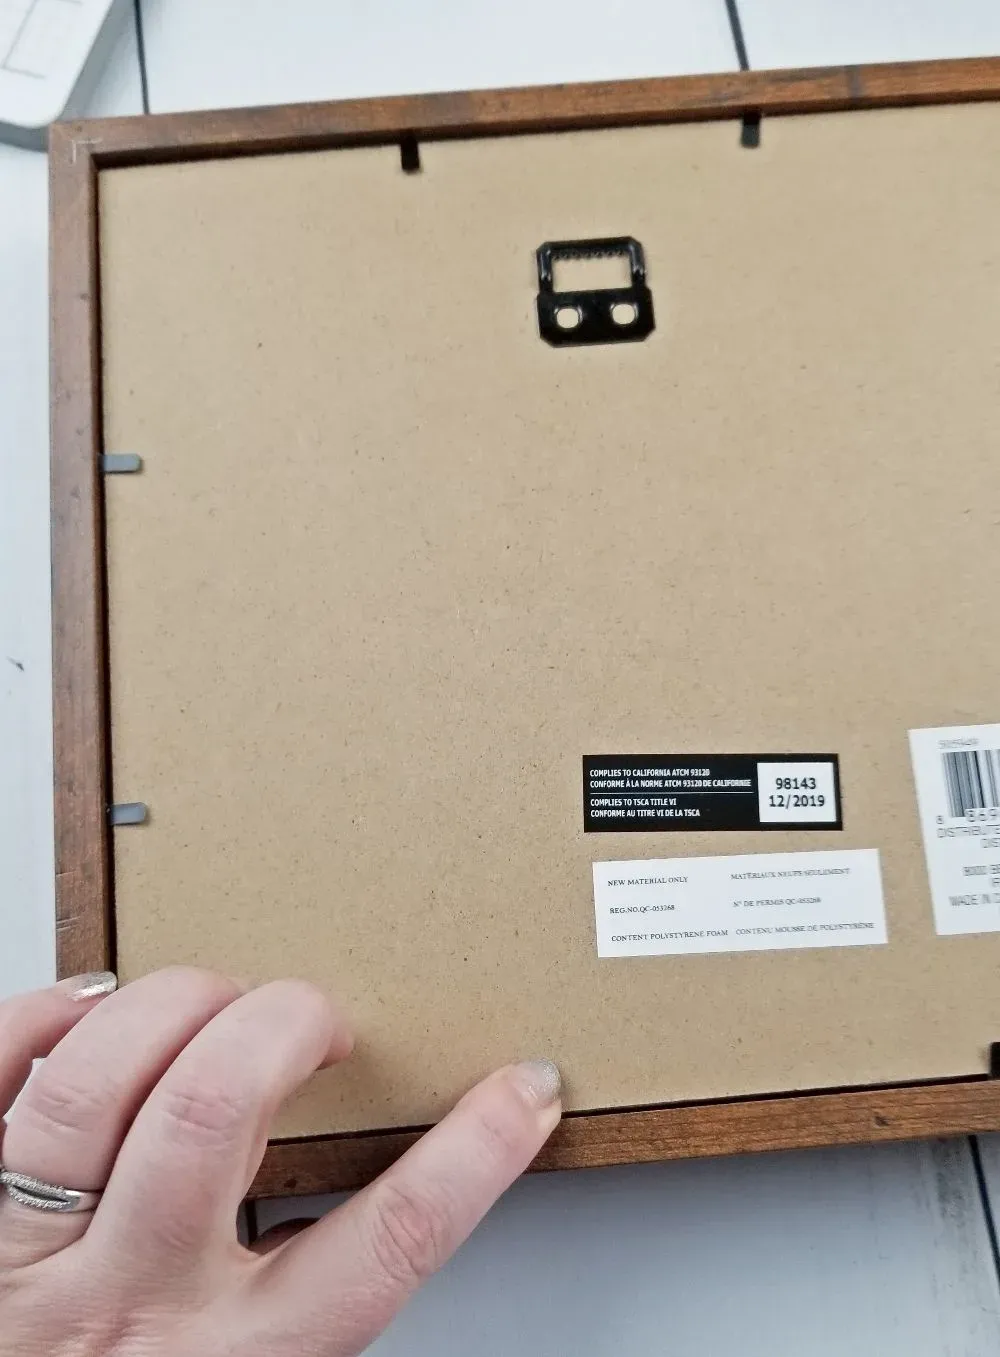 closing shadow box
Caption: Your personalized flower shadow box is now ready to be gifted or displayed with pride!
More Shadow Box Inspiration
Looking for more shadow box inspiration? Check out these amazing ideas:
 flower shadow box idea
Caption: A shadow box filled with delicate paper flowers in a rainbow of hues.
 flower shadow box idea
Caption: A whimsical shadow box showcasing paper succulents and cacti for a touch of desert charm.
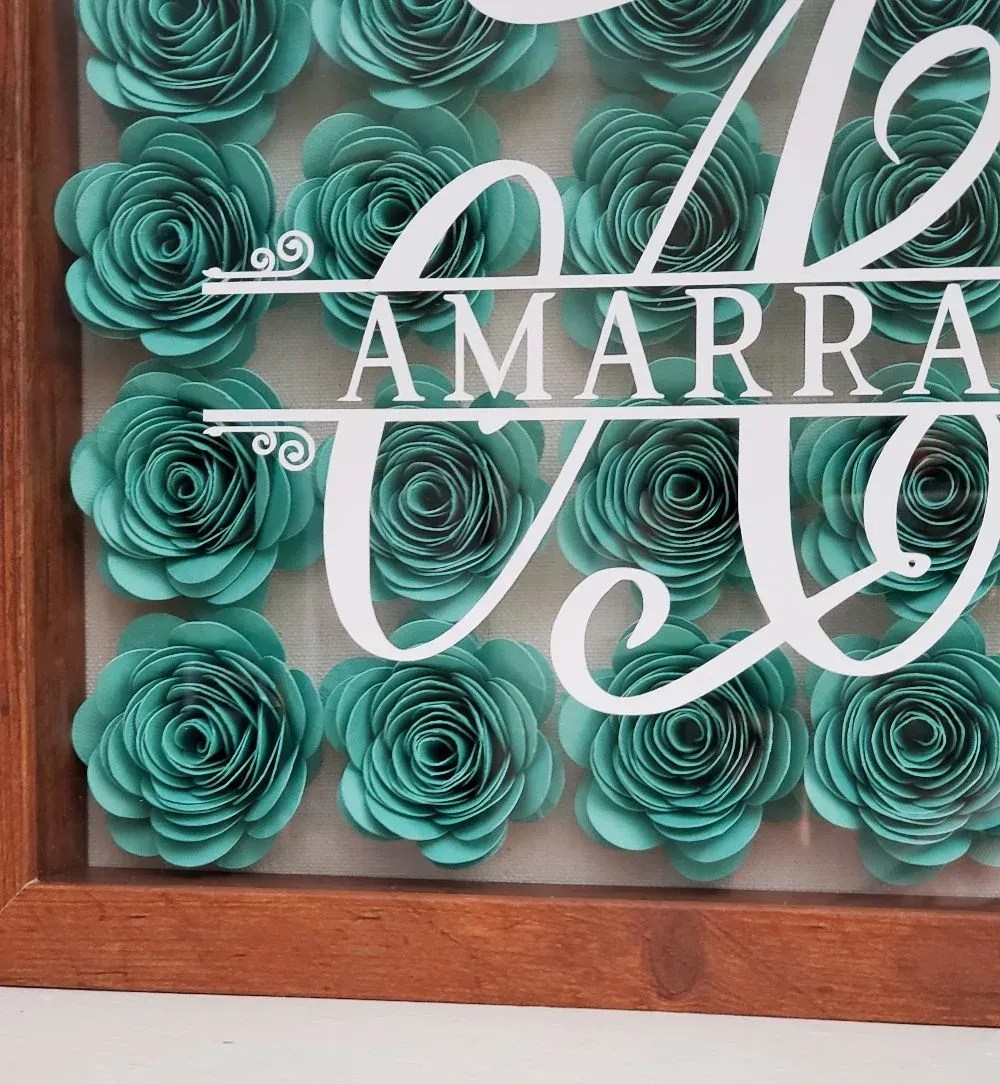 diy paper flower shadow box
Caption: A personalized shadow box featuring a family name amidst a cascade of paper flowers.
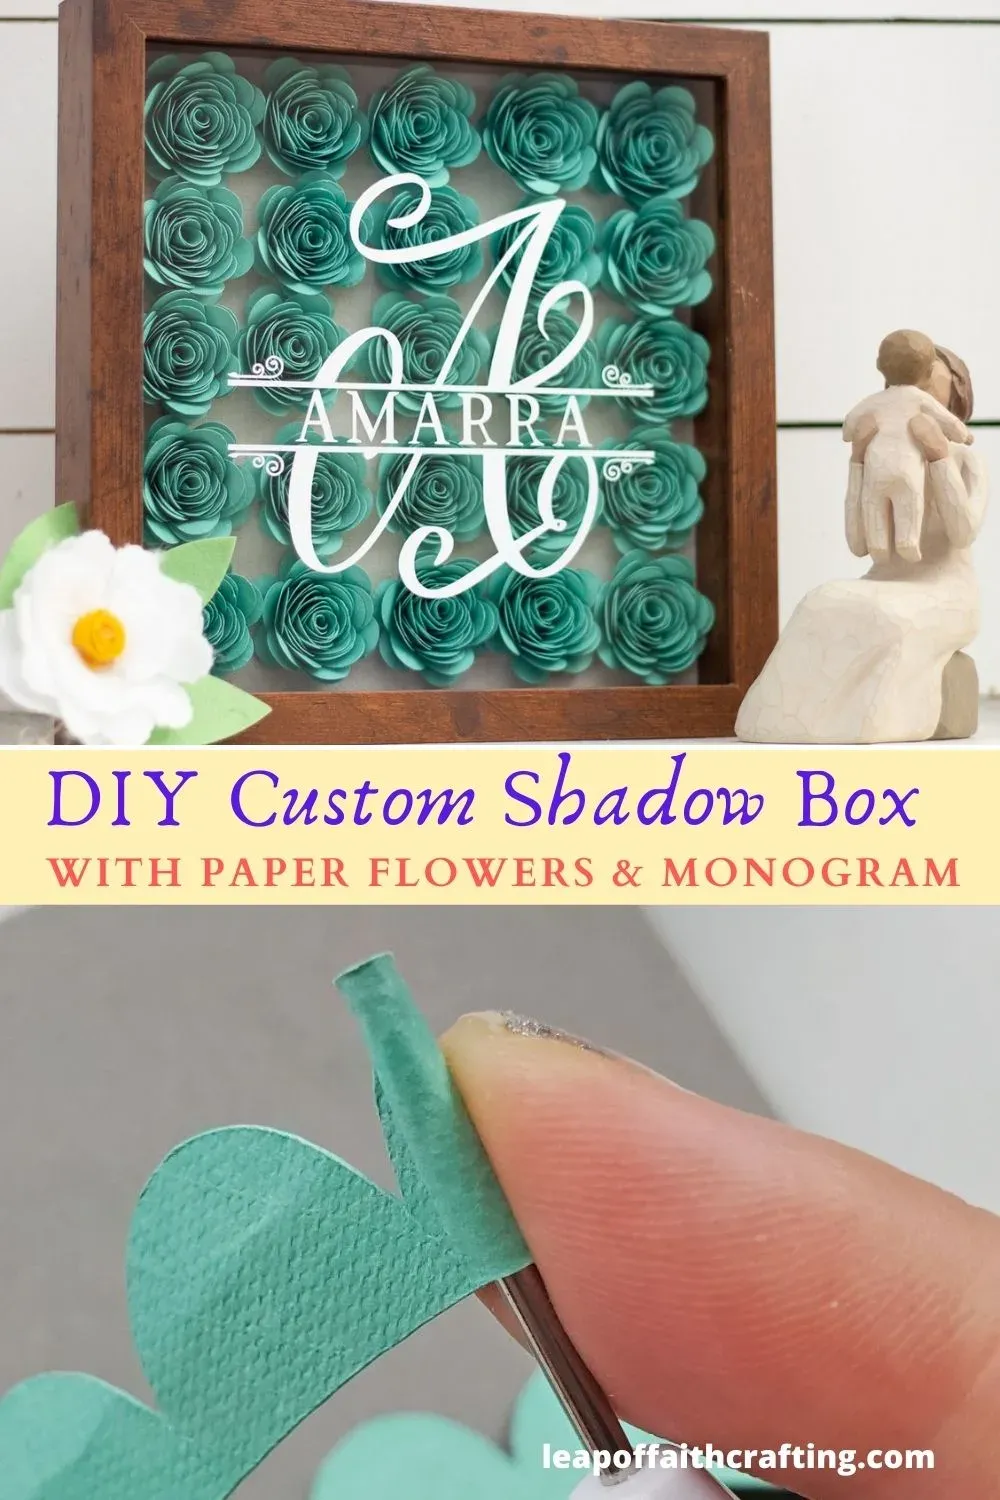 cricut shadow box baby
Caption: A precious keepsake shadow box for a newborn, adorned with delicate paper flowers and personalized details.
