Blog
How to Craft a Stunning Paper Flower Shadow Box with Your Cricut

Hey there, fellow craft enthusiasts! Robert Kline here, and I’m thrilled to share a project that’s been a long-time favorite of mine – a stunning paper flower shadow box that’s as fun to make as it is beautiful to behold. This is the perfect DIY gift idea for practically any occasion, from baby showers and weddings to birthdays and anniversaries. And the best part? You can fully customize it with a personalized touch!
Completed Flower Shadow Box
A DIY Paper Flower Shadow Box makes a beautiful personalized gift
Gathering Your Materials
Before we dive into crafting, let’s gather our supplies. You’ll need:
- A Shadow Box: Check your local craft stores for deals or use a coupon! Here’s a similar one I like on [Amazon](link to an Amazon shadowbox)
- Cardstock: I recommend using Cricut 12×12 in a color that complements your design.
- Quilling Tool or Tweezers: These will help shape the delicate petals of our paper roses.
- Adhesive Vinyl: For that personalized touch, we’ll be adding a monogram or design.
- Transfer Tape: To seamlessly apply the vinyl onto our shadow box.
- Tacky Glue or a Hot Glue Gun: To secure our beautiful paper roses in place.
- Cricut Explore Air or Cricut Maker: Our trusty companions for precision cutting! Check both Cricut.com and [Amazon](link to Cricut on Amazon) to snag the best deals.
 Shadow box supplies from Michaels
Having all your materials ready keeps the creative process flowing smoothly
Crafting the Paper Roses
Now, for the heart of our project – creating the 3D paper roses! This part does require a bit of patience but trust me, the results are well worth the effort.
- Designing in Cricut Design Space:
- Open Cricut Design Space and search for “3D flowers” in the Image library. To use the same template I did, simply type “#M3D7E1” in the search bar (don’t forget the “#”).
- Resize the image to 6 inches wide. This size works best for a 9×9 inch shadow box. For reference, each rose will be about 1.6-1.75 inches wide once rolled.
- I like to maximize my materials, so I arranged four roses on a 12×24 mat setting in Cricut Design Space. This way, I can cut multiple roses from a single sheet of cardstock.
 Adjusting a rose design in Cricut Design Space
Cricut Design Space makes it easy to create the perfect size roses for your project.
-
Cutting the Roses:
- Load your cardstock onto a standard Cricut mat and set your machine to “Cardstock.” Send the design to your Cricut and watch those beautiful roses come to life!
 Sizing your roses to fit inside your shadow box
Test out different rose sizes before committing to cutting multiples! -
Rolling the Roses:
- Now, for the therapeutic part! Use a quilling tool or your fingers to gently roll each petal inward, starting from the outer edge.
- If you’d like the petals to have a more splayed-out look, use a ball tool to gently curl the edges backward before rolling.
- Secure the base of each rose with a dab of tacky glue or hot glue and set them aside to dry. For a detailed visual guide, check out the full YouTube video linked at the end of this post.
 Placing cardstock on a Cricut cutting mat
A Cricut cutting mat helps to keep your cardstock in place while cutting. Four paper roses in Cricut Design Space ready to cut
- Arranging multiple roses on your Cricut mat saves time and material.*
 Four paper roses cut and ready to roll
Once your Cricut has finished cutting your roses it’s time to start assembling!
Assembling Your Flower Shadow Box
With our beautiful paper roses ready, it’s time to bring our shadow box to life.
-
Preparing the Shadow Box Base:
- Disassemble your shadow box and remove the backing board. I find it helpful to keep the wooden frame nearby as a guide for placement.
- Lay out your paper roses on the board to get a sense of spacing and arrangement. Aim for five rows of five flowers to create a lush and full look.
-
Adhering the Roses:
- Find the exact center of the board and mark it lightly with a pencil. This is where your center rose will be placed.
- Begin gluing the roses down, starting from the center and working outwards. Be sure to apply even pressure to ensure they adhere securely.
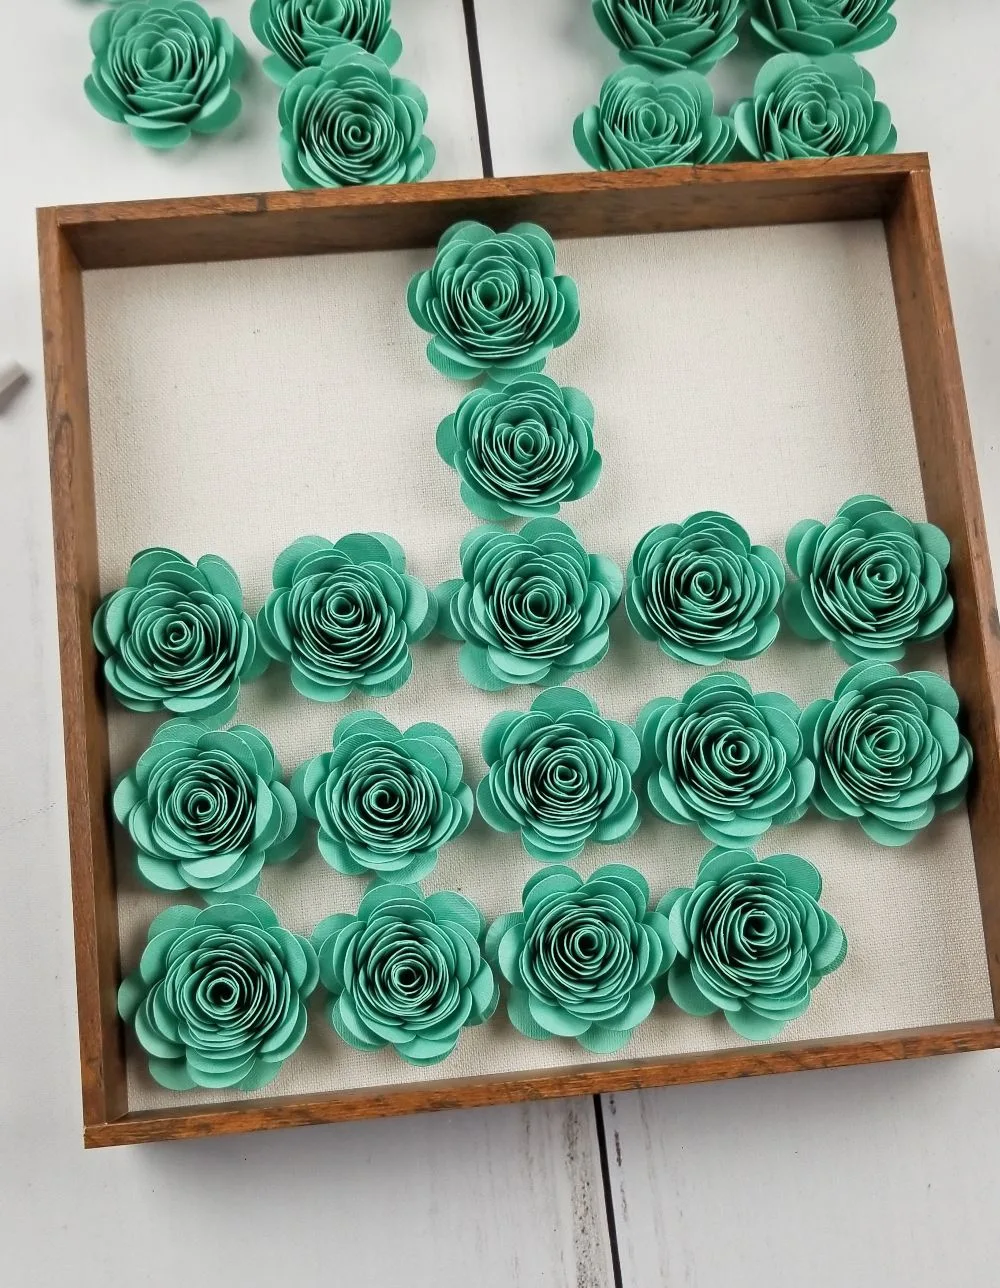
 A shadow box with paper flowers glued in place
Gluing down your roses is a very satisfying part of this DIY craft! DIY shadow box with paper roses
Take your time to get the placement of your roses just right
Creating a Personalized Monogram
Now, for that extra special touch – a personalized monogram!
-
Designing in Cricut Design Space:
- You can get creative and design your own phrase, use a favorite quote, or create a classic monogram. I opted for a split-letter monogram with a name nestled in between.
- I found a fantastic deal on CreativeFabrica for split letter monograms, but you can also find a wide variety of free SVG files right here on Robert Kline Art! And don’t forget to subscribe to our community for access to our exclusive FREEBIE section, packed with even more crafting goodies.
 Removing the paper rose template from a Cricut mat
Once your design is cut, carefully remove it from your Cricut cutting mat. Close up of a paper rose with the Cricut mat in the background
Removing excess cardstock from your Cricut mat helps to keep it clean. -
Cutting and Weeding:
- Size your design to fit your shadow box – I went with just over 6 inches wide.
- Set your Cricut to “Vinyl” and load your adhesive vinyl. Let the machine work its magic!
- Once the design is cut, carefully weed away the excess vinyl, leaving only your beautiful monogram.
-
Applying the Vinyl:
- Clean the glass of your shadow box thoroughly. You can apply the vinyl either before or after reassembling the shadow box. I chose to apply it beforehand.
- Apply transfer tape to your vinyl, burnish it well, and trim away any excess.
- Center the design on the glass, using a ruler for precision. Use the hinge method – taping down the top portion of the transfer tape with painter’s tape to ensure a straight application.
- Flip the glass over, carefully peel away the vinyl backing, and gently lay the vinyl onto the glass.
- Smooth it out using a scraper, making sure there are no air bubbles, and then carefully remove the transfer tape.
Putting It All Together
We’re in the home stretch!
-
Reassembling the Shadow Box:
-
Carefully place the glass with your adhered monogram face down into the shadow box frame.
-
Gently lower the rose-covered backing board into the frame, aligning it with the glass.
-
Secure the backing board using the tabs or clips on your shadow box frame.
 Completed paper roses
A small pile of handcrafted paper roses brings such a feeling of accomplishment. Rolling the edges of a paper rose
Rolling the edges of each paper rose creates a beautiful, lifelike effect. Paper flowers for a shadow box
You can never have too many beautiful paper roses for your crafting projects! Completed paper flower shadow box
Once you have enough roses for your shadowbox, the real fun begins!
-
And There You Have It!
You’ve created a stunning, personalized paper flower shadow box – a beautiful handmade treasure perfect for gifting or displaying in your own home.
Looking for More Crafting Inspiration?
If you loved this project, be sure to check out the full video tutorial on our website [link to your website]. We’ve got tons more DIY craft ideas and inspiration waiting for you!
And don’t forget to share your creations with us! We love to see what you make.
Happy Crafting!
Robert Kline
Robert Kline Art
 DIY shadow box with paper flowers
With each step, you’re getting closer to creating a one-of-a-kind piece of art!
 Gluing paper flowers inside a shadow box
Using a generous amount of glue will help secure your paper flowers in place.
 DIY Flower Shadow Box
And just like that, you’ve created something truly special!
*Creating a DIY Paper Flower Shadow Box is a fun and rewarding project for all skill levels!*