Blog
DIY 4th of July Paper Flower Headband: Celebrate in Style!

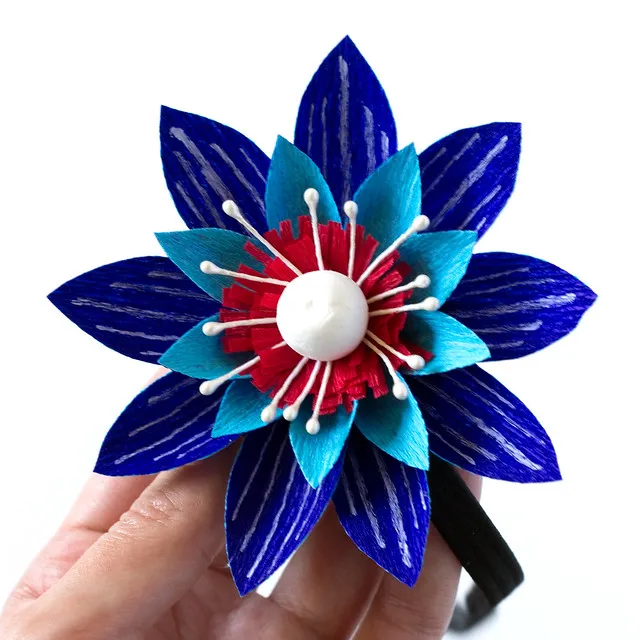
Hey there, fellow craft enthusiasts! As you know, I’m Robert Kline, and I’m all about creating beautiful things and sharing the joy of handmade crafts. With the 4th of July just around the corner, I’m feeling that patriotic spirit, and what better way to showcase it than with a festive and unique accessory? Today, we’re diving into a fun and easy DIY project: a stunning red, white, and blue paper flower headband! This headband is the perfect way to add a touch of handmade flair to your 4th of July outfit. Let’s get started!
Materials You’ll Need:
Before we begin, gather your crafting supplies. You’ll need:
- Scrap cardboard from a cereal box
- Double-sided crepe paper in deep indigo/bright blue
- Single-sided crepe paper in red
- Round flower center, about 1/2″
- Flower stamen/pips
- White chalk marker or gel pen
- Hot glue gun
- Solid washi tape
- Elastic headband
- Pencil
- Scissors
Let’s Create!
Step 1: Preparing the Headband Base
- Cut two circles, about 1 3/4″ in diameter, from the scrap cardboard.
- On one of the cardboard circles, cut a small hole on opposite sides of the circle’s edge.
- Thread your elastic headband through the two holes.
- Secure the cardboard to the headband by covering the cut edges with washi tape.
This cardboard base will allow the headband to comfortably stretch and move without disturbing the flower or pulling on your hair.
 DIY 4th of July Paper Flower Headband | click through for the tutorial!
Step 2: Crafting the Flower Components
- Large Petals: Cut 9 rectangular petals from the blue crepe paper, each measuring approximately 1 1/2″ x 3/4″.
- Small Petals: Cut 9 more rectangular petals, this time from the blue crepe paper, each measuring 1″ x 1/2″.
- Adding Stripes: Using your white chalk marker or gel pen, draw thin, evenly spaced white stripes on each of the larger blue petals.
- Shaping the Petals: Gently stretch the center of each petal to create a slightly concave shape. Gather the base of all 18 petals.
 DIY 4th of July Paper Flower Headband | click through for the tutorial!
- Red Rosette: Cut a strip of red crepe paper approximately 6″ wide and 3/4″ tall. Fringe the strip along the longer edge, creating delicate, closely spaced cuts. Starting from one end, tightly roll the fringed strip into a spiral shape, forming a charming rosette.
 DIY 4th of July Paper Flower Headband | click through for the tutorial!
Step 3: Assembling Your Patriotic Bloom
- Petal Placement: Using your hot glue gun, attach the large blue petals to the second cardboard circle (the one without the headband). Arrange the petals so their edges slightly touch, forming a full, circular shape.
- Layering Petals: Next, glue the smaller blue petals in between the larger petals, positioning them slightly closer to the center of the circle. This layering creates depth and dimension in your flower.
- Centerpiece: Attach the red rosette to the very center of the flower using hot glue.
- Finishing Touches: Add the flower stamen or pips to the center of the rosette for a touch of realism. Finally, secure the round flower center on top of the stamen, completing the flower’s eye-catching design.
 DIY 4th of July Paper Flower Headband | click through for the tutorial!
Step 4: Bringing It All Together
- Apply a small amount of hot glue to the center of the cardboard circle that is attached to the headband.
- Carefully align and press the two cardboard circles together, sandwiching the headband between them. Ensure the flower is centered and secure.
Conclusion: Rock Your Festive Flair!
Congratulations! You’ve created a unique and festive 4th of July paper flower headband. This DIY accessory is a fantastic way to express your creativity and showcase your holiday spirit.
As a craft enthusiast, I believe handmade items add a special touch to any celebration. Don’t you agree? Feel free to experiment with different color combinations and personalize your headband further.
I’d love to see your creations! Share pictures of your DIY 4th of July headbands in the comments below and let’s inspire each other. Remember to explore Robert Kline Art for more unique craft ideas and handmade gifts for any occasion. Happy crafting, and happy 4th of July!
