Blog
DIY Wind Chimes: A Symphony of Color for Your Backyard

Hey there, fellow art enthusiasts! Robert Kline here, and let me tell you, I recently embarked on a crafting adventure that truly tested my creative limits: DIY wind chimes. Imagine my daughter’s school, a flurry of emails, and yours truly impulsively volunteering to spearhead the Class Auction project. “Crafty parents needed!” they said. Challenge accepted!
Now, I consider myself quite the DIY enthusiast, but the thought of crafting something both beautiful and auction-worthy sent a jolt of panic through me. What to make? How to make it? And most importantly, how to wrangle a classroom full of energetic kids into creating something sellable?
 DIY Wind Chimes – Hand Painted
Finding My Chime – The Inspiration
After some frantic internet scouring (and maybe a pep talk in the mirror), I landed on wind chimes. Their gentle melodies evoke a sense of tranquility, and with a little creative flair, they could be transformed into unique, eye-catching art pieces. Plus, the Kentucky Derby theme of the auction called for something outdoorsy.
Project Unveiled: Crafting Hand-Painted Wind Chimes
Let me be upfront – this isn’t a quick afternoon craft. It’s an endeavor, a labor of love. But trust me, the final product is well worth the effort.
Gathering Your Supplies
Before we embark on this colorful journey, you’ll need to gather your crafting arsenal:
- Birch Branch: Forage one from nature or snag a pre-cut piece from a craft store.
- Ceramic Ornaments: These will be your chimes. Aim for around 21 for a visually appealing cascade.
- Fishing Line: The invisible thread that holds the magic together.
- Small Eye Hooks: You’ll need 11 of these to secure your chimes.
- Large Eye Hooks: Two of these will be used for hanging the entire masterpiece.
- Sharpies: Unleash your inner artist with a rainbow of colors.
- Rubbing Alcohol: The secret ingredient for creating stunning, watercolor-like effects with Sharpies.
- Krylon UV Resistant Clear Acrylic Coating: Protects indoor chimes from fading.
- Resin Top Coat: Your go-to for weatherproofing outdoor chimes.
- Q-Tips or Small Paint Brush: Handy tools for applying the rubbing alcohol.
- Thick Twine: Adds a rustic touch and acts as the main hanger.
Step-by-Step Guide: Bringing Your Wind Chime to Life
-
Paint Your Chimes: Now for the fun part! Using Sharpies and rubbing alcohol, transform your plain ceramic ornaments into vibrant works of art. (Check out my “How to Paint with Sharpies and Alcohol” blog post for a detailed tutorial).
-
Seal Your Masterpieces: Once your painted chimes are dry, protect them with a sealant. Remember to apply sealant to both sides, allowing ample drying time between coats.
-
Plan Your Design: Before you start stringing, visualize your desired layout. I opted for a triangular arrangement, but feel free to experiment! Mark the branch where you’ll attach the hooks for the chimes, ensuring adequate spacing for a gentle tinkling sound when they collide.
-
Attach Hooks to the Branch: This step requires a bit of elbow grease! Screw the small eye hooks into your marked spots on the branch.
-
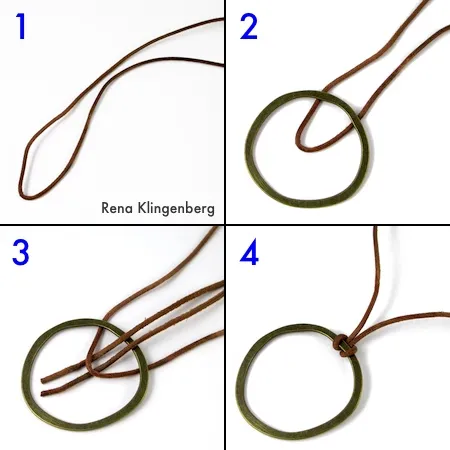
String Your Chimes: Cut lengths of fishing line double the desired hanging length. Fold each piece in half and thread the closed end through a chime’s hole. Bring the open ends through the loop, creating a secure lark’s head knot.
 Lark's head knot pendant for Adjustable Sliding Knot Necklace – tutorial by Rena Klingenberg
 -
Assemble Your Wind Chime: Starting from the top left hook, attach the first chime by tying the fishing line to the hook using another lark’s head knot. Continue adding chimes row by row, ensuring they hang evenly.
-
Create the Cascading Effect: To achieve a visually appealing V-shape, attach some chimes directly to those in the row above. This creates a beautiful layered look.
-
Finishing Touches: Once all your chimes are in place, attach your two large eye hooks to the top of the branch for hanging. Finally, thread your thick twine through these hooks and tie a secure knot.
 DIY Hand Painted Wind Chimes
The Grand Finale
And there you have it – your very own handcrafted wind chime! Not only is it a feast for the eyes, but its gentle melodies will fill your outdoor space with a sense of peace and tranquility.
Remember, this project is all about embracing your creativity and infusing your personality into every knot and brushstroke. Don’t hesitate to experiment with different colors, patterns, and materials.
And for those who prefer ready-made artistry, explore the curated collection of handmade wind chimes on Robert Kline Art. From colorful wine bottle chimes to elegant glass pyramids, there’s a symphony of sounds waiting to grace your home.
Happy crafting, everyone! Let me know if you have any questions or need further guidance.
