Blog
Creating a DIY Pebble Mosaic Pathway

As an artist with a passion for transforming the ordinary into the extraordinary, I’ve always been drawn to the raw, natural beauty of pebbles. Like many of you, I’ve collected these small wonders from riverbeds and beaches, storing them away, just waiting for the perfect project to bring them to life. My inspiration struck on a trip to Spain and Portugal, where the sidewalks were a mesmerizing tapestry of pebble mosaics. I was captivated by the artistry and knew I had to bring this ancient craft to my own backyard.
From patios to pathways, the potential of pebble mosaics is limitless. And the best part? It’s a surprisingly affordable and achievable DIY project for any skill level. Let’s explore how you can create your own stunning outdoor stone path using simple materials and a touch of creativity.
Gathering Your Supplies
Before we embark on our creative journey, let’s gather the tools and materials we’ll need. The quantities will depend on the size of your path, but here’s a general checklist:
Tools:
- Contractor’s wheelbarrow
- Garden hoe
- Garden hose and spray nozzle
- Garden or concrete trowel
- Short stool
- Sturdy rubber gloves
- Dust mask
- Contractor’s-grade 1/2-inch thick plywood (3-foot by 3-foot sheet)
- Rags
- Respirator (optional)
Materials:
- Material for forms (2×6 lumber and stakes, sturdy plastic edging, or bender board)
- Crushed gravel (for the base)
- Premixed dry mortar in 60- or 80-pound bags (80 pounds will provide a base for 3 to 4 square feet of mosaic)
- Sorted drain-rock pebbles (or gathered pebbles)
- Muriatic acid (optional)
A Word on Pebbles: Drain rock is an affordable bulk option, but be prepared to spend some time sorting. I recommend sorting at the supply yard and wetting the pebbles to reveal their true colors.
Designing and Preparing Your Pathway
Every masterpiece starts with a vision. Sketch out your design on paper first, experimenting with different shapes and patterns.
Don’t be afraid to get creative! Consider incorporating curves, spirals, or even a mosaic border using larger, flatter stones.
Once you have a design you love, translate it to your yard. Use string or garden hose to mark the outline of your path and arrange your larger stones within the path to ensure they fit well.
Next, excavate the area for your path, digging down about 5 inches below the desired finished level. Rake the area smooth and ensure proper drainage with a slight grade if needed.
Pro Tip: For larger patios or pathways in areas with frost heave, consult with your local building department about the appropriate base depth or consider building your mosaic on top of a concrete slab for added durability.
Creating a Solid Foundation
A sturdy base is crucial for a long-lasting mosaic. Fill the excavated area with compacted crushed gravel, aiming for a depth of 2 inches (adjust as needed for your climate).
Install your chosen form material along the edges of your path, ensuring the top of the form is level with the desired finished height of your mosaic.
Bringing Your Vision to Life: Laying the Mosaic
Now comes the fun part – bringing your pebble mosaic to life! Here’s a step-by-step guide:
-
Mix the Mortar: Working in small batches, combine one bag of premixed dry mortar with water in your wheelbarrow, aiming for a thick pudding-like consistency.
Safety First: Always wear sturdy gloves and a dust mask when handling mortar.
-
Pour and Spread: Pour the mortar onto your prepared base, starting at one edge of your form. Spread the mortar evenly, leaving about a half-inch of space below the top of the form to accommodate the pebbles.
-
Place Your Pebbles: Now, the artistic magic begins! Start placing your pebbles into the mortar, embedding them firmly and spacing them closely together for a visually appealing look.
Design Tip: Wetting your pebbles before placing them will help the mortar adhere better.
-
Level and Compact: After placing a section of pebbles, lay a piece of plywood over the area and step on it to level and compact the mosaic. Repeat this process until the mosaic is level with the top of the form.
-
Clean and Cure: Gently spray away any displaced mortar using your garden hose. As the mortar dries, keep the mosaic surface consistently moist for a few days to prevent cracking.
-
Final Touches: Once the mortar is completely dry, you can use a diluted solution of muriatic acid (while wearing proper safety gear) to clean away any remaining mortar film on the pebbles.
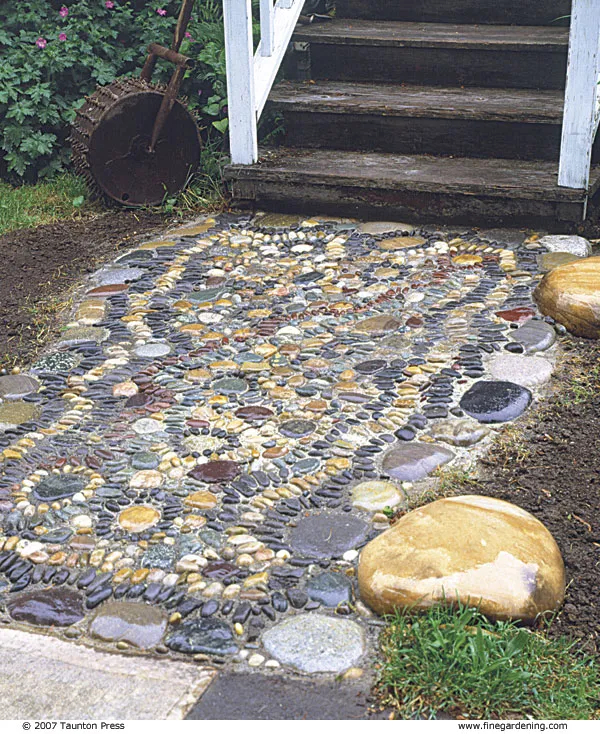
 A pebble mosaic pathway with a design that reflects the natural edge of a stream.
Enjoy Your Work of Art
Congratulations! You’ve now created a one-of-a-kind pebble mosaic pathway that’s sure to spark joy and conversation for years to come. Remember, the beauty of this craft lies in its imperfections and the unique character of each stone. Embrace the process, experiment with different designs, and let your creativity flow!
Share Your Creations: I would love to see your finished pebble mosaic pathways. Feel free to share your pictures in the comments below. And be sure to explore Robert Kline Art for more inspiring DIY projects and unique handmade gifts for your loved ones.
