Blog
How to Build a DIY Outdoor Sink for a Sustainable Garden

As an artist and a gardener, I’ve always been drawn to projects that blur the lines between practicality and creativity. A DIY outdoor sink perfectly embodies this philosophy, offering a blend of function and charm that elevates any garden.
Imagine this: you’re harvesting fresh vegetables from your garden, the sun warm on your back. Instead of trekking inside to wash your bounty, you rinse them right there, in your outdoor haven. That’s the magic a DIY outdoor sink brings! It’s about streamlining your gardening routine while minimizing your environmental footprint.
This project is particularly close to my heart because it champions sustainability by repurposing materials and conserving water. It’s about transforming what some might consider “junk” into a functional and beautiful addition to your garden.
Breathing New Life into Old Materials
The beauty of this project lies in its adaptability and resourcefulness. Don’t feel constrained by a rigid plan – let your creativity guide you! Here’s how I approached my own DIY outdoor sink, drawing inspiration from Tammy Flowers, a fellow DIY enthusiast:
Materials:
- An old sink: Source one from a friend, a salvage yard, or even your own basement.
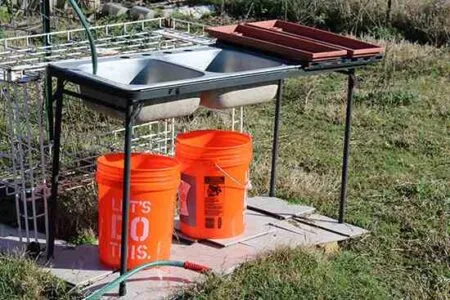
- A sturdy base: Tammy used an old metal table frame. You could repurpose an old dresser, a stack of cinder blocks, or even a sturdy wooden pallet.
- Scrap wood: Perfect for creating the countertop and adding rustic charm.
- Two 5-gallon buckets: These will collect the greywater for reuse in your garden.
- Basic tools: Saw, drill, screws, and possibly a level.
Construction:
- Lay the Foundation: Create a level base for your sink using bricks, pavers, or even gravel. This ensures stability and prevents your sink from sinking or tipping.
- Assemble the Base: Securely attach your sink to the base you’ve chosen. Use sturdy screws or bolts to ensure it can handle the weight of the sink and water.
- Craft the Countertop: Measure and cut your scrap wood to create a countertop that extends beyond the sink’s edges. This provides workspace and adds a finished look.
- Position the Buckets: Place the 5-gallon buckets under the sink drains to collect the greywater.
Tips from Robert Kline Art
- Embrace Imperfection: Remember, this is a DIY project, so don’t fret over achieving a flawless finish. The beauty lies in its handcrafted charm.
- Customize with Color: Add a splash of personality by painting the sink base or the surrounding wood. Choose colors that complement your garden’s aesthetic.
- Add a Backsplash: Protect your wall from splashes by adding a backsplash behind the sink. You can use tiles, stones, or even a piece of salvaged corrugated metal.
 article image
The Joys of a Sustainable Garden
This DIY outdoor sink isn’t just a practical addition; it’s a testament to a mindful approach to gardening. By reusing materials and conserving water, you’re minimizing your environmental impact while creating a beautiful and functional space.
Repurposing Greywater for a Thriving Garden
The greywater collected in the buckets is a valuable resource for your garden. “Greywater is a fantastic way to conserve water and provide your plants with essential nutrients,” says renowned gardening expert, Emily Carter. “Just be sure to avoid using water that’s come into contact with harsh chemicals or grease.”
Elevate Your Gardening Experience
Imagine stepping outside to a dedicated space where you can clean your tools, pot plants, or simply wash your hands after a long day in the garden. It transforms your outdoor space into a true haven for creativity and connection with nature.
Join the DIY Revolution!
Ready to embark on your DIY outdoor sink adventure? Remember, this is just a starting point. Let your imagination guide you, and don’t hesitate to experiment with different materials and designs.
Share your creations with the Robert Kline Art community! I’m eager to see the unique and inspiring outdoor sinks you bring to life. And don’t forget to explore our website for more unique handmade gifts and DIY inspiration.
