Blog
Building Your Dreamy DIY Outdoor Reading Nook: A Step-by-Step Guide

Want to transform your backyard into a haven for relaxation and literary adventures? Building a DIY outdoor reading nook is the perfect way to combine your love for crafting and escaping into a good book.
This comprehensive guide will take you through each step, from gathering your materials to adding those final, personal touches. We’ll be your trusted companions, just like a well-worn paperback on a lazy afternoon. So grab your tools, and let’s get building!
Gathering Your Materials: The Building Blocks of Your Oasis
Before you embark on your construction journey, it’s crucial to assemble the essential materials. Think of it as gathering the ingredients for a delicious recipe – a little preparation goes a long way!
Here’s what you’ll need:
- Lumber:
- (2) 2x8s at 60 inches
- (3) 2x8s at 96 inches
- (4) 4x4s at 60 inches
- (2) 2x6s at 60 inches
- (2) 2x4s at 37 inches
- (2) 2x4s at 41 inches
- (1) 2×4 at 93 inches
- (13) 2x6s at 60 inches
- (2) 2x6s at 50 inches
- Lattice: (1) 4×8 sheet
- Hardware:
- (12) Corner braces
- (2) 90-degree angle braces
- (6) 2×4 braces
- 1 box of 1 1/2-inch deck screws
- 1 box of 3-inch deck screws
Pro Tip from Bob, a seasoned DIYer: “Always buy a little extra lumber than you think you’ll need. This accounts for any mistakes and ensures you won’t have to make multiple trips to the store!”
Constructing the Base: Laying a Solid Foundation
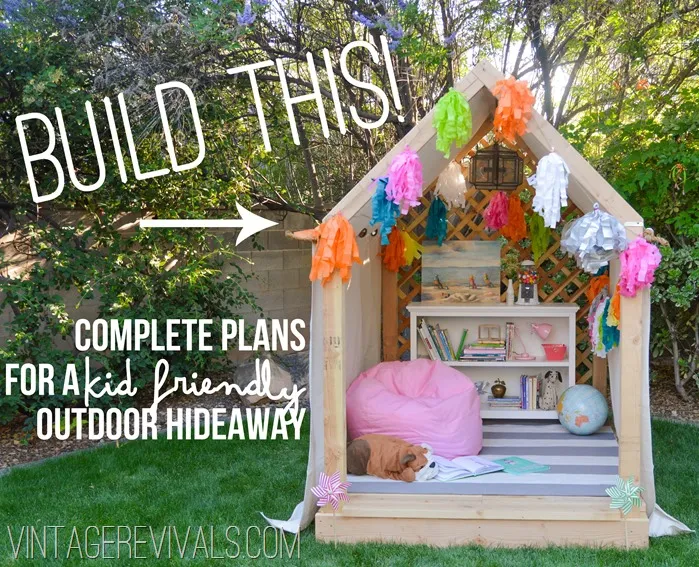
 Summer Reading Nook Outdoor Hideaway Building Plans @vintage revivals
Image: The finished base, ready for the next steps.
-
Building the Frame: Begin by constructing the base frame using your 2x8s. This will form a sturdy rectangular base measuring 60 inches by 96 inches.
-
Securing with Braces: Attach the 4×4 posts to the corners of your base frame using corner braces. Make sure they are flush with the edges for maximum stability.
-
Adding the Center Support: Attach the center joist to the base using the same corner braces. This will provide additional support for your deck floor.
Creating the Deck: A Platform for Relaxation
-
Attaching the Decking Boards: Cut your 2x6s to 60 inches long and begin attaching them to the base. Make sure to space them evenly and secure them directly to the base frame.
-
Adding a Touch of Flair: To add a unique touch and create a more step-like appearance, leave a slight overhang on the ends of the deck. Cut the two remaining 2x6s to 50 inches and attach them between the 4×4 posts.
Raising the Roof: Shelter from the Sun and Stars
-
Prepping the Roof Pitch: Cut two 2x4s at a 45-degree angle to create the pitch of your roof. Then, cut a 90-degree angle off the end of each 45-degree cut to ensure a flush fit against the 4×4 posts.
-
Attaching the Braces: Attach the 90-degree angle braces to the top of your 4×4 posts. Next, secure the 2×4 braces to the back of the front pitch and the front of the back pitch.
-
Securing the Cross Bar: Place your 2×4 cross bar within the braces you just attached and screw it into place.
-
Placing the Roof: Carefully lift your assembled roof structure and position it within the braces attached to the 4×4 posts. Secure it in place with screws.
Adding the Finishing Touches: Latticework and Personalization
-
Incorporating Lattice: Cut your 4×8 sheet of lattice to size and attach it to the bottom half of your reading nook. Attach the remaining lattice to the roof pitch and trim any excess using a saw.
-
Personalize Your Space: Now comes the fun part – making it your own! Add cushions, blankets, outdoor lighting, and decorative elements to create a cozy and inviting atmosphere.
Conclusion: Enjoy Your Newfound Reading Haven
Congratulations! You’ve successfully built your very own DIY outdoor reading nook. Now, grab your favorite book, pour yourself a refreshing drink, and escape into the world of literature from the comfort of your handcrafted haven.
Robert Kline Art encourages you to share your creations and inspire others. What personal touches will you add to make your reading nook uniquely yours? Share your thoughts and experiences in the comments below!
Looking for more handcrafted gift ideas? Explore our website for unique and personalized creations that will delight your loved ones!
