Blog
Creating a DIY Pebble Mosaic Pathway: A Step-by-Step Guide

As an artist specializing in handcrafted art, I’m often drawn to the raw, natural beauty of simple materials. Like many of you, I’ve always been fascinated by the unique charm of pebbles. This fascination, passed down from my geologist grandparents, led me to the captivating world of pebble mosaic art.
Journeying through Spain and Portugal, I was mesmerized by the intricate pebble mosaic designs adorning plazas and sidewalks. From the sweeping waves of river pebbles in Seville’s Plaza de España to the mesmerizing black-and-white patterns in Lisbon, I realized the artistic potential of this humble medium.
Inspired, I embarked on a creative journey, transforming my collection of gathered pebbles into stunning mosaics. Today, I’ll share my well-honed technique, guiding you through the process of crafting your own DIY outdoor pebble mosaic pathway.
Essential Tools and Materials for Your Pebble Mosaic Project
Before we begin, let’s gather our tools and materials. The quantities will vary depending on your project’s size, but here’s a comprehensive list:
Tools:
- Contractor’s wheelbarrow
- Garden hoe
- Garden hose and spray nozzle
- Garden or concrete trowel
- Short stool
- Sturdy rubber gloves
- Dust mask
- Contractor’s-grade 1/2-inch thick plywood, 3-foot by 3-foot sheet
- Rags
- Respirator (optional)
Materials:
- Material for forms (2×6 lumber and stakes, sturdy plastic edging, or bender board)
- Crushed gravel (for the base)
- Premixed dry mortar in 60- or 80-pound bags (80 pounds covers roughly 3-4 sq ft)
- Sorted drain-rock pebbles
- Muriatic acid (optional)
From Vision to Reality: Designing and Preparing Your Pathway
Conceptualizing Your Design
While spontaneity has its place in art, I always start with a design plan, no matter how big or small the project. Sketch your design on paper, then recreate it on-site using large stones as placeholders. This helps visualize the final look and ensures everything fits perfectly.
Pro Tip: If you’re new to pebble mosaics, begin with a small project like a stepping stone to master the technique before tackling larger projects.
Prepping the Site
Once your design is finalized, prepare the pathway area:
- Excavate: Dig out the area to a depth of 5 inches below the desired finished level, ensuring a smooth and level base.
- Grading (If Necessary): For drainage, incorporate a 2 percent grade, sloping the area slightly downward.
- Gravel Base: In my climate (USDA Hardiness Zone 7), a 2-inch layer of compacted crushed gravel forms the base for the mosaic and a 3-inch mortar bed. Spread the gravel evenly and tamp it down firmly using your feet or a vibrating plate compactor for larger areas.
Important Note: Consult local building codes for frost-prone areas to determine the appropriate base depth. Consider building on a concrete slab for increased durability.
Creating Forms for Straight or Curved Edges
- Straight Edges: Build a form using stakes and 2×6 boards before adding the gravel base.
- Curved Edges: Use sturdy plastic lawn edging or bender board, installing it above the gravel base to ensure the top aligns with the desired finished level.
Pro Tip: The form’s top acts as a leveling guide, so double-check for accuracy using a string level for longer mosaics.
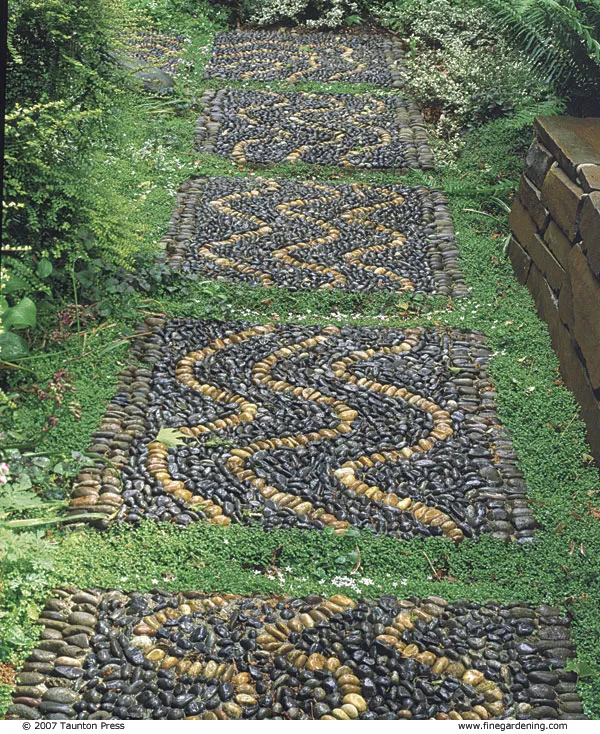
 "This walkway represents the river of life. It leads to the Persian carpet patio from lede photo above"
Caption: This stunning walkway, representing the river of life, is a testament to the artistic potential of pebble mosaics.
Bringing Your Design to Life: The Art of Pebble Setting
Sorting and Preparing Your Pebbles
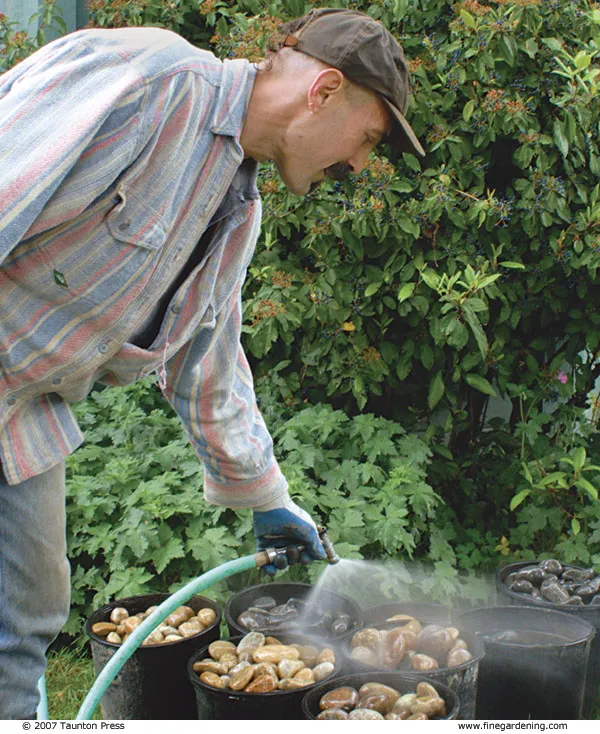
To ensure a smooth workflow, I sort my pebbles by color and size beforehand. Wetting the stones reveals their true colors and patterns, making the sorting process easier.
Robert Kline Art Tip: Large plastic nursery pots are perfect for sorting and wetting pebbles.
Mixing Mortar: The Heart of Your Mosaic
Mortar, not concrete, is the secret ingredient for a successful pebble mosaic. I’ll guide you through my batch-mixing method:
- Wheelbarrow Setup: Add an inch of water to your wheelbarrow.
- Mortar Mix: Add one bag (60-80 lbs) of premixed dry mortar to the water.
- Mixing: Using a garden hoe, thoroughly combine the mortar and water, adding more water as needed until you achieve a stiff pudding consistency.
Safety First: Always wear sturdy rubber gloves and a dust mask when mixing mortar to avoid inhaling dust particles.
 "Author wetting rocks in buckets to accentuate their color distinctions."
Caption: Wetting the pebbles beforehand brings out their vibrant colors and helps the mortar adhere better.
Laying the Foundation: Spreading the Mortar
Pour the mixed mortar onto the compacted gravel base, starting from one edge of your form. Maintain a mortar depth of about half an inch below the finished grade to accommodate the pebbles.
Placing the Pebbles: Precision and Artistry
Now comes the fun part – bringing your design to life:
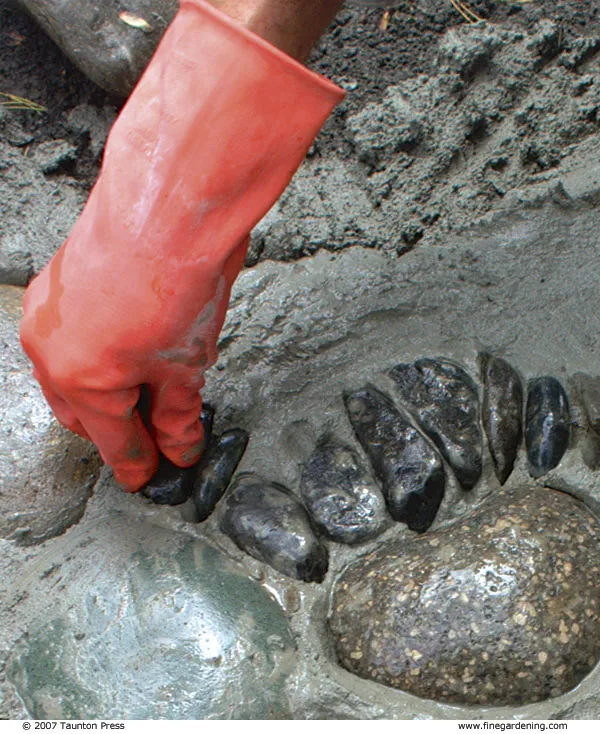
- Setting the Pebbles: Place smaller pebbles on their sides, embedding them at least halfway into the mortar. For larger pebbles, scoop out some mortar to ensure a snug fit.
- Achieving a Seamless Look: Wet the pebbles before setting them to enhance mortar adhesion. Aim for tight spacing between the stones, minimizing visible mortar for a polished look.
- Leveling the Mosaic: Once a section is complete, lay a piece of plywood over it and step on it to level the pebbles with the form’s top. Repeat as needed until the desired level is achieved.
 "Close-up of author pressing small stones closely together into mortar, wearing gloves."
Caption: Press the pebbles closely together, ensuring minimal mortar shows for a visually appealing finish.
Cleaning and Curing Your Mosaic Masterpiece
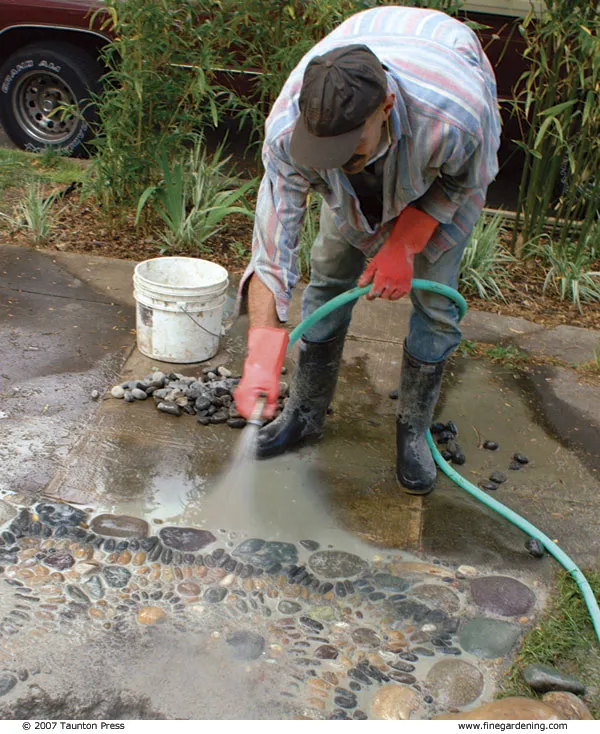
- Removing Excess Mortar: Gently spray away displaced mortar with a hose, ensuring the mosaic surface is clean. Trim any remaining mortar along the edges using a trowel, chisel, or small pick ax.
- Curing Time: Allow the mortar to cure slowly for maximum strength. Wet the surface frequently during the first few days to prevent cracking.
 "Author spraying mosaic with hose to clean off any displaced mortar."
Caption: Gently spray the mosaic with a hose to remove any displaced mortar, revealing the beautiful design.
Final Touches: Enhancing and Maintaining Your Pebble Mosaic
Removing Mortar Film (Optional)
Once the mosaic is dry, remove any mortar film on the pebbles using muriatic acid. Apply carefully with a rag, wearing protective gear. Rinse thoroughly with water to neutralize the acid.
Replacing Dislodged Pebbles
For any loose pebbles, secure them using Thinset, a strong acrylic-based adhesive. Apply sparingly, cleaning up excess to maintain a uniform look.
Conclusion: The Enduring Beauty of Handcrafted Art
Creating a DIY pebble mosaic pathway is a rewarding experience, transforming your outdoor space with a touch of handcrafted artistry. As you step back and admire your creation, you’ll discover, as I did, that the magic lies not just in the final product but in the journey itself.
I encourage you to embark on your own pebble mosaic adventure. Don’t hesitate to share your experiences and creations in the comments below – I’d love to see what you create! And for more unique, handcrafted gift ideas, visit Robert Kline Art – your source for handcrafted art inspiration.
