Blog
How to Create a DIY Mosaic Birdbath Inspired by Van Gogh

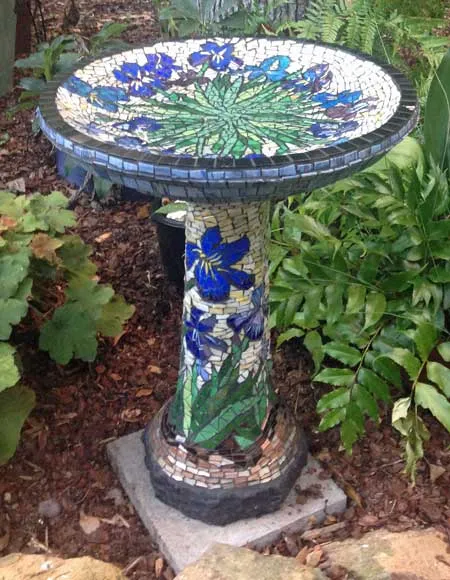
Hey there, fellow art enthusiasts! Robert Kline here, and I’m thrilled to share a recent project that’s as beautiful as it is inspiring. My talented friend, artist Lyn Richards, created a stunning mosaic birdbath that’s captured the essence of Van Gogh’s “Irises” and brought a touch of art nouveau to her garden.
Today, I’m going to walk you through the process of creating your own DIY mosaic birdbath, using Lyn’s project as inspiration. Let’s dive into the world of vibrant colors, intricate designs, and the joy of handcrafted beauty!
Choosing Your Base
The first step is selecting the perfect foundation for your mosaic masterpiece. You can opt for a ready-made concrete birdbath from a garden center – a convenient and affordable option. For those seeking a more unique touch, consider crafting an original concrete sculpture.
Lyn, in her creative spirit, chose a two-piece concrete birdbath, consisting of a base column and a bowl. This provided a balanced structure and ample space for her intricate design.
Gathering Your Materials
Now, let’s talk materials! Here’s what you’ll need to bring your mosaic birdbath to life:
Thinset Mortar and Tools:
- Thinset Mortar: Unlike adhesive, thinset mortar provides a durable bond for your tiles, ensuring your masterpiece stands the test of time. Refer to my detailed instructions on using thinset mortar with glass tile (don’t worry, it’s easier than it sounds!).
- Tools: You’ll need a bucket for mixing, a margin trowel for spreading the thinset, and a sponge for cleaning up.
Glass Mosaic Tile:
- Glass mosaic tile: Opt for non-porous glass tiles, as they resist water damage, making them perfect for outdoor use. Explore the diverse world of glass tile – from vitreous and metallic to iridescent and stained glass.
- Calculating Tile Quantity: Divide your birdbath into basic shapes (cylinder and disk) to estimate the surface area. Our handy mosaic tile estimator can help determine the amount of tile you’ll need. Remember to account for cutting waste and order a bit extra to ensure you have enough!
Finding Your Artistic Inspiration:
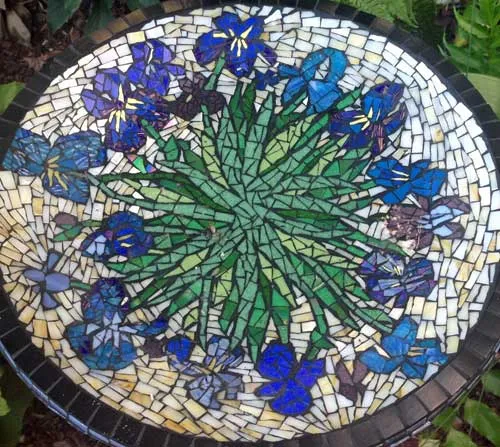
- Pattern Selection: This is where your creativity takes center stage! Lyn drew inspiration from Van Gogh’s “Irises,” sketching the flower outlines directly onto the concrete. Experiment with different patterns, from floral motifs to geometric designs – the sky’s the limit!
Bringing Your Mosaic Vision to Life
Now comes the exciting part – creating your mosaic masterpiece!
Transferring Your Pattern:
- Pencil Sketch: Lightly sketch your chosen pattern onto the birdbath surface using a pencil. This allows for easy adjustments and erasures.
- Sharpie Outline: Once you’re satisfied with your design, retrace the pencil lines with a black Sharpie marker. This permanent outline will guide your tile placement.
Cutting and Attaching Tiles:
- Tile Cutting: While you can cut tiles as you go, pre-cutting them can streamline the process. Nippers are perfect for creating intricate shapes.
- Applying Thinset: Working in small sections, spread a thin layer of thinset mortar onto the birdbath surface using a margin trowel.
- Placing Your Tiles: Press each tile firmly into the thinset, following your pattern. Ensure the tiles are evenly spaced.
- Allow for Drying Time: Let the thinset cure for at least 24 hours before moving on to grouting.
Grouting:
- Clean the Surface: Remove any excess thinset from the tile surfaces using a damp sponge.
- Grout Selection: Black grout provides a striking contrast, making your colors pop. Experiment with different grout colors to achieve your desired aesthetic.
- Grout Application: Apply grout generously, pressing it into the spaces between the tiles using a grout float.
- Clean Up: Wipe away excess grout with a damp sponge, being careful not to dislodge the tiles.
Sealing and Finishing Touches:
- Seal Your Mosaic: After the grout has cured (typically 24-72 hours), seal your mosaic with a silicone-based tile and grout sealer. This crucial step protects your creation from the elements.
- Smooth Out Edges (Optional): For a polished look, smooth any sharp tile edges using a rubbing stone.
The Beauty of Handmade Craftsmanship
 mosaic-birdbath-close
A close-up of Lyn’s mosaic masterpiece, showcasing the intricate details and vibrant colors.
 mosaic-birdbath-top-det
A top view of the mosaic birdbath, nestled beautifully in Lyn’s garden.
Creating a DIY mosaic birdbath is a journey of creativity, patience, and the joy of transforming simple materials into something truly extraordinary. As Lyn’s project demonstrates, the beauty lies not just in the final product but in the process itself – the exploration of colors, the play of textures, and the satisfaction of creating something beautiful with your own hands.
I encourage you to embark on your own mosaic adventure. Don’t hesitate to experiment, personalize your design, and let your creativity soar!
And when you’ve finished your masterpiece, share your creation with us! Leave a comment below, or better yet, share your photos on our Robert Kline Art community page. Let’s inspire each other with the endless possibilities of handcrafted art.
