Crafting a Rustic Haven: DIY Scrap Wood Towel Rack

Hey there, fellow craft enthusiasts! Robert Kline here, your guide to transforming ordinary materials into extraordinary creations. Today, we’re diving headfirst into the world of woodworking with a project that’s as practical as it is stylish: a DIY scrap wood towel rack.
This isn’t just about tidying up your bathroom; it’s about infusing it with character and charm. We’ll be taking those forgotten scraps of wood, breathing new life into them, and crafting a piece that’s both functional and visually appealing. Trust me, the satisfaction of creating something beautiful with your own two hands is unparalleled.
Gathering Your Supplies: A Scavenger Hunt for Creativity
Every crafting journey begins with gathering the right tools and materials. For our scrap wood towel rack, here’s what you’ll need:
- 2×2 Lumber Scraps: The star of the show! (See the cut list below for specific dimensions)
- Wood Glue: Our trusty adhesive for a strong bond.
- 2 ½” and 3″ Wood Screws: For securing those joints.
- Drill & Driver: Your trusty sidekicks for making holes and driving screws.
- Miter Saw: For precise and clean cuts.
- Wood Finish (Stain and Polyurethane): To protect and enhance the natural beauty of the wood.
- Stud Finder: Ensures your towel rack is securely mounted.
- Clamps: To hold everything snugly while the glue dries.
Cut List (Embrace the beauty of customization, feel free to adjust these to your liking):
- (2) 2x2s @ 12″ long (Back pieces)
- (4) 2x2s @ 5″ long (Side pieces)
- (2) 2x2s @ 24″ long (Front pieces)
Crafting Your Masterpiece: A Step-by-Step Guide
Ready to roll up your sleeves and get building? Let’s break down this project into three manageable steps:
Step 1: Building the Foundation – Assembling the Back and Sides
- Begin by selecting two of your 12″ 2x2s for the back pieces of the towel rack. Remember, if you’re working with rough 2x2s, consider milling them down for a more polished look.
- Next, grab four of your 5″ 2x2s for the sides. The length of these pieces will determine the spacing between the towel bars. Feel free to adjust based on your towel size and preference.
- Apply wood glue to the ends of two of the 5″ side pieces and attach them to a 12″ back piece. Use clamps to hold them in place and pre-drill holes to prevent the wood from splitting. Then, drive in your 2 ½” wood screws to secure the joints.
- Repeat this process to create the second side assembly.
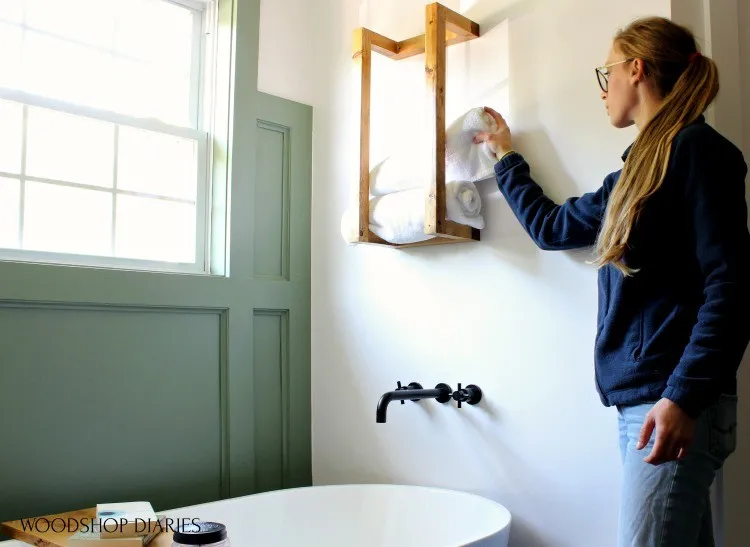
 Shara Woodshop Diaries removing towel from scrap wood towel rack hanging on wall above tub
Step 2: Adding the Finishing Touch – Attaching the Front Pieces
- With your side assemblies complete, it’s time to add the front pieces that will serve as the towel bars.
- Apply wood glue to the exposed ends of the 5″ side pieces. Carefully align your 24″ front pieces and clamp them in place.
- You have a couple of options for securing the front pieces:
- Drive in 2 ½” wood screws (like in step 1) if you don’t mind a slightly more industrial look.
- Opt for brad nails (2″ or longer) for a more subtle appearance and added holding power.
Step 3: From Workshop to Bathroom – Finishing and Hanging
- Once the glue is dry, sand away any excess glue squeeze-out for a smooth finish.
- Now it’s time to personalize your creation! Apply your desired wood stain, allowing it to penetrate the wood and bring out its natural grain.
- Once the stain is dry, apply a couple of coats of polyurethane for a protective and moisture-resistant finish. Remember to sand lightly between coats for a silky smooth surface.
Time for Installation!
- Use a stud finder to locate a stud in your wall where you want to hang the towel rack.
- Pre-drill holes through the back 2x2s of the rack and use 3″ wood screws to securely attach it to the wall stud. Using studs provides the most stability, especially for heavier towels.
- If you can’t find a stud in your desired location, drywall anchors are a reliable alternative.
From Scrap Wood to Statement Piece
Congratulations! You’ve officially transformed ordinary scrap wood into a beautiful and functional towel rack. It’s a testament to your creativity and resourcefulness. Now, step back, admire your handiwork, and give yourself a pat on the back.
Remember, the beauty of DIY lies in the details. Don’t be afraid to experiment with different finishes, add decorative elements, or customize the dimensions to suit your style and space.
We’d love to see your creations! Share your finished towel racks with us in the comments below. And for more inspiring DIY projects and craft ideas, be sure to explore the Robert Kline Art website. Happy crafting!
