Blog
DIY Hanging Jewelry Organizer: A Stylish Solution for Tangle-Free Trinkets

Hey there, jewelry enthusiasts and craft lovers! Are you tired of tangled necklaces and misplaced earrings? Do you dream of a jewelry organization system that’s both stylish and functional? Look no further than a DIY hanging jewelry organizer! As an avid crafter and self-proclaimed jewelry aficionado, I’m excited to guide you through creating a customized organizer that will keep your precious pieces beautifully displayed and easy to access.
Lessons Learned: From Drawer Pulls to a Better Way
Over the years, I’ve experimented with countless jewelry storage solutions. Remember that Pinterest trend of using drawer pulls and knobs on a fabric-covered frame? I jumped on that bandwagon, but it wasn’t my favorite. Cup pulls swallowed my stud earrings, knobs couldn’t contain my bracelets, and constantly clasping and unclasping necklaces became a chore.
However, that experience taught me the beauty of wall-mounted jewelry organizers. Seeing my jewelry displayed inspired me to wear it more often, and using wall space freed up valuable drawer and tabletop real estate.
Why Choose a Wall-Mounted Jewelry Organizer?
- Visibility is Key: Seeing your jewelry collection displayed encourages you to wear and enjoy it more often.
- Space-Saving Solution: Wall-mounted organizers free up valuable space in drawers, on dressers, or in jewelry boxes.
- Tangle-Free Zone: Dedicated hooks and rods keep necklaces, bracelets, and earrings separate and organized.
- Customization is King: Design a DIY organizer that perfectly fits your jewelry collection and complements your decor.
Crafting Your Custom Jewelry Organizer
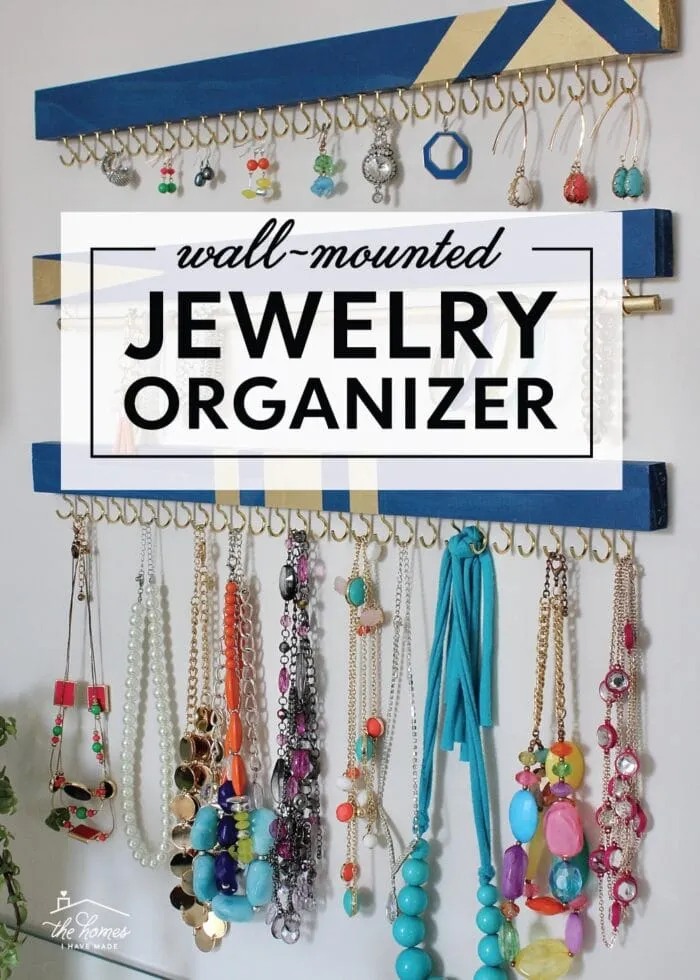
This DIY hanging jewelry organizer is crafted from three simple wood boards, transformed with paint, stain, and strategically placed cup hooks.
Supplies You’ll Need:
Materials:
- Common board or plywood 1x2s (approximately 20″ long)
- Cup hooks in your desired finish (I love the look of brass!)
- Wooden dowel (choose a size compatible with your cup hooks)
- Paint and/or stain for a personalized touch
- Command strips (or alternative hanging hardware)
Tools:
- Painters tape
- Ruler or tape measure
- Pencil
- Drill with a 1/16″ drill bit
- Sanding block
Step-by-Step Guide:
1. Prepare the Wood Boards
- Cut your 1x2s to the desired length, ensuring all edges are smooth.
- Sand away any rough spots.
2. Infuse Color and Personality
- Stain or paint your wood boards in your chosen color scheme.
- For a two-tone look like mine, start with your base color, let it dry completely, then use painter’s tape to create your desired pattern.
- Apply your contrasting color, let it dry, and carefully remove the tape.
- Paint the wooden dowel to match your cup hooks.
3. Plan Your Hook Placement
- Decide how you want to organize your jewelry. For example, one board for earrings, one for necklaces, and one for bracelets.
- Use a ruler and pencil to mark the placement of your hooks, keeping in mind the size and spacing of your jewelry.
4. Drill Pilot Holes for Secure Hooks
- Using a drill with a 1/16″ drill bit, create pilot holes at your marked locations. These holes will make it easier to twist in the cup hooks.
5. Install the Cup Hooks
- Twist the cup hooks into the pre-drilled holes until they are snug and secure, ensuring they all face forward uniformly.
- For the bracelet rod, install two cup hooks on one board, spacing them evenly to support the wooden dowel.
6. Mount Your Masterpiece
- Attach Command strips (or your chosen hanging hardware) to the back of each board, ensuring they are level.
- Press the boards firmly onto the wall, allowing the adhesive to bond fully.
7. Admire Your Handiwork!
- Hang your necklaces, dangle your earrings, and arrange your bracelets on the dowel.
Robert Kline Art Recommends: Tips and Tricks for Success
- Spacing Matters: When marking hook placement, consider the size of your jewelry. Earrings and delicate necklaces can be spaced closer together, while chunkier pieces will require more breathing room.
- Dowel Delight: The wooden dowel is a game-changer for bracelet storage! It keeps them organized, untangled, and easy to access.
- Stud Solution: For stud earrings, consider a small dish or tray displayed near your hanging organizer.
 DIY Jewelry Organizer
Conclusion: A Tidy Oasis for Your Treasures
This DIY hanging jewelry organizer is not only a practical storage solution but also a beautiful addition to your bedroom or dressing area. The best part? It’s completely customizable to suit your unique jewelry collection and personal style. So gather your supplies, embrace your inner DIYer, and get ready to enjoy a beautifully organized and tangle-free jewelry collection.
What are your favorite ways to keep your jewelry organized? Share your tips and tricks in the comments below! And for more handmade gift ideas and creative inspiration, be sure to explore the unique creations on the Robert Kline Art website!
