Blog
Harnessing the Wind: Building Your Own DIY Wind Generator with a Car Alternator

Living off-grid, I’ve learned to embrace renewable energy sources. One of the most empowering projects I’ve undertaken is building a DIY wind generator. Imagine the satisfaction of generating your own electricity, powered by the very wind that sweeps across your land. This project isn’t just about saving on energy bills; it’s about embracing self-reliance and sustainable living.
In this guide, we’ll delve into the intricacies of constructing a homemade wind generator using a readily available car alternator. Don’t worry, you don’t need to be an electrical engineer to make this work. With basic tools and a bit of ingenuity, you can have your own wind turbine up and spinning in no time.
Gathering Your Supplies: What You’ll Need for Your DIY Wind Generator
Before we embark on this electrifying journey, let’s gather our tools and materials. Here’s what you’ll need:
Core Components:
- Car alternator with a built-in voltage regulator: This will be the heart of your wind generator, converting wind energy into electricity. Ensure the alternator has a built-in voltage regulator for optimal performance.
- General Motors (GM) fan and clutch assembly: This will form the blades of your wind turbine, capturing the wind’s energy. A fan and clutch assembly from a 1988 GM 350 motor worked perfectly for me.
- Tower or pole: You’ll need a sturdy structure to mount your generator. I used a 15-foot section of used 2-inch tubing, a cost-effective and robust option.
- Metal for the mounting bracket: This will secure the generator to the tower. You can use readily available metal tubing or repurposed materials.
Additional Materials:
- Electrical cable or wires
- 5/8-inch-by-3-inch washer (3/16-inch thick)
- 1/4-inch thread tap
- Drill bit (matching your thread tap)
- Four (4) 1/4-inch-by-1-1/2-inch to 2-1/2-inch bolts with nuts and lock washers
- 1/2-inch galvanized pipe and fittings (if you’re not welding)
- Old tin siding or roofing for the tail fin
- Steel roofing screws
- Zip ties, baling wire, or duct tape (for securing wires)
Remember, you can always adapt and modify the materials to suit your needs and what’s available to you. That’s the beauty of DIY projects!
Assembling Your Wind Powerhouse: Step-by-Step Guide
Now, let’s roll up our sleeves and get down to building.
Step 1: Attaching the Fan Clutch to the Alternator
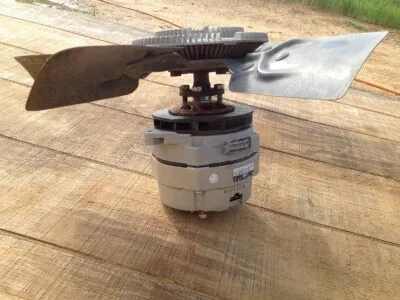
The fan blades, repurposed from your GM fan clutch, need to be securely attached to the alternator. If you’re comfortable with welding, you can directly weld the fan clutch hub to the alternator hub. However, if welding isn’t your forte, don’t fret! You can achieve a solid connection using a washer, bolts, and a bit of drilling.
- Creating the Union: Drill four holes into the washer, matching the holes in the fan clutch. Use your tap to thread these holes. This washer-bolt assembly will act as a bridge between the fan clutch and the alternator.
- Securing the Assembly: Slide the washer and bolt assembly onto the alternator shaft, ensuring the bolts face away. Reattach the alternator fan and nut, securing the union in place. Finally, attach the fan clutch assembly to the protruding bolts, tightening everything down with lock washers.
 fan attached to an alternator
Step 2: Building the Mounting Bracket
A robust mounting bracket is crucial for holding your generator steady against the wind’s force.
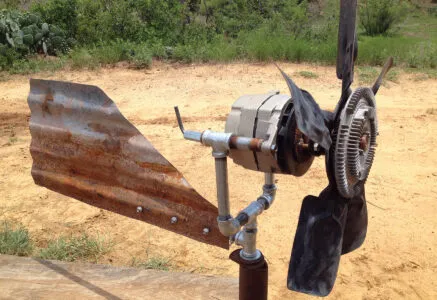
- Welding Approach: If you have access to a welder, fashion a bracket using 1-inch square tubing. Incorporate a 2-foot length of 1-inch pipe as the rotating stem, which will be fitted inside your tower or pole.
- Pipe Fitting Method: No welder? No problem! Construct the bracket using 1/2-inch galvanized pipe and a variety of fittings. This method offers flexibility and requires only basic tools.
Remember to attach a tail fin to the bracket. This simple addition, crafted from old tin siding or roofing, ensures your generator always turns into the wind, maximizing energy capture.
Step 3: Erecting Your Wind Turbine Tower
A sturdy tower is essential for harnessing wind power effectively.
- Repurposed Materials: I opted for a used television antenna tower for its height and stability. You can also utilize heavy-gauge metal tubing, ensuring it’s securely anchored to a building or a solid base.
- Safety First: When erecting the tower, prioritize safety. Use ropes and a come-along for heights, and consider guy-wires for added stability, especially in windy locations.
Step 4: Wiring and Final Touches
With the mechanical assembly complete, it’s time to connect the electrical components.
- Wire Attachment: Connect the positive and negative wires to your alternator, securing them along the tower with zip ties, baling wire, or even duct tape.
- Charge Controller: Incorporate a charge controller between the generator and your battery bank. This essential component prevents overcharging and ensures the longevity of your batteries.
 article image
Enjoying the Fruits of Your Labor: Wind-Powered Independence
Congratulations! Your DIY wind generator is now complete. As the wind whips through your property, spinning the blades of your creation, you’ll experience the profound satisfaction of generating your own electricity. This project is a testament to human ingenuity and our ability to harness the power of nature.
Remember to exercise caution when working with electricity and always prioritize safety. If you have any doubts, consult with a qualified electrician.
This project is just the beginning of your renewable energy journey. Explore, experiment, and discover the endless possibilities of sustainable living!
Ready to explore more unique, handmade crafts? Browse the exquisite selection of handmade gifts and creations at Robert Kline Art, and discover the perfect piece to add character to your home or to surprise a loved one. Don’t forget to share your DIY wind turbine experiences in the comments below – let’s inspire each other to embrace sustainable living!
