Blog
Craft Your Own Tranquility: A DIY Guide to Building an Infrared Sauna
Imagine this: it’s a chilly evening, and you’re stepping into the warm embrace of your very own sauna, the soft glow of cedar surrounding you. The stresses of the day melt away as the gentle infrared heat soothes your muscles. This luxurious dream can be your reality! In this guide, we’ll embark on a rewarding journey of crafting a DIY infrared sauna, a testament to your creativity and a sanctuary for relaxation.
Planning Your Oasis of Warmth
Before diving into sawdust and the satisfying scent of cedar, careful planning is essential. Let’s map out the key considerations for your sauna project:
Location, Location, Location
- Indoor Sanctuaries: Transform an unused closet, carve out a corner in your basement, or dedicate a spare room to your wellness haven.
- Backyard Retreats: Picture a freestanding sauna nestled amidst nature, a private escape in your own backyard.
Sizing Up Relaxation
- Solo Serenity or Shared Bliss?: Determine the sauna’s capacity based on how many people will enjoy it simultaneously.
- Cozy Efficiency: Smaller saunas with lower ceilings heat up faster, maximizing efficiency and minimizing energy consumption.
Powering Up Your Retreat
- Circuit Capacity: Assess the nearest power source’s amperage. You might need the expertise of a licensed electrician to install a dedicated circuit for your sauna.
Calculating for Optimal Heat
- Cubic Feet Equation: Measure the length, width, and height of your sauna, then multiply these figures to find the cubic footage.
- Wattage Requirements: A general rule of thumb is to allocate 10 watts per cubic foot. Multiply your cubic footage by 10 to determine the total wattage needed.
- Infrared Panel Selection: Standard infrared panels are often 300 watts. Divide your total wattage requirement by the wattage of your chosen panels to determine the number needed.
Building the Foundation: The Floor Base
With a plan in hand, let’s begin the construction!
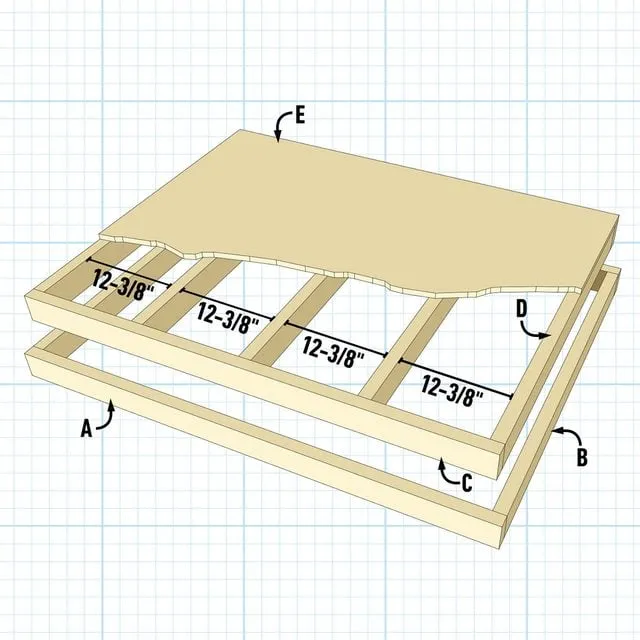
- Framing the Base: Cut and assemble four 2x4s to create the outer frame. Next, measure the interior dimensions of the outer frame to determine the size of the inner frame.
- Inner Frame and Support: Construct the inner frame using 2x4s, ensuring it’s slightly smaller than the outer frame. Add support boards evenly spaced within the inner frame.
- Insulation and Flooring: Secure the inner frame within the outer frame, leaving a 1-1/2-inch gap between the top of the inner frame and the top of the outer frame. Fill the spaces between the studs with 1-1/2-inch foam board insulation for added warmth. Finally, attach a sheet of 3/4-inch plywood to the top of the inner frame using 1-1/2-inch screws. This forms your sturdy sauna floor.
 Infrared Sauna Floor Base Fig 3 A solid base is the first step in building your DIY sauna.
Erecting the Walls: Your Cedar Sanctuary Takes Shape
- Precise Cuts: Refer to your cut list and cut all the 2x4s and 2x2s to the required lengths for your sauna walls.
- Stud Placement: Lay the top and bottom boards of your wall frame together and mark the location for each stud. This ensures accurate and even spacing.
- Assembling the Frames: Using 3-inch screws or nails, attach the studs to the top and bottom boards at your marked locations.
- Reinforcing with Bracing: Add bracing between the studs on the back and side walls where your sauna bench and infrared panels will be mounted. This provides extra support.
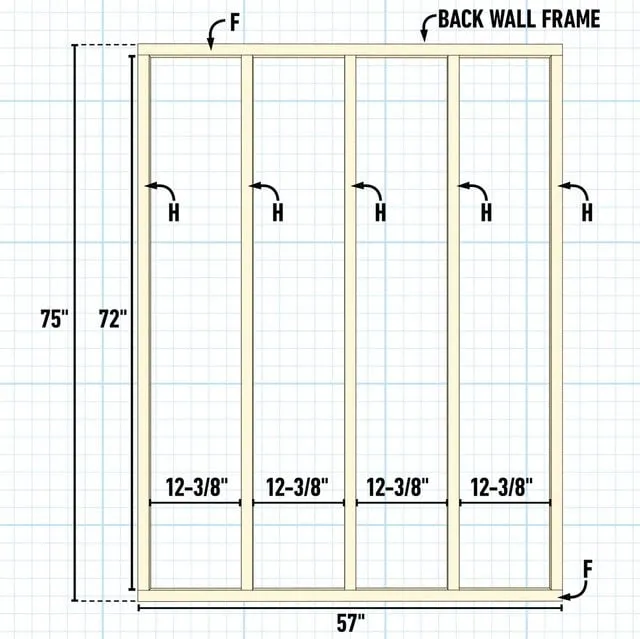 Infrared Sauna Back Wall Frame Fig 4 Assembling the wall frame is a satisfying step towards your dream sauna.
Exterior Walls: Choosing Your Style
The exterior of your sauna walls offers a canvas for your design preferences. T1-11 plywood siding is a cost-effective and aesthetically pleasing choice.
- Attaching Siding to Side Walls: Lay a sheet of siding on top of a side wall frame, ensuring it’s flush with the bottom edge. Secure it with galvanized siding nails. Repeat this for the other side wall.
- Siding the Front and Back Walls: When attaching siding to the front and back walls, allow it to overhang by 2-1/4-inches on both sides of the frame. This overhang will be trimmed later.
- Cutting the Doorway: Using a wood router equipped with a flush trim bit, carefully cut out the opening for your sauna door on the front wall.
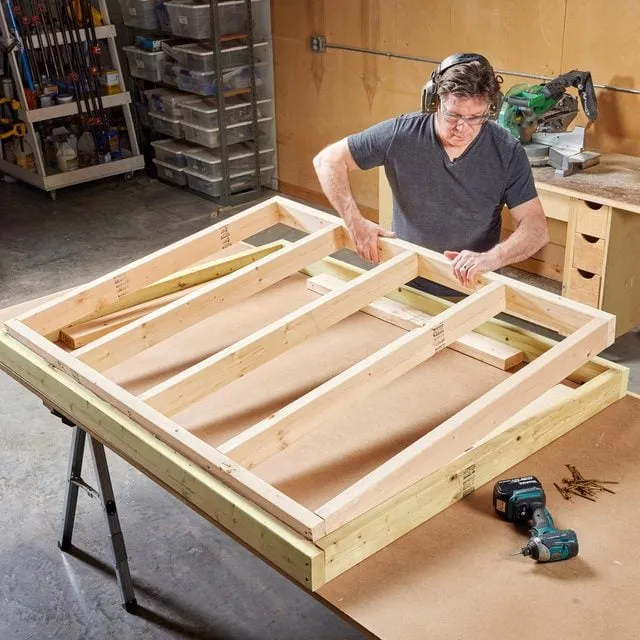 man building sauna walls in a workshop Building the walls in a well-lit workshop makes the process smoother.
Insulation and Vapor Barrier: Locking in the Heat
- Measure and Cut Insulation: Carefully measure the spaces between your wall studs. Cut pieces of 1-1/2-inch foam insulation to fit snugly within these spaces.
- Vapor Barrier Installation: Staple foil vapor barrier to the interior of all four walls, ensuring the reflective side faces inward.
- Sealing for Moisture Control: Seal all edges and seams of the vapor barrier using foil tape. This crucial step prevents moisture from compromising your sauna’s insulation.
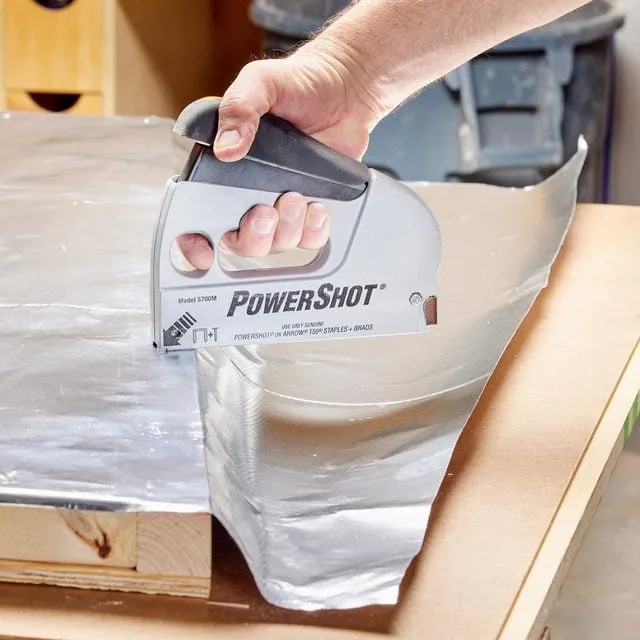 close up of a hand using a staple gun to attach foil vapor barrier to the interior of the sauna wall A vapor barrier is essential for a well-insulated sauna.
Cedar Shiplap: Infusing Warmth and Aroma
- Creating an Air Gap: Attach 1/4-inch x 1-1/2-inch wood strips to each stud, running the full length of all four walls. This gap between the vapor barrier and the cedar shiplap is crucial for allowing moisture to evaporate.
- Installing Side Wall Shiplap: Starting 2-1/4-inches from the bottom and 1-1/2-inches from each side, attach the cedar shiplap boards to the side walls using 1-1/4-inch nails.
- Front and Back Wall Shiplap: Begin your first row of shiplap 2-1/4-inches from the bottom, but this time, position it only 1/2-inch from each side. Secure the shiplap boards as you did for the side walls.
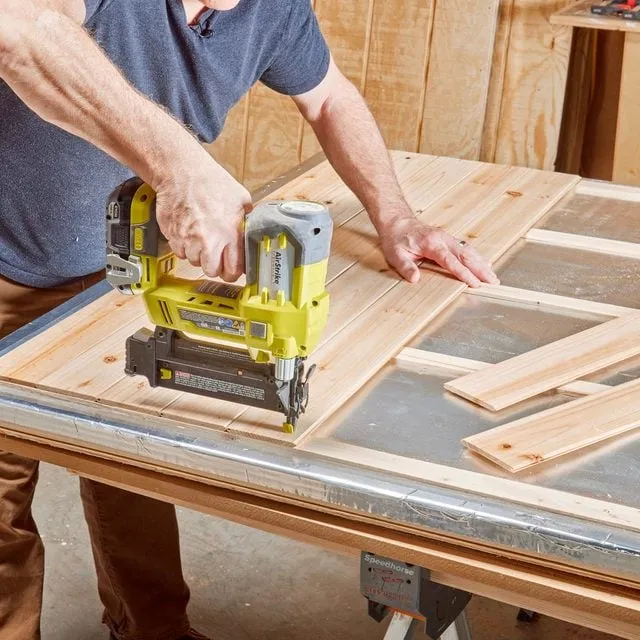 adding cedar planks of wood over the insulation on the sauna walls Cedar shiplap adds a touch of natural beauty and a soothing aroma.
Bringing It Together: Assembling the Walls
With the individual components complete, it’s time to unite them!
- Positioning the Back Wall: Set the back wall on the floor base and enlist a helper to hold it steady. Alternatively, temporarily secure it to the base with a 2×4.
- Adding the Side Walls: Place a side wall on the floor base and clamp it to the back wall, ensuring the tops are aligned for a square structure. Secure the walls together using 5/16-inch x 4-inch structural screws. Repeat this process for the other side wall.
- Attaching the Front Wall: Carefully position the front wall on the base, clamp all four walls together securely, and double-check the alignment of the top edges. Fasten the side walls to the front wall using structural screws.
- Exterior Finish: Apply a protective coat of paint or polyurethane finish to the plywood siding, shielding it from moisture and enhancing its longevity.
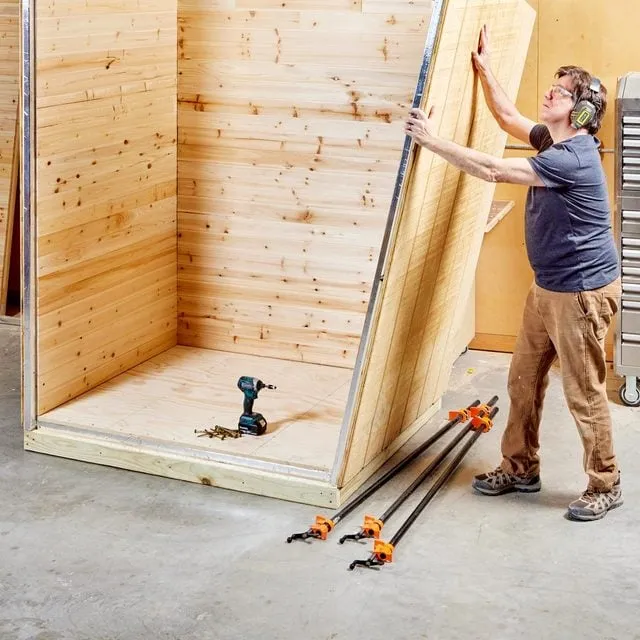 man in a workshop assembling three sauna walls together Assembling the sauna walls is a rewarding milestone in the construction process.
The Crowning Touch: Constructing the Roof
- Framing the Roof: Measure the interior width and depth of your sauna. Using these dimensions, construct the roof frame by attaching studs to the front and back boards with 3-inch screws.
- Roof Deck: Cut a sheet of 3/4-inch plywood to create the roof deck. You might need to join two pieces or opt for a larger sheet, depending on the dimensions of your sauna.
- Attaching the Frame: Center the roof frame on the plywood deck and secure it from underneath using 1-1/2-inch screws.
- Insulation, Vapor Barrier, and Shiplap: Insulate the spaces between the roof frame studs, then attach the foil vapor barrier to the frame, mirroring the steps you took for the walls. Add the 1/4-inch wood strips to create an air gap, and finally, install the cedar shiplap, ensuring it’s flush with all edges of the frame.
- Installing the Roof: With a helping hand, carefully lift the roof assembly and position it on top of the sauna walls. Fasten it securely using 3-inch lag screws driven through the top rim of the walls into the roof frame.
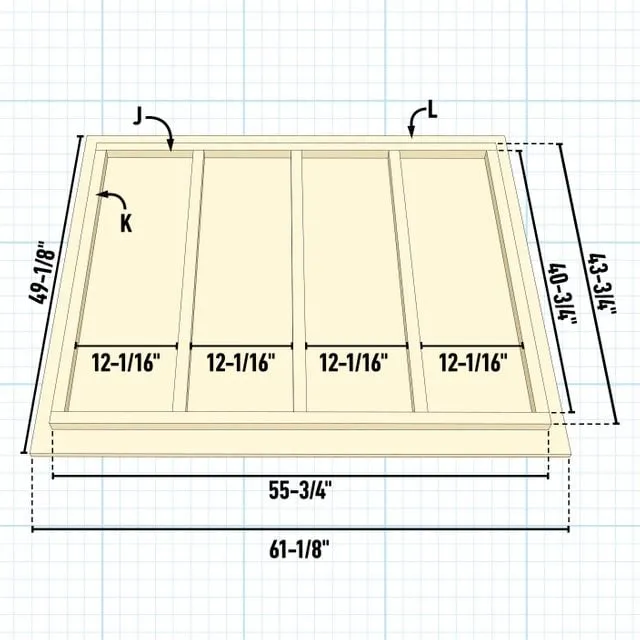 Sauna Roof Frame fig 7 diagram A sturdy roof is essential for a safe and enjoyable sauna experience.
Building the Bench: A Seat of Serenity
- Measurements and Cut List: Determine the desired height of your bench and measure the width of your sauna’s interior. With these measurements, create a cut list for the bench frame and decking.
- Frame Assembly: Cut the 2x4s for the bench frame to length and assemble them using 3-inch screws. Attach nailing cleats to the inside of the frame to support the decking.
- Decking Installation: Place the cedar deck boards on the nailing cleats, leaving a 1/2-inch gap between each board for expansion and contraction. Secure the deck boards using 2-1/2-inch finishing nails or screws.
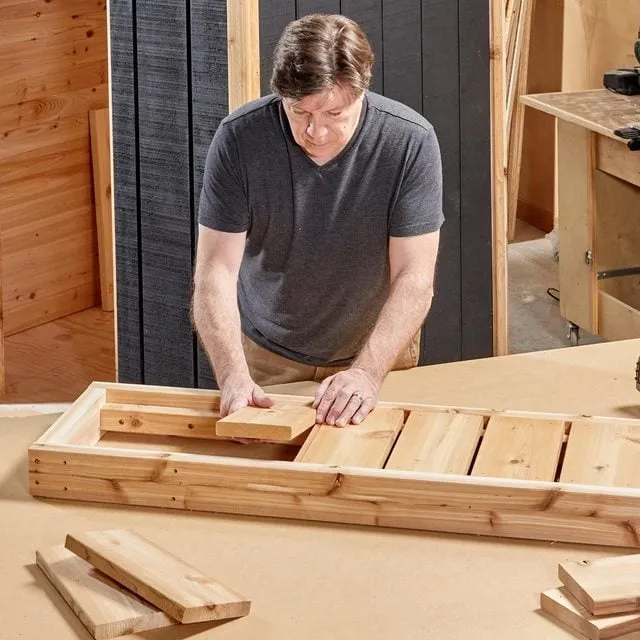 man in a workshop building a bench for the sauna with cedar wood planks Crafting the sauna bench is where comfort meets craftsmanship.
The Doorway to Relaxation: Creating the Entrance
- Safety First: The door to your sauna should always open outward for safety reasons. Never install a lock on a sauna door.
- Design Options: Choose a door design that complements your sauna’s style. A simple plywood door with hinges and a door pull offers a practical solution, while a glass panel door adds a touch of modern elegance.
- Cedar and Glass: Consider using cedar boards and tempered glass cutting boards for a cost-effective yet stylish door option.
Infrared Panels: The Heart of Your Sauna
- Panel Selection: Infrared panels come in various sizes and wattages. Consult a reputable manufacturer or distributor to determine the ideal panels for your sauna’s dimensions.
- Control Panels: Choose a control panel that aligns with your preferences and budget. Options range from simple on/off timers to sophisticated digital panels with temperature, time, and lighting controls, and even remote access.
- Lighting: Enhance the ambiance of your sauna with mood lighting. LED strip lights installed along the ceiling perimeter or under the bench create a relaxing glow.
- Audio: Elevate your sauna experience with an audio system. You can opt for a built-in system or keep it simple with a Bluetooth speaker.
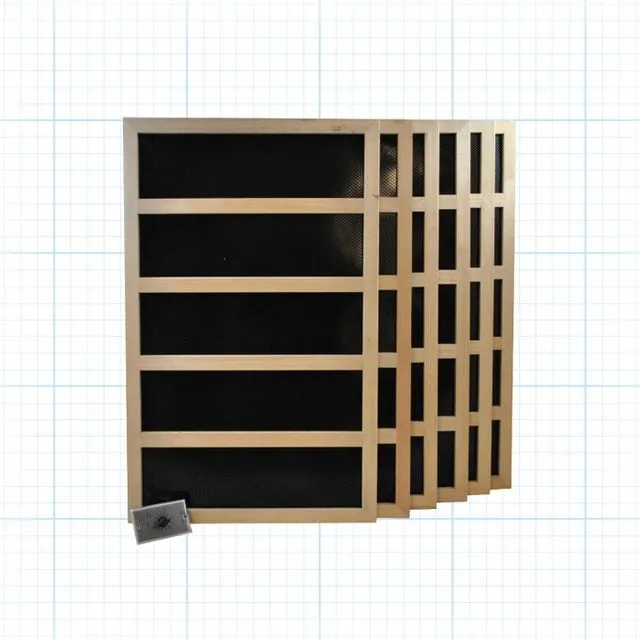 sauna panels on a grid background Infrared sauna panels provide gentle, therapeutic heat.
Installing and Wiring: The Final Touches
- Mounting Infrared Panels: Ensure a 1/4-inch gap between the infrared panels and the wall, with a foil barrier in between to reflect heat. Secure the panels using finish screws driven through the panel frames into the wall studs.
- Wiring: The wiring process for infrared panels varies depending on the manufacturer. Some panels plug into a central power box, while others require hardwiring. It is crucial to enlist the services of a licensed electrician to handle all electrical connections, ensuring safety and compliance with building codes.
Conclusion
Congratulations! You’ve successfully navigated the rewarding journey of building your very own DIY infrared sauna. As you bask in the warmth of your creation, remember that this project is a testament to your craftsmanship and a source of relaxation for years to come.
Share your experiences, tips, and photos of your completed sauna in the comments below! For those eager to explore more handcrafted projects and unique gift ideas, visit the Robert Kline Art website and discover the endless possibilities of creativity.
