Blog
Building a Budget-Friendly Green Roof for Your Chicken Coop

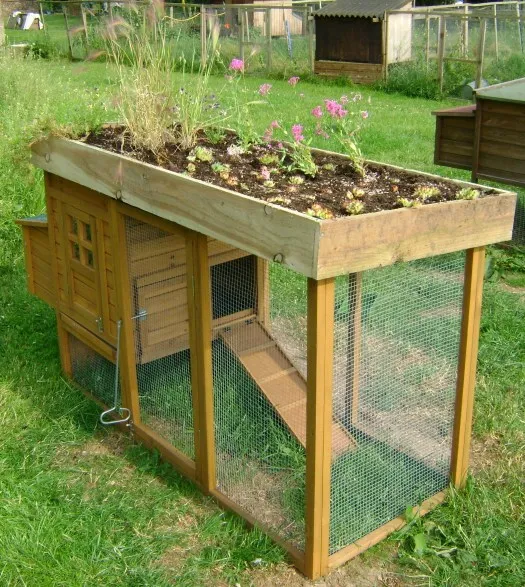
Hey there, fellow craft enthusiasts! Robert Kline here, and today we’re diving into the world of sustainable DIY projects. Remember that time I had a surplus of chicken coops after some field trials? Instead of letting them sit idle, I decided to experiment with a green roof on one of them. It was a fascinating journey of turning a simple coop into an eco-friendly haven, and I’m excited to share the process with you.
Now, you might be thinking, “Green roofs? Those sound expensive and complicated!” And while you can find pre-made matting for a hefty price, I’m all about budget-friendly solutions. This project will guide you through creating a beautiful and effective green roof for under £20, especially if you’re like me and enjoy starting plants from seeds or propagating them.
Why Choose a Green Roof?
Aside from the cost-effectiveness, building your own green roof comes with a bunch of benefits:
- Eco-Friendly: It adds a living, breathing space that benefits the environment.
- Aesthetic Appeal: Transform a dull roof into a vibrant, eye-catching feature.
- Increased Growing Space: It’s like adding a mini garden to your existing structure!
- Customization: You get to choose your plant palette and create a unique design.
This technique isn’t just limited to chicken coops. You can apply it to sheds, log stores, or even birdhouses! The possibilities are endless.
Gathering Your Supplies:
Before we begin, let’s gather our tools and materials. You’ll need:
- Offcut of pond liner or damp proof liner
- Geotextile membrane or old blankets
- Sufficient Yorkshire board (to frame the roof perimeter)
- Screws
- 10mm gravel (one sack should suffice)
- Peat-free compost mixed with sharp sand
- Drill
- Saw
- Screwdriver
Step-by-Step Construction Guide:
Ready to get your hands dirty? Let’s dive into the construction process:
## Step 1: Assessing the Roof Structure
Choose a roof with a slight pitch (around 9-10 degrees is ideal). Ensure it’s sturdy enough to bear the weight of a saturated green roof. If needed, reinforce it with crossbeams attached to the side supports and roof for added strength.
## Step 2: Creating a Waterproof Barrier
Attach the pond liner or damp proof membrane to the roof surface. Ensure it overlaps the edges to prevent water from seeping into the structure. Secure it in place with staples and trim any excess material.
## Step 3: Building the Roof Frame
Cut the Yorkshire boards to create a perimeter around the roof. This “box” will contain the planting medium. Remember to leave a 5mm gap between the board’s lower edge and the roof for efficient water drainage.
## Step 4: Adding the Moisture-Retention Layer
Staple the geotextile membrane (or those old blankets you have lying around) to the inside of the boards. This layer helps retain moisture, reducing the need for frequent watering.
## Step 5: Incorporating the Drainage Layer
Spread a 2cm layer of gravel over the geotextile membrane. This layer facilitates water dispersal and drainage, preventing waterlogging.
## Step 6: Adding the Planting Medium
Finally, add a 5cm layer of the peat-free compost and sharp sand mixture. Level it out, and voilà! Your green roof is ready for planting.
 " alt="
Choosing the Right Plants:
For a thriving green roof, opt for hardy, low-maintenance plants like sedums, alpines, mosses, grasses, seasonal herbs, and house leeks. Consider the amount of sunlight your roof receives and choose plants accordingly.
Conclusion:
There you have it – a simple, affordable, and eco-friendly way to add a touch of green to your chicken coop or any other structure in your backyard. Remember, gardening is a journey of learning and experimentation. Don’t be afraid to get creative and personalize your green roof.
Now I’d love to hear from you! Have you tried building a green roof before? What plants are you planning to use? Share your thoughts and experiences in the comments below. And for more unique, handcrafted gift ideas, be sure to browse the Robert Kline Art website. You’re bound to discover something special!
