Blog
DIY Entryway Shoe Storage Bench: Conquer the Footwear Chaos

Let’s face it, a cluttered entryway can really put a damper on your home’s welcome. As a craftsman myself, I’ve always believed in the power of a well-placed DIY project to inject style and function into a space. That’s why I’m excited to share my latest build with you: a DIY entryway shoe storage bench that’s as easy on the eyes as it is on your busy schedule.
Taming the Shoe Pileup: A Craftsman’s Mission
I don’t know about you, but the constant battle against shoe mountain in my house is real! Sound familiar? It was time for a stylish solution – one that could handle the daily shoe shuffle while adding a touch of handcrafted charm to my entryway.
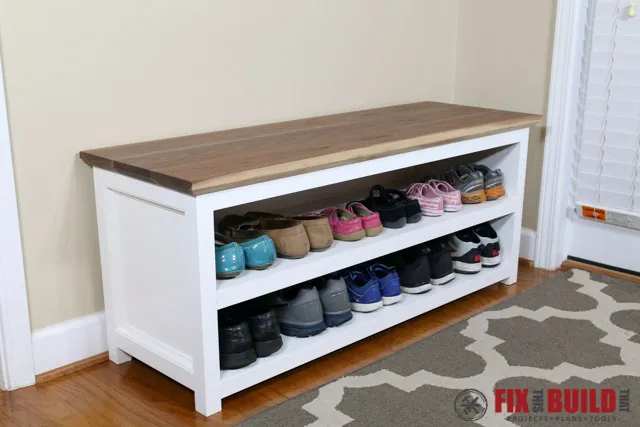
This DIY shoe storage bench is designed with both beauty and practicality in mind. It’s built to last with sturdy construction and features a spacious top for sitting while you tie your laces (or supervise the little ones doing the same).
Get Crafty: Building Your Own Shoe Storage Bench
Ready to roll up your sleeves? Let’s dive into the step-by-step process of creating your very own DIY shoe storage bench.
Materials You’ll Need
- Wood:
- (1) 4’x4′ ¾” plywood
- (1) 2’x4′ ¼” plywood
- (2) 8′ 1″x2″ select pine boards
- (1) 8′ 2″x2″ select pine boards
- (9′) 11/16″ cove molding trim
- Hardware:
- Shelf pins
- 1-¼” Pocket Hole Screws
- Paint and Finish:
- Semi-gloss white paint
- Satin Polyurethane
Tools for the Job
- Tablesaw (or circular saw)
- Digital Angle Finder
- Miter saw
- Random Orbital Sander
- Cordless Drill
- Drill Press
- Forstner Bit
- Pocket hole jig
- Face Clamp
- Brad Nailer
Step 1: Building the Legs
The sides of this bench have a frame-and-panel design. Begin by cutting the 2x2s to size to create the legs. Remember to cut a rabbet into the back legs to accommodate the ¼” plywood back panel.
Step 2: Assembling the Sides
Rip the 1x4s to create the side rails. Drill pocket holes in the rails and plywood panels. Attach the top rail to the legs using pocket screws, followed by the plywood panels to form the sides. Use playing cards as shims if needed to ensure the panels are flush with the legs.
Step 3: Crafting the Connectors
Next, create the lower shelf by cutting a piece of plywood and drilling pocket holes along its edges. Attach 1×2 trim to the front of the shelf using pocket screws. Create a back stretcher from plywood and drill counterbore holes for attaching the top later.
Step 4: Bringing the Base Together
Assemble the base by attaching the front and back stretchers to the sides using pocket screws. Flip the base and attach the lower shelf. Finally, create the adjustable shelf and set it aside for now.
Step 5: Adding Trim and a Touch of Color
Install cove molding around the inside of the side panels for a decorative touch. Sand all the base components smooth and apply three coats of semi-gloss white paint, using a foam roller for a flawless finish.
Step 6: Crafting the Showstopping Top
Now for the star of the show: the top! I used beautiful walnut for a touch of elegance. Mill your wood of choice to the desired thickness, rip it to size, and join the boards using wood glue and clamps. A drum sander works wonders for flattening, but a hand sander will do the trick too.
Step 7: Finishing Touches and Final Assembly
Once your glue is dry, cut a bevel on the underside of the top to add a light and airy feel. Sand the top smooth and apply a few coats of satin polyurethane for a protective finish. Finally, attach the top to the base using pocket screws. Nail the back panel in place, install your adjustable shelf with shelf pins, and voila!
 DIY Shoe Storage Bench for Entryway
Embrace the Joy of Handcrafted Furniture
Congratulations! You’ve conquered the shoe clutter and added a touch of your own handiwork to your home. Not only will this DIY entryway shoe storage bench keep your entryway organized, but it will also serve as a constant reminder of your crafting prowess.
“Creating something with your own hands brings a sense of accomplishment and satisfaction that you just can’t replicate,” says renowned furniture maker, Emily Carter. “And the best part? It’s a gift that keeps on giving every time you walk through the door.”
Ready for your next DIY adventure? Head over to the Robert Kline Art website for more inspiring projects, tips, and tricks to unleash your inner artisan. Don’t forget to share pictures of your creations – we love seeing what you come up with!
