Blog
DIY Pull-Out Trash and Recycling Bins: A Step-by-Step Guide

Tired of wrestling with your trash can? Does the thought of your recycling bin hidden in a dark corner of your kitchen send shivers down your spine? Fear no more! In this guide, we will embark on a journey of transforming that cluttered cabinet under your sink into a sleek and functional pull-out trash and recycling center.
This project is easier than you think, and you can easily complete it in a weekend. It’s affordable, customizable, and will completely transform how you deal with your kitchen waste.
Let’s dive into creating a pull-out trash and recycling system that’s both practical and stylish!
Gathering Your Supplies:
Before we begin, let’s assemble the necessary tools and materials. Having everything ready will streamline the process and make your DIY experience even more enjoyable.
Here’s what you’ll need:
- Measuring Tape: Precision is key! Accurately measure your cabinet space to ensure a perfect fit.
- Trash Cans: Opt for sturdy, square-ish shaped cans that fit comfortably within your cabinet. Consider those with bag-securing features for added convenience.
- Slides: Choose heavy-duty slides that extend twice the depth of your cabinet. Full extension slides provide easy access to the entire bin.
- Wood: You’ll need a sturdy piece of 1×4 lumber for the frame and a sheet of plywood for the top. Consider hardwoods like birch for their durability and aesthetic appeal.
- Jigsaw: For cutting precise holes in the plywood top for your trash cans. If you’re new to using a jigsaw, numerous online tutorials can guide you.
- Screws: Use appropriate length screws for securing the frame, top, and slides.
- Wood Glue (optional): Enhances the strength and stability of the frame.
- Polyurethane: A protective finish for the wooden components. Opt for a durable and easy-to-clean option like Rustoleum’s Ultimate Polyurethane.
- Paint or Stain (optional): Customize the look of your pull-out system by painting or staining it to match your kitchen cabinets.
- Screwdriver: For driving screws efficiently.
- Clamps: Helpful for securing the cabinet door during attachment.
Step-by-Step Construction:
1. Measure and Prepare:
- Cabinet Dimensions: Begin by measuring the interior width, depth, and height of your cabinet.
- Trash Can Selection: Choose trash cans that fit comfortably within these dimensions, leaving ample clearance for the slides and frame.
2. Building the Frame:
- Cut the Lumber: Using your measurements, cut the 1×4 lumber to create a rectangular frame that fits snugly inside the cabinet.
- Assemble the Frame: Secure the frame together using wood glue and screws. Ensure the corners are square and sturdy.
3. Crafting the Top:
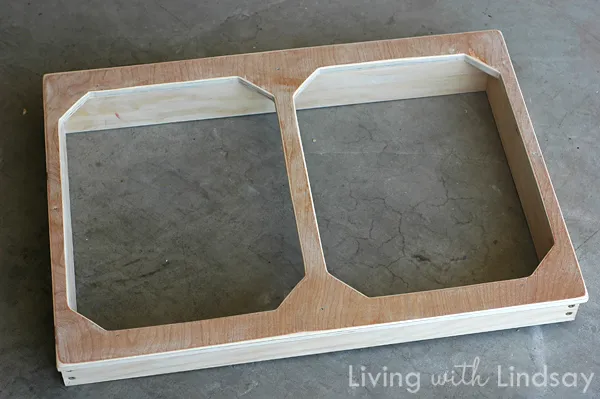
- Cut the Plywood: Measure and cut a piece of plywood to fit the top of the frame, leaving a slight overhang on the sides to create a lip. This lip will help contain any spills or crumbs.
- Mark and Cut Holes: Place your trash cans upside down on the plywood and trace their outlines. Using a jigsaw, carefully cut out the holes, making them slightly smaller than the traced outlines to allow the cans to hang securely.
 "Building the frame and the top." width=
4. Assembling the System:
- Attach the Top: Secure the plywood top to the frame using screws. Ensure the screws are long enough to hold securely but not so long that they protrude through the top.
- Install the Slides: Attach one side of each slide to the sides of the frame. Then, attach the other side of the slides to the inside walls of the cabinet, ensuring they are level and evenly spaced.
- Reinforce if Necessary: If your cabinet walls are thin, reinforce the slide attachments with additional wood blocks for added stability.
5. Finishing Touches:
- Apply Polyurethane: Protect your creation from moisture and wear by applying several coats of polyurethane to the frame and the top. Allow ample drying time between each coat.
- Paint or Stain (optional): If desired, paint or stain the frame to match your kitchen cabinets.
6. Attaching the Door:
- Remove Existing Hardware: If your cabinet door has existing hardware, remove it carefully.
- Align and Attach: Position the cabinet door on the front of the frame, ensuring it’s centered and level. Clamp the door in place to prevent shifting.
- Secure with Screws: Drive screws through the inside of the frame and into the back of the cabinet door. Use screws that are long enough to hold securely but don’t protrude through the front.
7. Final Steps:
- Reattach Hardware: Reattach the hardware to the cabinet door in the desired location. If the original placement interferes with the new functionality, consider repositioning the hardware.
- Install the System: Carefully slide the entire unit into the cabinet, ensuring the slides engage smoothly.
- Insert Trash Cans: Place your trash and recycling bins into the designated holes on the top.
Conclusion:
Congratulations! You’ve successfully transformed your ordinary cabinet into a model of efficiency and cleanliness. No more bending, reaching, or struggling with trash cans. This DIY pull-out system not only enhances your kitchen’s functionality but also adds a touch of sophistication and organization.
We encourage you to share your experience and showcase your creations! Was this guide helpful? Do you have any unique modifications or tips to share? Leave a comment below; we’d love to hear from you.
Looking for more innovative and stylish DIY projects to elevate your home? Explore the world of handcrafted wonders on Robert Kline Art and discover unique gift ideas for your loved ones or add a touch of handmade elegance to your life!
