Blog
Building a Basic Garage Tool Pegboard: A Step-by-Step Guide

Hey there, fellow DIY enthusiasts! Are you tired of your garage looking like a tornado just ripped through it? Trust me, I’ve been there, swimming through a sea of tools, sporting equipment, and who knows what else! That’s why I’m a firm believer in the power of a well-organized garage, and a tool pegboard is a fantastic place to start.
A pegboard is like the Swiss Army knife of garage storage – versatile, customizable, and oh-so-satisfying when you see all your tools neatly displayed. In this guide, we’ll break down the process of building a basic garage tool pegboard, even if you’re a beginner to the DIY world. So, grab your safety glasses, and let’s dive in!
Planning Your Pegboard
Before you even think about picking up a hammer, let’s lay the groundwork for a successful pegboard project.
1. Choose Your Location:
Think about where in your garage would be the most convenient spot for your pegboard. Ideally, it should be a wall space near your workbench or wherever you typically use your tools.
2. Measure Your Space:
Use a tape measure to determine the width and height of your desired pegboard. Remember, it’s better to go a little bigger than you think you’ll need. You can always add more tools later!
3. Sketch It Out:
Grab a piece of paper and sketch a rough design of your pegboard. This doesn’t have to be fancy, just a visual representation to help you plan the layout of your tools.
Pro Tip: Consider the weight of your tools when planning your layout. Heavier items should be placed on lower hooks for added stability.
Gathering Your Materials
Now that you have a plan, let’s round up the essentials for building your pegboard.
1. Pegboard Panel:
Pegboard panels are readily available at most home improvement stores in various materials and sizes. The most common type is made from hardboard, which is budget-friendly and durable enough for most tool collections.
2. Framing Lumber:
You’ll need some wood to create a frame for your pegboard. 1×2 inch lumber works well for this purpose.
3. Pegboard Hooks and Accessories:
This is where the fun begins! Choose from a variety of hooks, shelves, and bins designed specifically for pegboards. Think about what type of tools you’ll be hanging and select accessories accordingly.
4. Hardware:
Don’t forget the screws! You’ll need screws to attach the frame to the wall and the pegboard to the frame.
5. Basic Tools:
- Tape measure
- Saw (hand saw or circular saw)
- Drill
- Level
- Stud finder
- Pencil
Building Your Pegboard
Alright, let’s get those creative juices flowing and start building!
1. Construct the Frame:
Measure and cut your framing lumber to create a rectangular frame that fits snugly around your pegboard panel. Use a saw to make precise cuts.
2. Attach the Frame to the Wall:
Use a stud finder to locate wall studs and mark their location with a pencil. This will ensure that your pegboard is securely mounted to the wall. Align your frame with the marked studs and use a drill to screw it into place. Be sure to use a level to make sure your frame is straight.
3. Attach the Pegboard to the Frame:
Center your pegboard panel over the frame and secure it in place with screws. It’s helpful to have an extra set of hands for this step to hold the pegboard steady while you’re attaching it.
4. Insert Your Hooks and Accessories:
With your pegboard securely mounted, it’s time to add the finishing touches – your hooks and accessories! Arrange your tools on the floor in front of the pegboard to get a sense of how you want to organize them. Then, start inserting the hooks and accessories into the pegboard holes, customizing the layout to suit your needs.
5. Hang Your Tools and Admire Your Work:
The moment you’ve been waiting for – hanging your tools! Carefully hang your tools on the hooks, stepping back every now and then to admire your handiwork.
 Beginner's Toolkit Essentials for DIY
Figure 1: Basic tool kit essentials are all you need to build a simple pegboard.
 Charleston Crafted DIY Wall Mounted Yard Tool Organizer
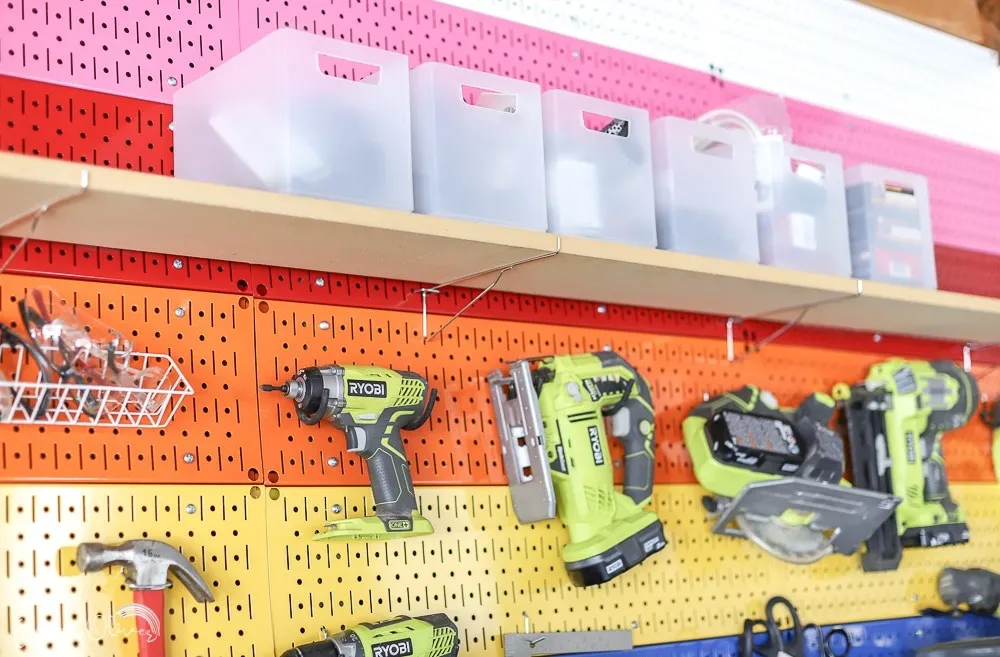
Figure 2: Get creative and personalize your pegboard with different colors and accessories.
Conclusion
Congratulations, you’ve officially transformed your garage chaos into a haven of organization! Building a basic garage tool pegboard is a rewarding project that even the most novice DIYer can tackle. And the best part? You can customize it to your heart’s content, adding more hooks, shelves, or even a fresh coat of paint to match your garage’s aesthetic.
So go ahead, unleash your inner organizer, and revel in the satisfaction of a clutter-free workspace.
Don’t forget to share your pegboard creations with us on social media! We’d love to see how you’ve organized your tools. And be sure to explore our website, Robert Kline Art, for more creative DIY projects, tips, and inspiration to elevate your crafting game.
