Blog
Taming Bathroom Counter Chaos with a DIY Vanity Organizer

We’ve all been there – battling a jumble of toiletries scattered across the bathroom counter. It’s a constant struggle to maintain order amidst the chaos. As a seasoned DIY enthusiast, I’ve discovered that a simple, handmade organizer can be a game-changer in the quest for a tidy and functional bathroom.
Inspiration Strikes: The Need for Accessible Organization
It dawned on me that people often resort to leaving items on the counter purely for convenience. It’s simply easier than wrestling with cluttered drawers or overstuffed cabinets. So, I decided to design a bathroom vanity organizer that would not only provide dedicated storage but also maintain that effortless accessibility.
The Plan: A Custom-Built Cubby Design
 Project Image
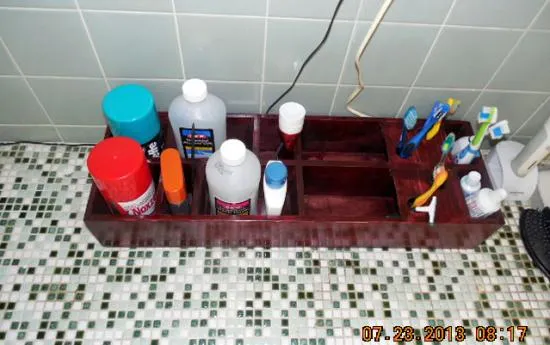
My vision was a simple yet effective cubby-style organizer, crafted from readily available materials.
Here’s a breakdown of the design:
- Dimensions: 22 inches long, 7 inches wide. These dimensions can be adjusted to fit your vanity perfectly.
- Compartments: 12 cubby holes of varying sizes to accommodate different toiletries.
- Special Features: Two cubbies with holes in the top, designed to hold toothbrushes and razors upright.
Bringing the Organizer to Life: Materials and Construction
With the design in mind, I gathered my materials, most of which were salvaged from my trusty scrap pile – a testament to the beauty of repurposing!
Materials:
- Wood: Scrap pine 1x4s (re-sawn to approximately 5/16″ thickness).
- Base: Scrap 1/8″ luan plywood.
- Glue: Tightbond II wood glue.
- Fasteners: Copper nails (strategically placed for added strength).
Construction:
- Prepare the Wood: Re-saw the 1x4s to your desired thickness using a band saw.
- Cut the Pieces: Measure and cut the wood pieces according to your chosen dimensions for the box and cubby dividers. Remember to account for the thickness of the wood when calculating the dimensions of each compartment.
- Assemble the Box: Use wood glue and copper nails to assemble the main box structure.
- Install the Cubby Dividers: Measure, cut, and glue the dividers into place, creating the individual cubbies.
- Attach the Base: Secure the plywood base to the bottom of the box using glue and nails.
Pro Tip: Allow ample drying time for the glue to ensure a strong and durable bond.
A Touch of Character: Finishing the Organizer
 Project Image
To complement my bathroom’s décor, I opted for a classic stained finish. I applied a coat of stain followed by a layer of antiquing oil for added depth and a touch of vintage charm. Feel free to choose a finish that aligns with your personal style and bathroom aesthetics.
Project Reflection: A Triumph of Organization and Resourcefulness
This DIY vanity organizer was not only a fun and rewarding project, but it also provided a practical solution to my bathroom clutter woes. The best part? It was incredibly budget-friendly, costing me a mere $2 (thanks to my resourceful use of scrap materials!).
Here’s a quick project overview:
- Estimated Cost: $2
- Time Investment: Two afternoons (including drying time)
- Lumber Used: Scrap pine 1x4s, 1/8″ luan plywood
Your Turn: Conquer the Counter Clutter!
I encourage you to embark on this simple yet transformative DIY journey. Tailor the design to your specific needs and unleash your creativity with the finishing touches. Not only will you enjoy a more organized bathroom, but you’ll also experience the satisfaction of creating something truly unique and functional with your own two hands.
Let me know in the comments below if you decide to tackle this project. I’d love to hear about your experience and see photos of your creations! And while you’re here, be sure to explore the other unique handmade gift ideas on Robert Kline Art – perfect for adding a personal touch to your home or surprising a loved one.
