Blog
Simple DIY Scrap Wood Towel Rack: A Step-by-Step Guide

Hey there, fellow craft enthusiasts! Robert Kline here, and today we’re diving headfirst into the wonderful world of scrap wood projects. I’m a firm believer that one person’s trash is another’s treasure, and scrap wood offers endless possibilities for crafting unique and functional pieces. In this post, we’ll be building a simple yet stylish DIY scrap wood towel rack that’s perfect for adding a touch of rustic charm to your bathroom.
Why a Scrap Wood Towel Rack?
I’m always on the lookout for ways to use up those leftover bits of wood from bigger projects. They hold so much potential! This towel rack is a prime example of how you can turn scraps into something both practical and visually appealing.
Plus, there’s something incredibly satisfying about breathing new life into discarded materials. Let’s get started, shall we?
Gathering Your Supplies
Before we get our hands dirty, let’s gather our tools and materials. For this project, you’ll need:
Materials:
- 2×2 scrap wood pieces (See cut list below)
- Wood glue
- 2 ½” and 3″ wood screws
- Wood finish (I prefer a simple stain and polyurethane)
Tools:
- Drill and driver
- Miter saw
- Stud finder
- Clamps
- Measuring tape
- Pencil
Cut List:
- (2) 2×2 @ 12″ long (back pieces)
- (4) 2×2 @ 5″ long (side pieces)
- (2) 2×2 @ 24″ long (front pieces)
Pro Tip: If you’re working with standard 2x2s, consider milling your own to ensure perfectly square edges. This will give your towel rack a more polished look.
Building Your Scrap Wood Towel Rack
This project is incredibly beginner-friendly and can be completed in just three simple steps.
Step 1: Assembling the Back and Sides
Grab two of your 5″ side pieces and apply wood glue to both ends. Place one 12″ back piece on each glued end, forming an “H” shape. Secure the pieces together using 2 ½” wood screws, driving them through the back piece and into the sides. Make sure to pre-drill your screw holes to prevent splitting the wood. Repeat this process for the remaining side and back pieces.
Key Point: The screw holes should be on what will become the backside of the towel rack, ensuring a clean finish when mounted on the wall.
Step 2: Attaching the Front Pieces
Apply wood glue to the exposed ends of the side pieces. Carefully align the 24″ front pieces with the sides and clamp them firmly in place. While the glue dries, double-check that the front pieces are square with the sides.
For added stability, you can secure the front pieces using 2 ½” wood screws or brad nails. If using screws, consider countersinking them and filling the holes with wood filler for a seamless look.
Step 3: Finishing and Hanging Your Masterpiece
Once the glue is dry, give the entire towel rack a good sanding to smooth out any rough edges or glue residue. Now it’s time to add your personal touch with your chosen wood finish. I love the classic look of Minwax Early American wood stain followed by a couple of coats of Minwax Polycrylic for a durable and moisture-resistant finish.
Hanging Your Towel Rack:
- Use a stud finder to locate a stud in the wall where you’d like to hang your towel rack.
- Pre-drill through the back 2x2s and into the stud.
- Secure the towel rack to the wall using 3″ wood screws, one at the top and one at the bottom.
Pro Tip: If you can’t align the towel rack with a stud, use drywall anchors for secure mounting.
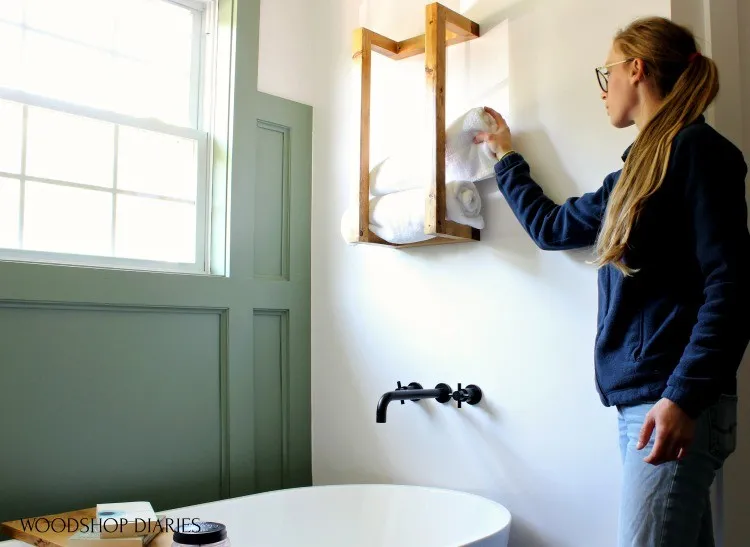
 Shara Woodshop Diaries removing towel from scrap wood towel rack hanging on wall above tub
Conclusion
And there you have it – a beautiful and functional scrap wood towel rack! Not only have you decluttered your workspace, but you’ve also created a charming and practical addition to your bathroom. Remember, the beauty of DIY lies in customization. Feel free to experiment with different wood species, finishes, and dimensions to create a towel rack that perfectly complements your style.
Now, it’s your turn! I’d love to see your scrap wood towel rack creations. Share your projects and tag Robert Kline Art on social media. And don’t forget to explore the Robert Kline Art website for more inspiring DIY projects and unique handmade gifts. Happy crafting!
