Blog
DIY Toilet Paper Holder with Shelf: A Simple Solution for Every Bathroom

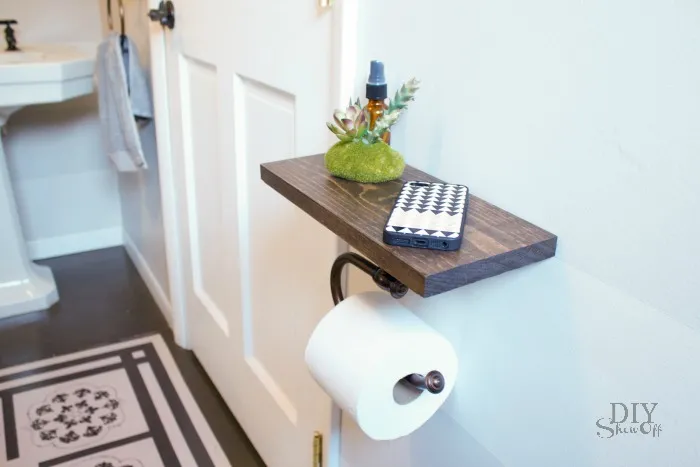
Have you ever noticed how a simple bathroom accessory can make a world of difference? It’s the little details that often elevate a space from simply functional to thoughtfully designed. As an avid crafter and advocate for practical DIY solutions, I’m thrilled to share a project close to my heart: a DIY floating toilet paper holder with a built-in shelf.
Why This Project is a Game-Changer
For years, my guest bathroom suffered from the “toilet paper in a basket” syndrome – a less-than-ideal situation, to say the least. Determined to find a solution that was both practical and aesthetically pleasing, I embarked on this simple DIY journey. Let me tell you, the results were transformative! This isn’t just a toilet paper holder; it’s a statement piece that adds functionality and charm to any bathroom.
Gathering Your Supplies: Simple and Accessible
One of the best things about this project is its simplicity. You likely already have most of the materials lying around your house! Here’s what you’ll need:
- An oil-rubbed bronze toilet paper holder (or any finish you prefer)
- Scrap wood (approximately 1″ x 6″ x 10″)
- Rust-Oleum Ultimate Wood Care stain & polyurethane (or your favorite brand)
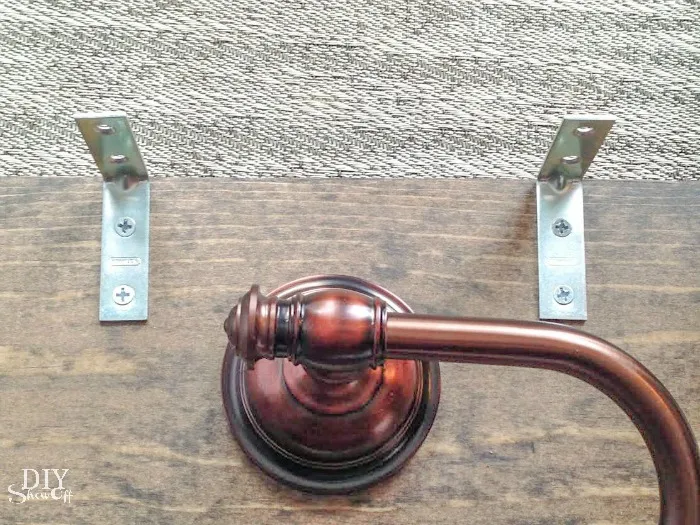
- Two corner brackets and screws
- Sandpaper
- A clean rag
Let’s Get Crafting: A Step-by-Step Guide
Are you ready to transform your bathroom? Here’s a detailed breakdown of the process:
Step 1: Prep Your Wood
Begin by cutting your scrap wood to the desired length (around 10 inches worked well for me). Sand it down thoroughly to ensure a smooth surface and wipe away any dust.
Step 2: Add a Touch of Color
Next, apply your chosen wood stain according to the manufacturer’s instructions. I opted for Rust-Oleum Ultimate Wood Stain in a rich, warm tone, which dries beautifully in about an hour. Remember to wipe away any excess stain with a clean rag for an even finish.
Step 3: Seal and Protect
Once the stain has dried completely, apply two coats of polyurethane to seal and protect the wood. This will ensure your stylish creation withstands the test of time (and humidity!)
Step 4: Attach the Toilet Paper Holder
Position your toilet paper holder on the underside of the wood shelf, ensuring there’s ample room for the toilet paper to roll freely without rubbing against the wall. Secure it in place with screws.
Step 5: Mount the Shelf
Attach the corner brackets to one side of the shelf, positioning them where the shelf will rest against the wall.
Step 6: Find the Perfect Spot
Now for the fun part – deciding on the perfect placement! Consider everyone’s reach and ensure it doesn’t obstruct knees or thighs. Using a level (my iPhone’s compass app has one!), mark the spot on the wall. Secure the shelf using screws, and use wall anchors if needed for extra stability.
Step 7: Admire Your Handiwork
Step back and admire your creation! Add a roll of toilet paper, and voila – your bathroom just got a whole lot more stylish and functional.
 DIY Toilet Paper Holder with Shelf tutorial @diyshowoff
Pro-Tips from Robert Kline Art
-
Get Creative with Brackets: For a touch of elegance, consider using decorative brackets that complement your bathroom’s style.
-
Maximize Storage Space: Place small plants, decorative candles, or even extra toiletries on the shelf to add personality and functionality.
-
Customize the Look: Don’t be afraid to experiment with different wood finishes, paint colors, or even decorative accents to match your unique bathroom decor.
 DIY shelf toilet paper holder at diyshowoff
 DIY shelf toilet paper holder at diyshowoff
 DIY shelf toilet paper holder at diyshowoff
 DIY shelf toilet paper holder at diyshowoff
 Lalka (ragdoll) at diyshowoff
 DIY shelf toilet paper holder at diyshowoff
 DIY Toilet Paper Holder with Shelf tutorial @diyshowoff
 DIY Toilet Paper Holder with Shelf tutorial @diyshowoff
This project is a testament to the power of simple DIY solutions. It’s amazing how a little creativity and effort can transform a mundane bathroom essential into a stylish and functional accent.
Looking for more ingenious DIY projects to elevate your living spaces? Explore the treasure trove of creative inspiration on Robert Kline Art – your one-stop destination for all things handmade! Don’t forget to share your creations and connect with fellow craft enthusiasts in the comments below. Happy crafting!
