Blog
DIY Rolling Laundry Hamper: Conquer Laundry Chaos with This Easy Build

Tired of laundry taking over your life? Join the club! I remember my bachelor days – laundry was a breeze. But once I started a family, those piles of dirty clothes multiplied faster than I could say “detergent.” That’s when I discovered the power of presorting and the magic of a rolling laundry hamper.
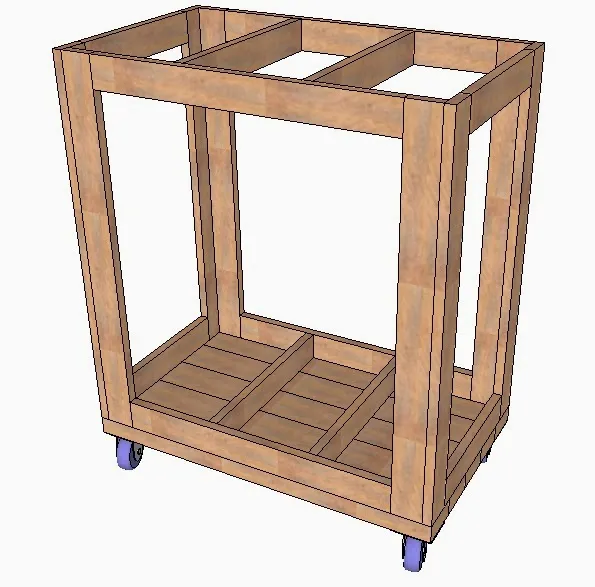
This isn’t just any hamper, though. This DIY rolling laundry hamper is designed for maximum efficiency and airflow, ensuring those forgotten damp clothes don’t turn into a science experiment. And the best part? Building it yourself is surprisingly simple, even if you’re new to DIY projects.
Ready to roll up your sleeves and reclaim your laundry room? Let’s get started!
Gathering Your Supplies: What You’ll Need for Laundry Nirvana
Before we dive into building, let’s make sure you have everything you need. Here’s your shopping list:
Lumber:
- 4 – Horizontal side pieces @ 12.5″ x 2.5″ (or 1×3″)
- 4 – Horizontal side pieces @ 23.5″ x 2.5″ (or 1×3″)
- 4 – Compartment divider pieces @ 16″ x 2.5″ (or 1×3″)
- 8 – Vertical corner pieces @ 31″ x 2.5″ (or 1×3″)
- 5 – Base pieces @ 30″ x 3.5″ (or 1×4″)
Hardware:
- 4 – 2″ Swivel Casters
- Wood glue
- Wood screws or nails
- Screen mesh material (optional)
- Staples or hot glue (for mesh, if using)
Tools:
- Measuring tape
- Saw (circular saw or miter saw recommended)
- Drill
- Screwdriver
- Staple gun or hot glue gun (for mesh, if using)
- Safety glasses
Pro Tip: “When working with softwoods like pine, consider using a glue-up technique for wider pieces. This involves gluing boards side-by-side for added stability and helps prevent warping.” – John Carter, Master Woodworker
Building Your Laundry Hamper: A Step-by-Step Guide
Now for the fun part – let’s build this thing!
Step 1: Assemble the Sides
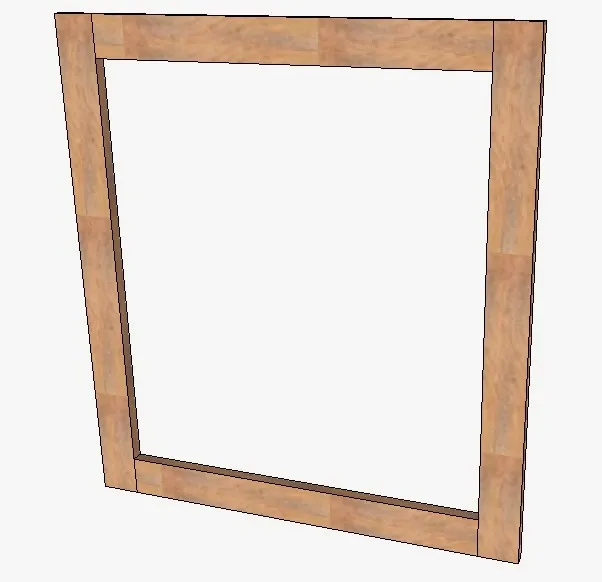
Begin by attaching the vertical and horizontal pieces to form the four sides of your hamper.
 Laundry Hamper with Wheels
- While pocket holes are a popular joinery method, they’ll be visible in this open design. Consider using dowels, biscuits, or another concealed method for a cleaner look.
Step 2: Connect the Sides
With your four sides ready, it’s time to connect them. Apply wood glue to the joining edges and secure them with screws or nails.
- If you’re using screen mesh, you can attach it to the inside of the frame at this stage. Secure it with staples or hot glue.
Step 3: Add the Compartment Dividers
Attach your compartment divider pieces to the top and bottom of the frame, creating the separate sections for sorting your laundry.
 "/></div><div class=
Step 4: Build the Base
Assemble the base of your hamper by attaching the base pieces together. You can use screws or nails to secure them.
Step 5: Attach the Base
Flip the hamper frame upside down and apply wood glue to the underside edges. Carefully position the base on top and weigh it down to ensure a strong bond. Add screws or nails for extra reinforcement if desired.
Step 6: Add the Wheels
With the glue dried, flip your hamper over. It’s time to give it the gift of mobility! Attach your swivel casters to the four corners of the base, ensuring they’re securely fastened.
Finishing Touches and Customization
Congratulations, your rolling laundry hamper is almost ready to tackle those clothes mountains! Here are a few finishing touches and customization ideas:
- Screen Mesh Dividers: If you haven’t already, attach screen mesh to your compartment dividers to prevent clothes from migrating between sections.
- Hook It Up: Instead of mesh, consider adding hooks to the inside of the dividers for hanging laundry bags.
- One Big Hamper: For a simpler approach, skip the dividers altogether and enjoy one large compartment.
Roll into a More Organized Future
And there you have it! A stylish and functional rolling laundry hamper built with your own two hands. Not only will it help keep your laundry organized, but it’s a project you can be proud of.
Now, who’s ready to tackle some laundry? Share your experience and photos of your creations in the comments below! And don’t forget to explore Robert Kline Art for more inspiring DIY projects and unique handmade gifts.
