Blog
Create a Cozy Outdoor Reading Nook: Your DIY Guide

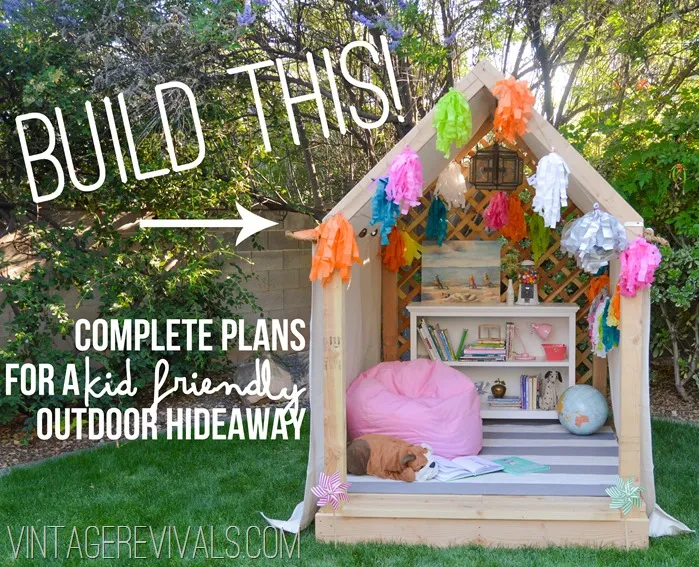
Hey there, fellow craft enthusiasts! Remember the joy of building forts as kids? Let’s recapture that magic and create a charming outdoor reading nook, a perfect hideaway to escape into the pages of a captivating book. This DIY project is simpler than you think and will transform your backyard into a haven for relaxation and creativity. Let’s gather our tools and embark on this fulfilling journey!
Planning and Materials
Before we dive into the construction, let’s ensure we have everything on hand. This project is designed to be accessible, utilizing readily available materials and straightforward techniques.
Here’s a checklist of what we’ll need:
(Lumber)
- (2) 2x8s @ 60”
- (3) 2x8s @ 96”
- (4) 4x4s @ 60”
- (2) 2x6s @ 60”
- (2) 2x4s @ 37”
- (2) 2x4s @ 41”
- (1) 2×4 @ 93”
- (13) 2x6s @ 60”
- (2) 2x6s @ 50”
(Other Materials)
- (1) 4×8 Sheet of Lattice
- (12) Corner Braces
- (2) 90-degree angle braces
- (6) 2×4 braces
- 1 Box of 1 1/2” Deck Screws
- 1 Box of 3” Deck Screws
Building the Base
Our reading nook’s foundation will be a sturdy platform.
-
Creating the Frame: Begin by constructing a rectangular frame using the 2x8s. This will form the base of our nook. The final dimensions should be 60″ x 96″, providing ample space for relaxation. A Kreg Jig is a handy tool for joining the boards, but if you prefer, deck screws work equally well.
-
Securing the Posts: Next, attach the 4×4 posts to each corner of the frame, ensuring they are flush. The corner braces will provide the necessary stability and support.
 Outdoor Reading Nook Base
-
Adding the Center Support: For added strength, attach a 2×4 brace across the center of the frame, securing it to the 4×4 posts using corner braces. This will prevent any sagging and ensure a level surface.
-
Laying the Deck: Now comes the satisfying part—creating the floor. Cut the 2x6s to 60″ lengths. Start by attaching the first board directly behind the corner posts, ensuring it’s flush with the frame’s edge. Continue adding boards, leaving a small gap between each for drainage. If you need to use two boards to make up the 60″ width, ensure the joint is centered on a joist for maximum support.
-
Adding a Finishing Touch: For a more polished look and a step-like entrance, add a slight overhang to the ends of the floor. Cut two 2x6s to 50″ and attach them between the 4×4 posts at each end.
Constructing the Roof
A gently sloping roof will provide shade and add to the nook’s charm.
-
Preparing the Pitches: The roof will consist of two pitches that meet at a 90-degree angle at the peak. To achieve this, we’ll use two 90-degree angle braces. Cut the 2x4s for the pitches to size, mitering one end at a 45-degree angle to fit flush on top of the posts. You’ll also need to cut a 90-degree angle off the end of the 45 to align with the 4×4 post.
-
Attaching the Braces: Attach the 90-degree angle brace to the underside of each pitch. Next, attach a 2×4 brace to the backside of the front pitch and the front side of the back pitch. These braces will provide additional support and ensure the roof’s structural integrity.
-
Adding the Crossbar: Place the 2×4 crossbar into the angle braces, securing it with screws. This will connect the two pitches at the peak and add stability to the roof structure.
-
Securing the Roof: Before placing the roof, attach a brace to the top of each 4×4 post. This will provide a secure point to attach the roof. Now, carefully lift the assembled roof and place it onto the braces, securing it with screws.
Adding the Lattice (Optional)
To enhance the nook’s visual appeal and create a sense of enclosure, consider adding lattice panels.
-
Measuring and Cutting: Measure the area you wish to cover with lattice and cut the sheets accordingly. We recommend attaching lattice to the backside of the nook for a clean look.
-
Attaching the Lattice: Secure the lattice panels to the frame using screws or staples. If you choose to add lattice to the roof, use a saw to trim any excess material for a neat finish.
Conclusion
Congratulations! You’ve successfully built a charming outdoor reading nook, a testament to your creativity and craftsmanship. Now, it’s time to personalize your new haven with comfortable cushions, warm lighting, and perhaps a side table for your favorite beverages. I encourage you to share your creations and inspire others to embark on their own DIY adventures.
Don’t forget to explore Robert Kline Art for more unique handmade gift ideas and crafting inspiration. Happy building!
