Blog
Building a Dream Greenhouse with Recycled Windows: A Step-by-Step Guide to Framing

Hey there, fellow DIY enthusiasts! I’m Robert Kline, and I’m thrilled to share my latest project with you: building a charming and functional backyard greenhouse using recycled windows. Transforming my vision into reality has been an incredible journey, and today, I’ll guide you through the planning and framing process. Let’s get started!
Building a Greenhouse: First Things First
Before we dive into the nitty-gritty, remember that building codes vary significantly. We’re fortunate to live in a rural area with minimal restrictions, but it’s crucial to check your local building codes before you begin. Trust me, it’s better to be safe than sorry!
Finding the Perfect (Free!) DIY Greenhouse Plans
Initially, I scoured the internet for free DIY greenhouse plans, hoping to find one that matched my vision. While there are fantastic resources available, like the simple and easy-to-follow plans from Ana White, my dream greenhouse was a bit more unique.
If you’re looking for a basic greenhouse design, I highly recommend checking out Ana White’s plans. They’re a great starting point for any DIYer.
Since I couldn’t find the exact plans I needed, we decided to create our own! Using Ana White’s plans as inspiration and combining them with our knowledge of framing and truss building, we felt confident in designing a greenhouse that met our specific needs and incorporated those beautiful old windows we’d been saving.
 A collection of old window sash ready to be used for a greenhouse
Designing Our Greenhouse with SketchUp
To bring our vision to life, we turned to SketchUp, a free 3D modeling software. It’s an incredibly powerful tool that has helped us design numerous projects. While it has a bit of a learning curve, the ability to visualize our greenhouse in 3D was invaluable.
Planning Our Materials
With a rough design in mind, we created a general materials list. We knew we wanted to use:
- Recycled windows: They add so much character!
- Corrugated polycarbonate sheets: For a sturdy and light-filtering roof.
- Wood siding: To enclose the lower section and provide a base for shelves, a potting bench, and even a cold frame.
Drafting Our Greenhouse Plans
Our first draft was ambitious, clocking in at a massive 20′ x 14′! We quickly realized it was way too big for our space and, more importantly, didn’t maximize functionality.

This is where careful planning and considering your needs is essential. I envisioned a greenhouse that would:
- Extend our growing season
- Provide a haven for frost-tender seedlings
- Offer ample space for seed starting, potting, and even some in-ground growing
Finding the Perfect Location
We learned a valuable lesson during this process: determine the greenhouse’s location before finalizing the design. What looks good on paper might not work in reality! Consider factors like:
- Sunlight: Choose a spot that gets plenty of direct sunlight, ideally with the long side facing south for maximum winter light.
- Accessibility: Ensure easy access for watering, ventilation, and transporting plants.
- Proximity to utilities: If you plan on having electricity or water in your greenhouse, factor in the location of these utilities.
Optimizing Size and Air Circulation
After some adjustments, our final greenhouse dimensions landed at a more manageable 16′ x 10′. We based this on:
- Polycarbonate panel sizes: To minimize waste and simplify installation.
- Seedling tray dimensions: To ensure a perfect fit on shelves and tables.
For ventilation, we decided on operable windows on each gable end instead of automatic louvers. While it requires a bit more hands-on management, we felt it better suited the vintage aesthetic we were aiming for.

Building a Sturdy Greenhouse Frame
Once the plans were finalized, it was time for the exciting part: bringing our greenhouse to life!
Creating a Solid Foundation
We opted for a slightly unconventional foundation method, using cinder blocks and gravel instead of poured concrete. This provides stability while allowing for easier adjustments if needed. However, always double-check local building codes to ensure compliance.
Framing Our Greenhouse
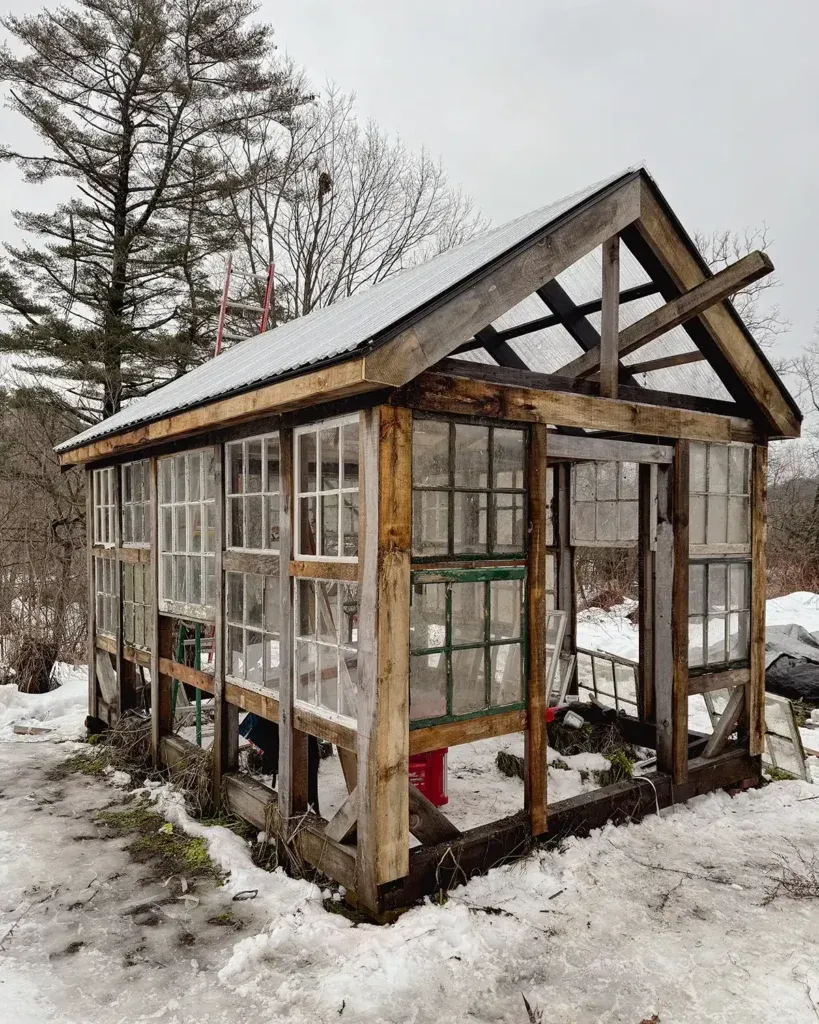
For the framing, we used rough-cut lumber from a local sawmill:
- 4×4 posts for the corners
- 4×6 beams for the base
- 2x4s for the studs and rafters
- 1x4s and 1x6s for cross-members and trim
Here’s a simplified breakdown of the framing process:
- Frame the base: Assemble the 4×6 beams, ensuring they’re level and square.
- Erect the corner posts: Secure the 4×4 posts to the base, adding braces for stability.
- Install the studs: Space the studs according to your window widths, but remember you can always make adjustments later.
- Build the roof trusses: Assemble the trusses on the ground for easier handling, then lift them into place.
- Add the cross-members: Install the 1x material for added support and to create a surface for attaching the roofing.

Stay Tuned!
That’s it for the planning and framing stage of our greenhouse build. In my next post, I’ll share our experience installing the recycled windows, adding the polycarbonate roofing, and putting on the finishing touches.
Building a greenhouse from scratch is an incredibly rewarding project. It allows you to customize every detail to your liking and create a space that reflects your gardening style. Plus, imagine the joy of harvesting your own fresh produce year-round!
If you have any questions or want to share your own greenhouse building experiences, please leave a comment below. I’d love to hear from you!
For more unique, handcrafted gift ideas, be sure to explore the rest of the Robert Kline Art website. You’re bound to find something special. Happy building!
