Blog
Handmade Soap Gift Ideas: From Simple Pleasures to Creative Swirls

Everyone appreciates a handmade gift, and I find immense joy in creating them! It’s incredibly fulfilling to personalize each present, adding a touch of thoughtfulness that store-bought items simply can’t match. Recently, I decided to whip up some artisan soap for my dear friend who adores purple (almost as much as I do!). Inspired by the current plaid craze, I envisioned gifting her stunning plaid soap bars – a unique and luxurious treat.
I was buzzing with excitement to get started, picturing her delight upon receiving such a thoughtful gift. I had some experience with soap making, even hosting a fun crafting class dedicated to it. But as fate would have it, this particular project turned into a crafting comedy of errors!
My inspiration came from a Pinterest pin showcasing beautiful plaid soap. The instructions seemed straightforward enough, but my attempt went hilariously wrong, resembling nothing like the picture. It was a disaster! This crafting mishap forced me to pivot, sending me straight to Plan B.
Determined to salvage the project, especially since it was intended for our Festive Christmas Ideas Blog Hop, I got creative. If you’re looking for more handmade gift inspiration, be sure to check out all the fantastic ideas from my fellow crafters listed below!
Salvaging the Soapy Situation: A Handmade Gift Emerges
Despite my initial setback, I refused to let a little soap drama dampen my spirits. I decided to embrace the unexpected outcome and transform my soapy misadventure into something equally special.
Here’s how I turned my soap-making mishap into a delightful handmade gift:
From Plaid Dreams to Swirl Soap Magic
-
Embracing the Unexpected: My attempt at plaid soap may have gone awry, but the individual colored soap strips I created still held potential. I decided to re-melt these strips, hoping to create a mesmerizing swirl pattern instead.
-
A Happy Accident: As I melted the strips together, the colors blended in a way that I hadn’t anticipated. I decided to lean into this serendipitous blend, adding a touch of melted fuchsia soap to the tops for a pop of vibrant color.
-
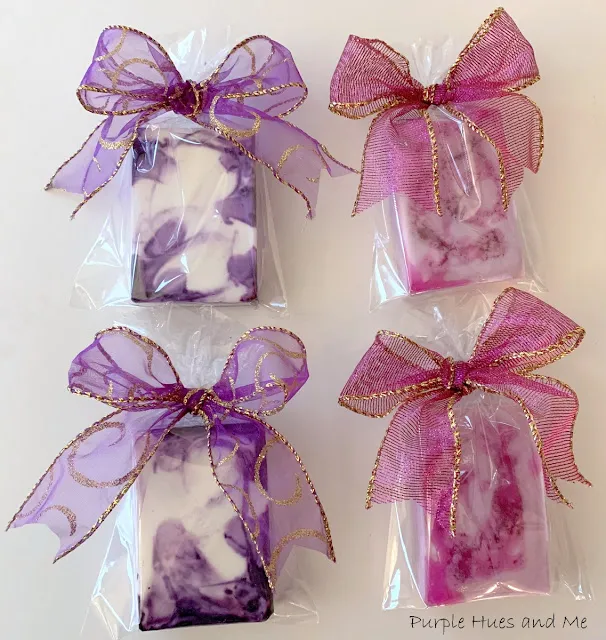
Adding a Touch of Luxury: I had some luxurious white shea butter soap base left over, which I decided to incorporate into the project. I added drops of purple dye to the bottom of the molds before pouring in the swirling mixture.
-
Creating Depth and Dimension: To further enhance the visual appeal, I used the tip of a knife to swirl in additional purple dots into the melted soap, creating a captivating depth of color.
Packaging with Panache: Presentation Matters!
Once the soap bars had set, I unmolded them, revealing beautifully scented and uniquely swirled creations. To add a final touch of thoughtfulness, I packaged each bar in clear cellophane bags tied with a delicate bow. The result? Charming and personalized handmade soap gifts perfect for sharing!
 "Handmade Soap Gift" aria-hidden=
The Beauty of Handmade Gifts: A Personal Touch
This soap-making adventure, despite its initial hiccups, reminded me of the joy of creating handmade gifts. It’s not about achieving Pinterest-worthy perfection every time, but rather about pouring your heart into a project and embracing the unexpected turns along the way.
Crafting Your Own Soap: Tips and Inspiration
If you’re feeling inspired to embark on your own soap-making journey, here are a few tips to guide you:
Basic Soap-Making Supplies:
- Melt & Pour Soap Base: Choose from a variety of options, like clear glycerin or shea butter base.
- Soap Molds: Get creative with shapes and sizes!
- Essential Oils: Add delightful scents to your soap. Lavender, sandalwood, and citrus are popular choices.
- Soap Dyes: Experiment with vibrant colors or natural pigments.
- Spray Bottle with Rubbing Alcohol: This helps eliminate bubbles in your soap.
Simple Soap-Making Steps:
- Melting the Base: Cut the soap base into small chunks and melt in a microwave-safe bowl using 30-second intervals, stirring in between.
- Adding Your Personal Touch: Once melted, stir in your choice of essential oils, colorants, or other additions like dried herbs or botanicals.
- Pouring and Setting: Carefully pour the mixture into your molds and spray the tops with rubbing alcohol to eliminate bubbles. Let the soap harden for several hours.
- Unmolding and Enjoying: Once set, gently remove the soap from the molds.
Remember:
- Soap making involves hot, melted materials. Always use caution and follow safety guidelines.
- Allow your soap to cure properly before using or gifting. Curing helps the soap harden and last longer.
Explore More Handmade Gift Ideas from Robert Kline Art
From unexpected twists to simple pleasures, crafting offers a world of creative possibilities. If this soap-making adventure sparked your imagination, be sure to explore the wealth of handmade gift ideas and inspiration right here on Robert Kline Art!
And don’t forget to share your own crafting experiences in the comments below. I’d love to hear about your triumphs, mishaps, and everything in between!
