Blog
The Simple Joys of Sourdough Focaccia: A Step-by-Step Guide by Robert Kline Art

Here at Robert Kline Art, we believe in the beauty of handcrafted creations, and what could be more satisfying than baking your own bread? Today, we’re diving into the wonderful world of sourdough with a recipe that’s sure to become a household favorite: sourdough focaccia.
This isn’t your average focaccia recipe. Oh no, this one is infused with the magic of sourdough, making it crispier, fluffier, and bursting with flavor. Whether you’re a seasoned baker or just starting your sourdough journey, this easy-to-follow guide will equip you with everything you need to create a masterpiece. So, roll up your sleeves, put on your apron, and let’s bake some deliciousness!
Why Sourdough Focaccia?
Focaccia, in all its glorious forms, is a true gift to the world of bread. But have you ever experienced the unique charm of its sourdough cousin? Sourdough focaccia is not just a bread; it’s an adventure for your taste buds.
Unlike traditional focaccia made with instant yeast, this recipe relies on the natural magic of a sourdough starter. This creates a lighter, airier texture and a depth of flavor that will have you hooked from the first bite.
Gathering Your Supplies
Before we embark on our baking journey, let’s gather our trusted tools and ingredients:
For the Sourdough Focaccia:
- Bubbly, active sourdough starter (50-75g)
- Water (375g, see notes)
- Honey (20g, optional)
- Bread flour or all-purpose flour (500g, see notes)
- Fine sea salt (9g)
- Olive oil (2-3 tbsp, for coating the pan)
Optional Toppings:
- Fresh rosemary sprigs
- Garlic cloves (lightly crushed)
- Flaky sea salt
- Cherry tomatoes (halved)
- Olives
- Your favorite herbs!
Equipment:
- Rimmed sheet pan or non-stick rectangular pan (9×13-inch or 10×14-inch)
- Large mixing bowl
- Plastic wrap or a damp tea towel
The Sourdough Focaccia Dance: A Step-by-Step Guide
This recipe is designed for an overnight rise, which develops those incredible sourdough flavors. However, if you’re short on time, you can adapt it to a daytime rise.
Step 1: Awakening the Dough (Evening)
- In your large mixing bowl, gently whisk together your bubbly sourdough starter, water, and honey (if using).
- Add the flour and salt, then mix until a shaggy dough forms. It will be sticky – that’s perfectly fine!
- Cover the bowl and let the dough rest for a good 30 minutes to an hour. This gives the flour time to hydrate and the gluten to relax.
- After its rest, give the dough a little knead right in the bowl. It should become smoother and more elastic.
Step 2: The Overnight Slumber (Bulk Rise)
- Lightly oil your dough container (or just use the mixing bowl) and place the dough inside. Cover tightly with oiled plastic wrap or a damp tea towel.
- Find a cozy spot on your countertop away from drafts and let the dough rise overnight, or for about 12+ hours at 68-70°F (20-21°C). By morning, it should be beautifully doubled in size and full of air bubbles.
Step 3: Shaping and Second Rise (Morning)
- Pour 2 tbsp of olive oil onto your baking sheet and spread it evenly, reaching the corners and sides.
- Gently transfer your bubbly dough onto the oiled pan. Using oiled hands, spread it out to the edges. Don’t worry if it doesn’t reach perfectly; it will spread during baking.
- Cover the dough again and let it rise for a second time, about 1 1/2 – 2 hours. You’ll know it’s ready when it’s nice and puffy.
- While the dough rises, preheat your oven to 425°F (220°C).
Step 4: Creating Focaccia Art
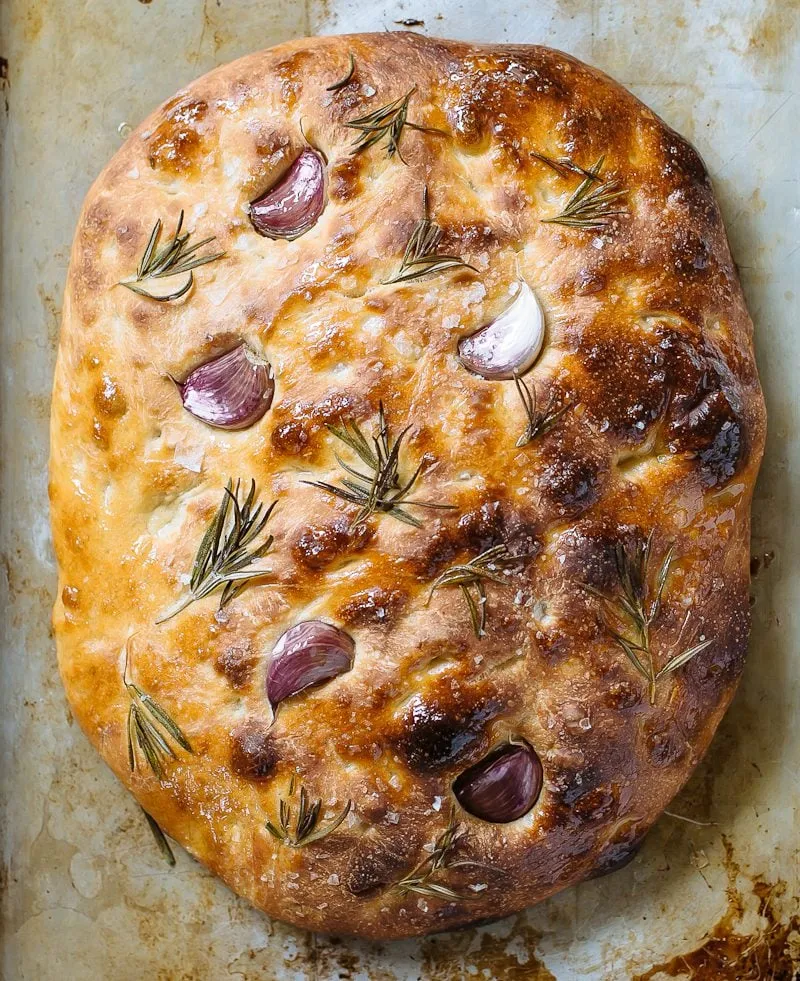
- Once the dough has risen, it’s time for the fun part: dimpling! Use your fingertips to gently press dimples all over the dough’s surface. This creates those beautiful pockets that hold the delicious toppings.
- Now, let your creativity shine by adding your favorite toppings. Gently press them into the dough, ensuring they’re well-anchored.
Step 5: Baking to Perfection
- Place your focaccia masterpiece on the center rack of your preheated oven and bake for 25-30 minutes, or until it turns a gorgeous golden brown.
Step 6: Cooling and Enjoying!
- Remove the focaccia from the oven and let it cool on a wire rack for at least 30 minutes. This allows the steam to escape and prevents a soggy bottom.
- Once cooled, slice your focaccia into squares or wedges and serve it warm.
Tips from the Robert Kline Art Studio
- Flour Power: Both bread flour and all-purpose flour work well for this recipe. Bread flour creates a chewier texture with a higher rise, while all-purpose flour yields a softer focaccia.
- Starter Strength: The amount of starter you use can impact your rise time. In colder weather, using a bit more starter can give your dough an extra boost.
- Par-Baking Power: For ultimate convenience, you can par-bake your focaccia. Simply bake it for 15-18 minutes, cool completely, and store it wrapped in plastic wrap at room temperature. When ready to serve, pop it back in the oven for 12-15 minutes for a freshly baked treat!
Embrace the Joy of Handmade
Making sourdough focaccia is more than just following a recipe; it’s about connecting with the simple joy of creating something with your own two hands. We encourage you to give this recipe a try and experience the magic yourself. And remember, at Robert Kline Art, we believe that the most beautiful things are often handmade.
Happy baking!
P.S.: Don’t forget to share photos of your sourdough focaccia masterpieces with us on social media! We love seeing your creations. And if you’re looking for unique, handcrafted gifts to complement your homemade delights, be sure to browse our curated collection on our website!
 Sourdough focaccia with rosemary and garlic on a sheet pan
